The hum of the kitchen feels like a welcome song tonight. My youngest is lining up little bowls while my partner sets a bowl of sliced cucumbers on the table. A warm, golden smell drifts from the pan and somehow everyone slows down, drawn together. That is the simple joy of Japanese Katsu Bowls for me: a little crunch, a little sweet sauce, and the whole family gathered around a single pot of rice.
Why This Japanese Katsu Bowls Feels Like Home
There is a reason this dish shows up on our table when we need something both easy and comforting. It brings bright texture and gentle flavors that please kids and adults at once. The crisp crust of the cutlet, the glossy tang of the sauce, and the soft bed of rice create a plate that feels both special and familiar.
I have memories of my grandmother making fried cutlets on a rainy afternoon. She would hum while she dredged the meat and tell tiny stories about the day. The sound of the cutlets sizzling on the pan and the steam rising from the rice felt like a promise that the world was right for a while. That memory is what I try to pass on when I make Japanese Katsu Bowls now.
This dish is forgiving. It comes together fast, uses simple tools, and makes clean-up easy when you use a single skillet and a rice cooker. That is practical comfort: a meal that tastes like a hug without demanding a full day in the kitchen.
How to Make Japanese Katsu Bowls, The Heartwarming Way
“This is where the magic happens, when the aroma fills the kitchen and my kids come running in, asking ‘Is it ready yet?’”
Start with good bread crumbs and a little patience. The process is straightforward: season, coat, fry, slice, and sauce. You will listen for a clear sizzle, watch for an even golden color, and test the meat for that faint, reassuring blush in the center.
The texture should speak to you: a bright, even crust that yields to a tender inside. The color gives you confidence: golden brown, not dark or burnt. The aroma should be warm and inviting, with a hint of toasted crumbs and a sweet-savory sauce that makes everyone glance up from their phone.
Next up, keep your work area organized. Have flour, eggs, and crumbs lined up like a mini assembly line. Meanwhile, get your rice cooking so it can rest and steam while you fry. From there, the plating is a sweet sprint: rice down, sliced cutlet on top, sauce across like a ribbon.
Ingredients You’ll Need
- Pork cutlets
- Bread crumbs
- Flour
- Eggs
- Tonkatsu sauce
- Rice
- Salt
- Pepper
- Oil for frying
Don’t skip the fresh herbs if you have them. A little chopped green onion or parsley brightens the plate like a small burst of sunshine. Use what’s in your fridge when you need to. This is about creativity, not perfection. If you prefer chicken, it works just as well. If you want to trim fat from pork, pat the cutlets dry and pound them a touch to even the thickness. That gives better, faster cooking.
Step-by-Step Directions
-
Cook rice according to package instructions and set aside.
Use a rice cooker or a pot with a tight lid. Let it rest once it’s done so the grains settle.
A small splash of rice vinegar makes the rice shine if you want a tiny lift.
-
Season pork cutlets with salt and pepper.
Pat the meat dry first so the seasoning sticks. Season both sides gently.
Give it a light press with your fingers so the salt meets the surface evenly.
-
Dredge each cutlet in flour, dip in beaten eggs, and coat with bread crumbs.
Shake off excess flour before dipping into the egg. Press crumbs into the meat so they cling well.
If kids are helping, let them do the egg dip. It’s the fun, slightly messy part they love.
-
Heat oil in a pan over medium heat and fry the cutlets until golden brown and cooked through.
Use enough oil to come about a quarter-inch up the side of the pan. Test with a small pinch of breadcrumb to see if it sizzles.
Fry for a few minutes per side depending on thickness. Aim for even color, not rush. Internal temp for pork should reach 145°F.
-
Drain on paper towels.
Let the cutlets rest on a rack if you have one to keep the crust crisp. A short rest helps juices settle.
Avoid stacking them so the steam does not soften the crust. Crispness matters here.
-
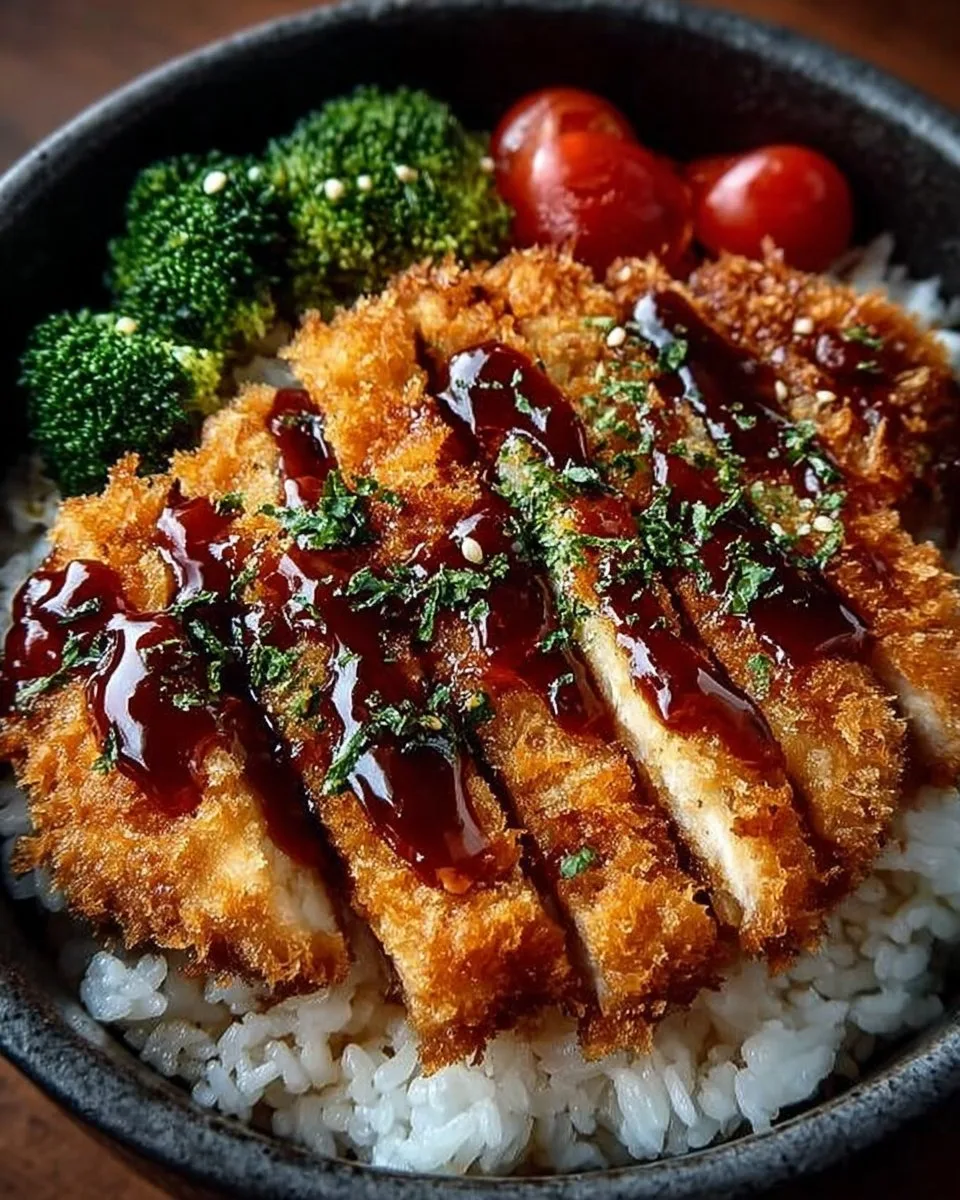
Slice the cutlets and serve over rice, drizzled with tonkatsu sauce.
Slice against the grain so each bite is tender. Arrange slices over a bowl of steaming rice.
Drizzle sauce in a thin ribbon so it covers but does not drown the cutlet. Add pickles or a side salad if you like.
Quick tips from my kitchen: a little browning here builds flavor, just like grandma showed me. If your crumbs brown too fast, turn down the heat and let the cutlets finish in the pan more slowly. Let the kids stir the breadcrumbs or set the plates. It’s a small way to make the meal feel like theirs.
Serving Japanese Katsu Bowls with Love
We serve Japanese Katsu Bowls family-style in the middle of the table. A big platter of sliced cutlets sits beside the rice pot and a small bowl of tonkatsu sauce. Everyone can help themselves and pile slices on top of rice the way they like it.
I like to add quick sides: shredded cabbage tossed in a touch of rice vinegar, sliced cucumbers, and some steamed greens. A bowl of miso soup or a simple clear broth makes the dinner feel complete. One child in my house always asks for extra sauce, while another prefers the cutlet plain. Those small preferences make the meal personal.
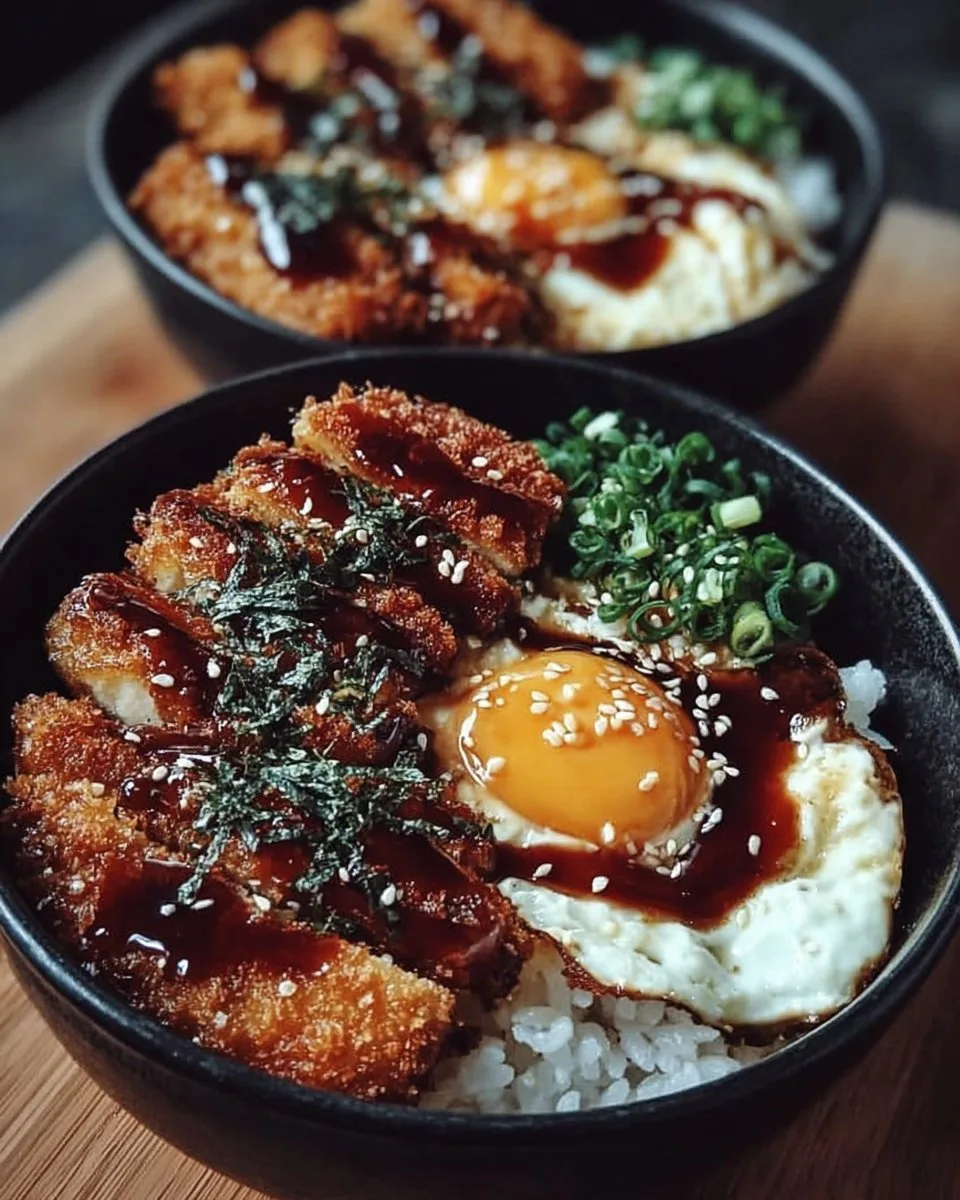
For a casual weeknight, serve with chopsticks and a few napkins on the side. For a slightly fancier night, garnish with toasted sesame seeds and finely sliced green onion. That light touch makes the same meal feel like an event.
Storage & Reheat Tips (Keeping the Goodness)
Store cutlets and rice separately when you can. That helps preserve the crust of the katsu.
In the fridge, keep the cutlets in an airtight container for up to three days. Wrap rice with a loose lid or use a shallow container so it cools evenly. If you plan to save them longer, flash-freeze cutlets on a tray and then transfer to a freezer bag for up to one month.
To reheat and keep that crisp, the oven is your friend. Preheat to 375°F and place cutlets on a wire rack set over a baking tray for 8 to 12 minutes. The oven warms through and re-crisps the crust.
If you need speed, the microwave is fine for a quick lunch. Pop the cutlet on a paper towel and heat in short bursts, then finish in a hot skillet for one minute per side to return some crunch. Be honest: the microwave will soften the crust, but it will still taste great.
For rice, sprinkle a little water over the grains and cover lightly before reheating in the microwave. This brings back a steam-kissed texture.
My Kitchen Notes & Shortcuts
- Make extra rice and freeze in portion bags. Thaw in the microwave for fast weeknight bowls.
- Use panko breadcrumbs for the lightest, crispest crust. They stay crunchy longer.
- Pound pork to an even thickness. This keeps cooking time predictable and prevents dry edges.
- Use a thermometer if you are unsure. Cook pork to 145°F and let it rest for a few minutes.
- Prep the dredging station ahead and line a tray with parchment for easy cleanup.
These small habits save time and keep stress low. I learned them after a few rushed dinners where everything finished at once and chaos followed. Now I prepare a small mise en place and the whole home feels calmer.
Family-Friendly Variations
Swap proteins easily. Chicken thighs or breaded tofu both make great alternatives if your family prefers them. Use thinner cuts for quick cooking on busy nights.
Make it lighter by baking the cutlets on a sheet pan at 425°F for 15 to 20 minutes until golden. Spray the tops lightly with oil to encourage crisping.
Add curry for a twist. Pour a spoonful of mild Japanese curry over the top for a heartier bowl that kids often love. Alternatively, top with a soft-cooked egg for a richer, silkier bite—this leans into katsudon territory if you soften the egg in the sauce.
For kids who prefer less sauce, serve the tonkatsu sauce on the side so everyone can control how much they add. A small bowl of soy mayonnaise also makes a fun dip.
FAQs About Japanese Katsu Bowls
Can I make this ahead for a busy week?
Absolutely. Make the cutlets and keep them wrapped in the fridge for up to three days. Reheat the oven to restore crispness before serving.
What oil is best for frying?
Use a neutral oil with a high smoke point, like vegetable or canola oil. It gives you steady heat and a clean flavor.
How do I keep the crust from falling off?
Pat the meat dry and press the crumbs onto the surface firmly but gently. Let the egg and crumbs sit a minute before frying so they bind better.
Is this safe to serve to kids?
Yes. Cook pork until it reaches 145°F and let it rest. For younger kids, thin slices and mild sauce usually go over well.
Can I freeze the katsu?
Yes. Freeze on a tray first, then transfer to a bag. Reheat from frozen in a 400°F oven for a few minutes until warmed through and the crust is crisp.
One Final Thought from My Kitchen
I hope making Japanese Katsu Bowls becomes one of those dinners that brings your family together. It is simple, bright, and forgiving, and it carries a little of my grandmother’s warmth in every bite. Give it a try—you might surprise yourself with how easy and satisfying it is.
Until next time, happy cooking. If this dish finds a spot on your weeknight table, know that a small bit of my kitchen is there with you, smiling at the memory of the first crunch.
Conclusion
If you want more ideas and variations to inspire your Japanese Katsu Bowls nights, here are a few recipes I often look to for new twists and techniques. They have lovely photos and helpful steps to build on this basic recipe.
For a crispy take with lots of color, try this recipe from Crispy Chicken Katsu Bowls – Half Baked Harvest.
If you like a bit of heat and a creamy sauce, this version with sriracha mayo shows a fun way to dress it up: Crispy Chicken Katsu Bowls with Sriracha Mayo.
To explore the classic katsudon technique with egg and sauce, this thorough guide is a great resource: Katsudon Japanese Pork Cutlet and Egg Rice Bowl – The Woks of Life.
For a curry-mayo spin that our kids adore on casual nights, take a look at this simple bowl: Easy Chicken Katsu Bowls – Simply Delicious.
And if you want a straight-to-the-point, homey chicken version with clear steps, this recipe is a nice companion to the pork version: Chicken Katsu Rice Bowls – Eight Forest Lane.
If you try any of these or add your own family twist, I would love to hear about it. Cooking is better when we share our little experiments and stories.
Japanese Katsu Bowls
Ingredients
For the Katsu
- 4 pieces Pork cutlets Can substitute chicken or tofu.
- 1 cup Bread crumbs Panko breadcrumbs recommended for extra crispiness.
- 1/2 cup Flour For dredging.
- 2 large Eggs Beaten for coating.
- 1/2 cup Tonkatsu sauce For serving.
- 2 cups Cooked rice White or jasmine rice recommended.
- 1 teaspoon Salt To season pork cutlets.
- 1/2 teaspoon Pepper To season pork cutlets.
- 1 cup Oil for frying Use neutral oil with high smoke point.
For Serving
- 1/2 cup Chopped green onion or parsley Optional garnish.
- 1 cup Sliced cucumbers Fresh side dish.
- 1 cup Shredded cabbage Tossed in rice vinegar for added flavor.
Instructions
Preparation
- Cook rice according to package instructions and set aside.
- Season pork cutlets with salt and pepper on both sides.
Dredging
- Dredge each cutlet in flour, dip in beaten eggs, and coat with bread crumbs.
Cooking
- Heat oil in a pan over medium heat and fry the cutlets until golden brown and cooked through.
- Drain on paper towels and allow to rest.
Final Assembly
- Slice the cutlets and serve over rice, drizzling with tonkatsu sauce.
- Add garnishes and side dishes as desired.