Category

Lunch

Category

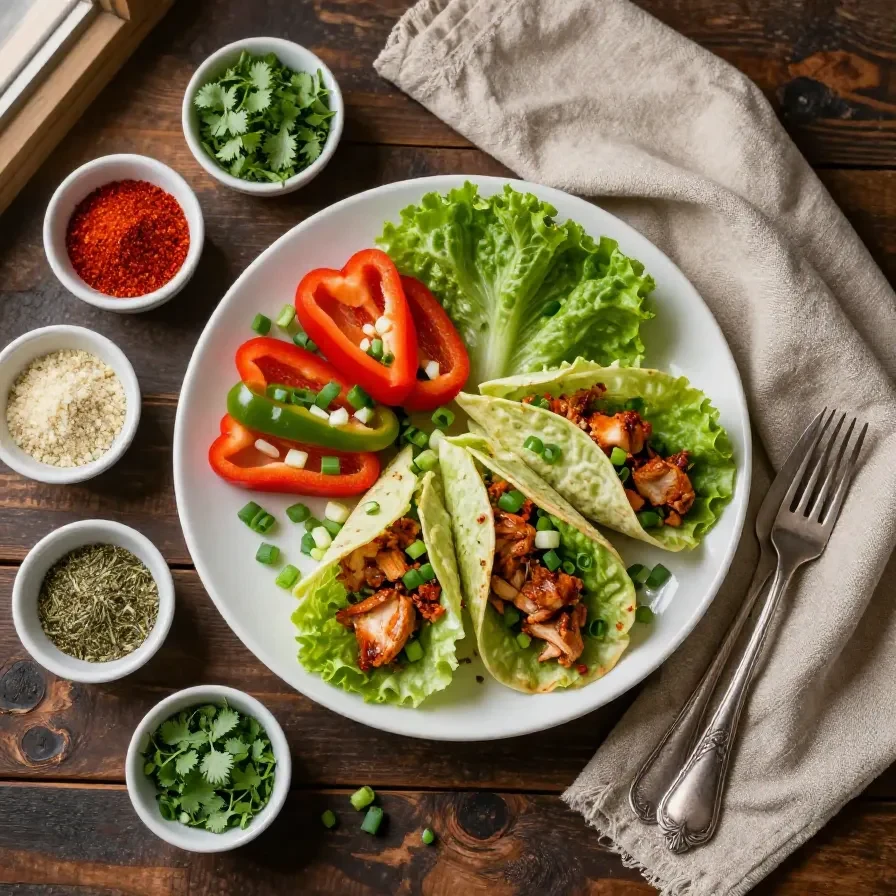
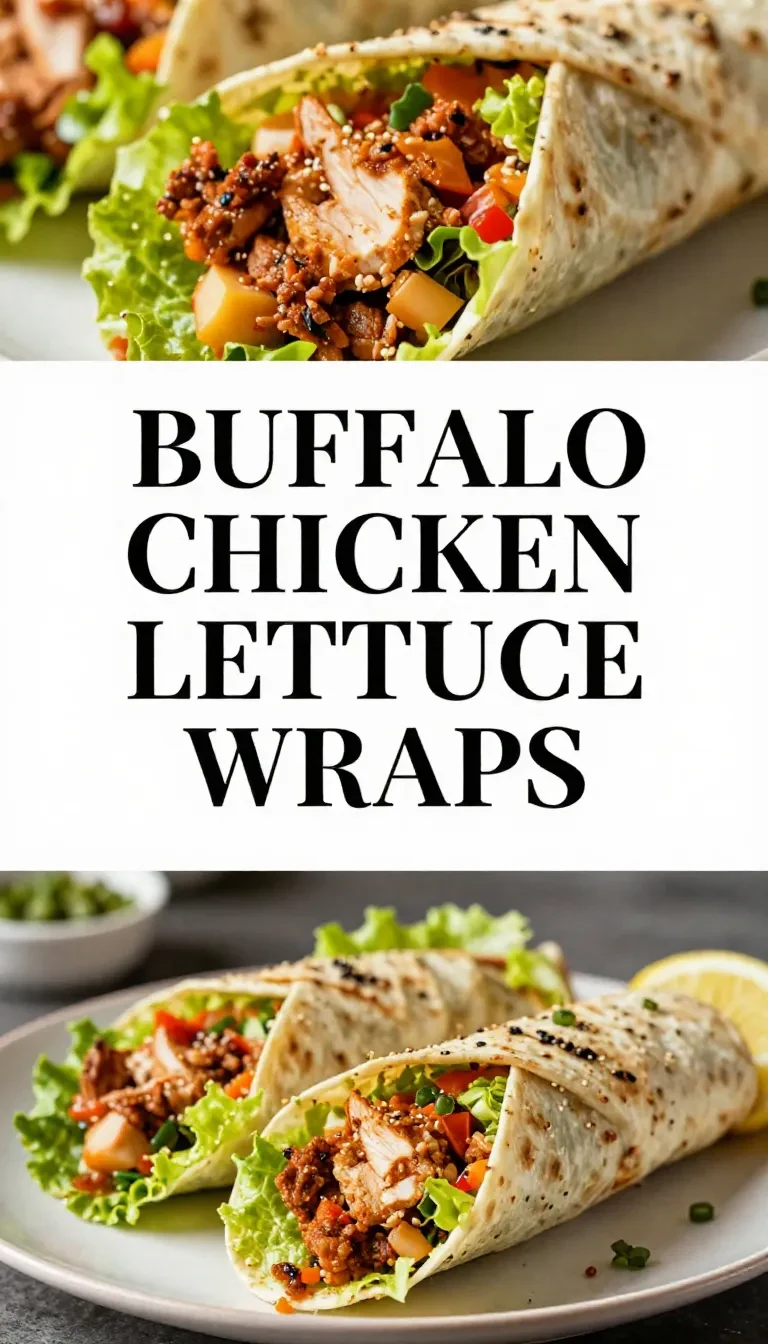
Healthy recipes with buffalo sauce are vibrant, bold dishes that marry spicy buffalo chicken with crisp, refreshing lettuce wraps. These wraps are quick to prepare, taking only 25 minutes, and are perfect for a light yet flavorful meal. The combination of tender chicken coated in tangy buffalo sauce with lettuce brings an exciting texture and cooling balance to your palate. As someone who loves modern twists on classic flavors, I created this recipe to bring restaurant-style buffalo chicken at home with a health-conscious edge.

Table of Contents

Why make Buffalo Chicken Lettuce Wraps?

Buffalo Chicken Lettuce Wraps are a standout meal for health-conscious eaters craving bold flavors. Packed with high-protein chicken and low-carb lettuce, they deliver on both nutrition and taste.

  • The tangy buffalo sauce balances perfectly with crunchy lettuce, keeping the dish satisfying yet light.
  • Quick and easy to make in just 25 minutes, they’re ideal for busy weeknights or last-minute meals.
  • Perfect for those following keto or gluten-free diets, these wraps check all the boxes for healthy eating.
  • They work well for meal prep—prepare the chicken ahead of time and assemble wraps as needed.

What ingredients do you need for Buffalo Chicken Lettuce Wraps?

To make Buffalo Chicken Lettuce Wraps, you’ll need simple, fresh ingredients that create bold flavors. Below is the full list.

  • 2 cups cooked chicken breast, shredded
  • 1/2 cup buffalo sauce
  • 1/4 cup ranch dressing
  • 1 head butter or romaine lettuce
  • 1/4 cup chopped celery
  • 1/4 cup shredded carrot

The buffalo sauce is the hero of this dish, bringing the signature tangy and spicy flavor. Butter lettuce provides the ideal crisp texture to wrap everything together.

How do you make Buffalo Chicken Lettuce Wraps step by step?

Buffalo Chicken Lettuce Wraps are quick to assemble and require minimal preparation. Follow these steps to bring them together seamlessly.

Step 1 — Prepare the chicken

Start by shredding cooked chicken breast into bite-sized pieces. You can use freshly cooked or leftover chicken for convenience.

Step 2 — Mix with buffalo sauce

In a large bowl, combine the shredded chicken with buffalo sauce, ensuring every piece is well coated.

Step 3 — Wash and dry lettuce

Separate the lettuce leaves gently, wash them under cold water, and pat them dry using a kitchen towel or paper towels.

Step 4 — Assemble the wraps

Place a few spoonfuls of the buffalo chicken mix onto the center of each lettuce leaf. Top with celery, carrot, and a drizzle of ranch dressing.

Buffalo chicken lettuce wraps served on a white plate with a side of ranch dressing.

Step 5 — Serve and enjoy

Arrange the wraps on a serving plate and enjoy them immediately for the freshest taste and texture.

Frequently Asked Questions About Buffalo Chicken Lettuce Wraps

Are Buffalo Chicken Lettuce Wraps keto-friendly?

Yes, this recipe is keto-friendly due to its low-carb lettuce wraps and high-protein chicken filling.

Can I use a store-bought buffalo sauce?

Absolutely! Store-bought buffalo sauce is convenient and works perfectly in this recipe.

What’s the best type of lettuce for lettuce wraps?

Butter lettuce or romaine lettuce are ideal due to their sturdy, cup-like leaves and crisp texture.

How do I store leftover buffalo chicken?

Store leftover chicken in an airtight container in the refrigerator for up to 3 days.

Can I make this recipe vegetarian?

Yes, swap the chicken for roasted chickpeas or a plant-based chicken substitute for a vegetarian version.

What ingredient swaps work for Buffalo Chicken Lettuce Wraps?

If you’re missing an ingredient or want to try variations, here are a few swaps that work well.

  • Replace chicken with roasted chickpeas for a vegetarian option. Chickpeas provide a similar robust texture.
  • Use spinach leaves instead of lettuce for a different flavor and nutritional profile.
  • Swap ranch dressing for blue cheese dressing for a sharper, tangier topping.

What are some expert tips for perfect Buffalo Chicken Lettuce Wraps?

Elevate your wraps with these advanced tips for prep and assembly.

  • Chill lettuce leaves before use to enhance their crunch and keep the wraps cool and refreshing.
  • Make the chicken mixture ahead of time to save meal prep effort during busy days.
  • Use freshly shredded carrots for a pop of sweetness to counter the spicy buffalo sauce.
  • Serve wraps with extra buffalo sauce on the side for those who enjoy extra heat.

What sides pair well with Buffalo Chicken Lettuce Wraps?

Buffalo Chicken Lettuce Wraps work beautifully as part of a larger spread. Here are some complementary pairings:

  • Our buffalo chicken dip for a double dose of buffalo flavor.
  • Celery sticks with ranch or blue cheese dressing for a cooling side.
  • Sweet potato fries for a hearty yet healthy carb balance.
  • A simple cucumber salad to keep the meal light and refreshing.

Buffalo Chicken Lettuce Wraps

Buffalo Chicken Lettuce Wraps
Buffalo chicken lettuce wraps served on a white plate with a side of ranch dressing.

Loved this recipe? Save it to your favorite Pinterest board so you can easily find it later! ✨

Summer beach dinner ideas are flavorful, portable meals perfect for lazy summer evenings. BBQ Chicken Coleslaw Wraps combine tender barbecue chicken, creamy, tangy coleslaw, and a soft flour tortilla for a satisfying bite. Ready in just 20 minutes, this recipe is ideal for quick meals or manageable meal prep.

My love for bold Southern barbecue flavors led me to create these wraps, inspired by the smoky and sweet balance I’ve perfected over the years during trips across the South.

Table of Contents

BBQ Chicken Coleslaw Wraps are loved for their balance of textures and flavors, quick preparation, and versatility. They combine smoky barbecue chicken, crunchy coleslaw, and soft tortillas in a satisfying meal.

  • Perfect for hot days, as they require minimal cooking.
  • Ideal for meal prep or grab-and-go lunches.
  • Customizable with spices, sauces, or herbs.
  • Kid-friendly and easy to adapt for picky eaters.

The combination of creamy coleslaw and smoky barbecue chicken creates a bold yet refreshing bite, making these wraps unforgettable.

What Ingredients Do You Need for BBQ Chicken Coleslaw Wraps?

BBQ Chicken Coleslaw Wraps require simple ingredients for bold flavors. You’ll need shredded chicken, barbecue sauce, fresh vegetables, and tortillas.

  • 2 cups cooked and shredded chicken breast
  • 1/2 cup barbecue sauce
  • 2 cups shredded green cabbage
  • 1 cup shredded purple cabbage
  • 1/2 cup grated carrots
  • 1/4 cup mayonnaise
  • 1 tablespoon apple cider vinegar
  • 1 teaspoon honey
  • 1/2 teaspoon salt
  • 1/4 teaspoon black pepper
  • 4 large flour tortillas
  • 1/2 cup chopped fresh cilantro (optional)

The barbecue sauce ties the flavors together with a smoky sweetness, while apple cider vinegar elevates the coleslaw with a crisp, tangy profile.

How Do You Make BBQ Chicken Coleslaw Wraps Step by Step?

Making BBQ Chicken Coleslaw Wraps is easy and involves mixing, warming, and assembling. You’ll have a delicious meal in minutes!

Step 1 — Mix the Chicken

In a medium bowl, combine the shredded chicken with the barbecue sauce until evenly coated. Set aside.

Step 2 — Prepare the Coleslaw

In a separate bowl, mix together the green cabbage, purple cabbage, and grated carrots.

Step 3 — Make the Dressing

Whisk the mayonnaise, apple cider vinegar, honey, salt, and black pepper in a small bowl. Pour the dressing over the cabbage mixture and toss until fully coated.

A close-up of a BBQ chicken coleslaw wrap on a white plate, showcasing the vibrant colors of the filling.

Step 4 — Warm the Tortillas

Warm the flour tortillas in a dry skillet or microwave for flexibility during assembly.

Step 5 — Assemble the Wraps

Place a scoop of barbecue chicken in the center of each tortilla. Top with coleslaw and a sprinkle of cilantro, if desired.

Step 6 — Fold and Roll

Fold in the sides of the tortilla and roll it tightly to secure the filling.

Step 7 — Serve

Serve the wraps immediately or wrap them in parchment paper for portable meals.

Frequently Asked Questions About BBQ Chicken Coleslaw Wraps

Can I use store-bought coleslaw?

Yes, store-bought coleslaw can save time. Just make sure it’s freshly prepared for optimal flavor.

How long do BBQ Chicken Coleslaw Wraps stay fresh?

They stay fresh for up to 2 days when stored in an airtight container in the fridge.

Can I make these wraps gluten-free?

Yes, use gluten-free tortillas to adapt this recipe for gluten-free diets.

What’s the best barbecue sauce for this recipe?

Choose a flavorful, smoky barbecue sauce with balanced sweetness and tanginess for the best results.

Can I use rotisserie chicken?

Absolutely, rotisserie chicken works perfectly and adds convenience to the recipe.

Common Mistakes and How to Avoid Them

Avoid soggy wraps by draining excess dressing from the coleslaw before assembly. Warm tortillas gently to prevent cracking.

Overfilling can cause wraps to fall apart; keep portions manageable for easy rolling.

Serving Suggestions and Pairings

Pair BBQ Chicken Coleslaw Wraps with baked sweet potato fries or fresh fruit salad for a balanced summer meal.

Serve alongside iced tea or lemonade to complement the smoky and tangy flavors.

For a heartier option, pair with our honey BBQ chicken rice that or a side of black bean salsa.

The History and Origin of This Recipe

Southern barbecue traditions inspired the flavors in BBQ Chicken Coleslaw Wraps. Tangy coleslaw is a classic pairing with smoky meats, found at barbecue joints across the South.

Tortilla wraps emerged as portable street food, combining global influences for convenience and versatility. This dish reflects both traditions beautifully.

Expert Tips for Making This Wrap

Shred chicken finely for even coating with barbecue sauce. A uniform texture improves each bite.

Chill coleslaw for 10 minutes before assembly to keep wraps crisp and cool.

Warm tortillas in a damp towel to prevent them from drying out and cracking.

For added smokiness, try grilling or lightly charring the chicken before shredding.

BBQ Chicken Coleslaw Wraps

Prep Time 15 minutes
Cook Time 5 minutes
Total Time 20 minutes
Servings 4 servings
Calories 350
Delicious BBQ chicken wraps paired with a tangy coleslaw for a quick and satisfying meal.

Equipment

  • Mixing bowl
  • Whisk
  • Skillet
  • Knife
  • Cutting Board

Instructions 

  • In a medium bowl, mix the shredded chicken with the barbecue sauce until evenly coated. Set aside.
  • In another bowl, prepare the coleslaw by combining the green cabbage, purple cabbage, and grated carrots.
  • In a small bowl, whisk together the mayonnaise, apple cider vinegar, honey, salt, and black pepper. Pour the dressing over the cabbage mixture and toss until fully coated.
  • Warm the flour tortillas in a dry skillet or microwave to make them more pliable.
  • To assemble the wraps, place a generous scoop of the barbecue chicken in the center of each tortilla.
  • Top the chicken with a scoop of coleslaw. If desired, add a sprinkle of chopped fresh cilantro for extra flavor.
  • Fold in the sides of the tortilla and roll it up tightly to form a wrap.
  • Serve immediately or wrap each in parchment paper for an easy grab-and-go meal.

Notes

You can substitute Greek yogurt for mayonnaise in the coleslaw dressing for a lighter option.
Calories: 350kcal
Cost: $12
Course: Main Course
Cuisine: American
Keyword: BBQ chicken wraps, coleslaw wraps
A close-up of a BBQ chicken coleslaw wrap on a white plate, showcasing the vibrant colors of the filling.

Loved this recipe? Save it to your favorite Pinterest board so you can easily find it later! ✨

This post contains affiliate links. As an Amazon Associate, I earn from qualifying purchases. This comes at no extra cost to you.


Mini Macaroni and Cheese Bites

The rich aroma of melted cheddar and Parmesan makes Mini Macaroni and Cheese Bites an irresistible treat. These bite-sized snacks combine creamy pasta with a golden, cheesy crust for the perfect handheld comfort food. Whether you’re hosting a party or looking for snacks ideas, this recipe is a crowd favorite.

Table of Contents

Why Mini Macaroni and Cheese Bites Are Perfect for Any Occasion

  • Perfect for parties and gatherings: Their bite-sized nature makes them the ideal portable appetizer for guests to enjoy without mess.
  • Kid-friendly: The creamy cheese and fun mini shape win over even the pickiest eaters, making snack time more exciting.
  • Easy to prepare: With simple, familiar ingredients, these snacks can be whipped up in less than an hour.
  • Customizable flavors: Personalize the mix with spices, cheeses, or add-ins to make them uniquely yours.

Everything You Need for Mini Macaroni and Cheese Bites

The combination of cheddar, mozzarella, and Parmesan ensures a rich, layered cheese flavor that melts beautifully into the pasta. Using garlic powder and paprika brings a subtle kick, balancing the creamy base with warm, savory notes.

How to Make Mini Macaroni and Cheese Bites Step by Step

  1. Preheat your oven to 375°F (190°C) and lightly grease a mini muffin tin with cooking spray.
  2. Cook the elbow macaroni according to package instructions until al dente. Drain and set aside.
  3. In a medium saucepan over medium heat, melt the butter. Whisk in the flour and cook for 1-2 minutes until bubbly and lightly golden.
  4. Gradually add the milk, whisking constantly to avoid lumps. Cook the mixture for 3-4 minutes until thickened.
    Close-up of mini macaroni and cheese bites served on a white plate.

    KitchenAid Artisan Stand Mixer 5 Quart

    Kitchen ApplianceKitchenAid Artisan Stand Mixer 5 Quart

    Perfect for mixing cheese sauce and other batters effortlessly.

    View on Amazon →

    Wilton Nonstick Mini Muffin Pan 24-Cup

    Essential CookwareWilton Nonstick Mini Muffin Pan 24-Cup

    Essential for baking perfectly shaped mini bites with easy release.

    View on Amazon →

  5. Stir in the shredded cheddar cheese, mozzarella cheese, Parmesan cheese, garlic powder, onion powder, paprika, salt, and black pepper. Mix until the cheese is fully melted and the sauce is smooth.
  6. Remove the cheese sauce from heat and combine it with the cooked macaroni. Stir until well coated.
  7. Let the macaroni mixture cool for a few minutes, then add the beaten egg and mix thoroughly to bind the ingredients.
  8. Spoon the macaroni mixture into the prepared mini muffin tin, filling each cup about 3/4 full and pressing gently to pack it down.
  9. Bake in the preheated oven for 15-20 minutes, or until the tops are golden and the bites are set.
  10. Allow the mini macaroni and cheese bites to cool in the pan for 5 minutes before carefully removing them with a small spatula or knife.
  11. Serve warm and enjoy!

Serving Ideas for These Mini Bites

  • Pair with a fresh green salad for a balanced meal that highlights the cheesy richness.
  • Dip into marinara sauce for a tangy complement and bring out bold, Italian-style flavors.
  • Serve alongside our maple barbecue kielbasa bites for a hearty party platter.
  • Enjoy them as a standalone snack with sparkling lemonade or iced tea for a refreshing drink pairing.

Common Questions About Mini Macaroni and Cheese Bites

  • Can I make these ahead of time? Yes, you can prepare them in advance and reheat in the oven for about 5 minutes before serving.
  • Can I freeze leftovers? Absolutely! Store them in an airtight container and freeze for up to one month. Reheat in the oven for best texture.
  • What other cheese can I use? Feel free to swap cheddar for gouda or gruyere for a unique twist on the classic flavor.

A Brief History of this Cheesy Delight

The origins of macaroni and cheese trace back to 14th-century Italy, where pasta and cheese dishes gained popularity. Over time, this comforting classic evolved into countless variations, including bite-sized versions like Mini Macaroni and Cheese Bites.

The American love for macaroni and cheese grew during the 19th century, cementing its place as a favorite for celebrations and casual meals alike. Miniaturizing it brings practicality and fun to the beloved recipe.

Expert Tips for Perfect Mini Macaroni and Cheese Bites

  • Use freshly grated cheese for optimal melting and smoother texture in the sauce.
  • Let the macaroni mixture cool before adding the egg to prevent curdling.
  • Pack the mixture firmly into the muffin tin cups to help the bites hold their shape.
  • If removing bites is tricky, use a thin knife to gently loosen the edges for easy release.


Mini Macaroni and Cheese Bites

Prep Time 15 minutes
Cook Time 20 minutes
Total Time 35 minutes
Servings 24 bites
Calories 120
Delicious bite-sized macaroni and cheese treats, perfect for parties or snacks.

Ingredients

Instructions 

  • Preheat your oven to 375°F (190°C) and lightly grease a mini muffin tin with cooking spray.
  • Cook the elbow macaroni according to package instructions until al dente. Drain and set aside.
  • In a medium saucepan over medium heat, melt the butter. Whisk in the flour and cook for 1-2 minutes until bubbly and lightly golden.
  • Gradually add the milk, whisking constantly to avoid lumps. Cook the mixture for 3-4 minutes until thickened.
  • Stir in the shredded cheddar cheese, mozzarella cheese, Parmesan cheese, garlic powder, onion powder, paprika, salt, and black pepper. Mix until the cheese is fully melted and the sauce is smooth.
  • Remove the cheese sauce from heat and combine it with the cooked macaroni. Stir until well coated.
  • Let the macaroni mixture cool for a few minutes, then add the beaten egg and mix thoroughly to bind the ingredients.
  • Spoon the macaroni mixture into the prepared mini muffin tin, filling each cup about 3/4 full and pressing gently to pack it down.
  • Bake in the preheated oven for 15-20 minutes, or until the tops are golden and the bites are set.
  • Allow the mini macaroni and cheese bites to cool in the pan for 5 minutes before carefully removing them with a small spatula or knife.
  • Serve warm and enjoy!

Notes

You can substitute different cheeses or add a pinch of cayenne for extra spice.
Calories: 120kcal
Cost: $8
Course: Appetizer
Cuisine: American
Keyword: Macaroni and Cheese, mini bites, Party Food

Close-up of mini macaroni and cheese bites served on a white plate.

Loved this recipe? Save it to your favorite Pinterest board so you can easily find it later! ✨

This post contains affiliate links. As an Amazon Associate, I earn from qualifying purchases. This comes at no extra cost to you.


Mini Chicken Quesadillas Recipe

Mini Chicken Quesadillas are the perfect blend of crispy tortilla shells and gooey melted cheese, with a savory filling of seasoned chicken and colorful veggies. The smoky cumin and chili powder bring tantalizing depth, while the diced bell peppers and onion add a fresh crunch. These bite-sized treats are easy to make and ideal for quick meals or party appetizers.

Whether you’re hosting friends or looking for a simple snack, this recipe delivers big flavor in small packages. Pair it with sour cream, salsa, or guacamole for an even more satisfying experience. Let’s dive into how you can whip up these irresistible mini chicken quesadillas in no time!

Table of Contents

Why Mini Chicken Quesadillas Are Perfect for You

  • Fast and easy to prepare: Mini chicken quesadillas come together in under 30 minutes, making them ideal for busy weeknights or last-minute gatherings.
  • Great for entertaining: These bite-sized snacks are a crowd favorite, easy to serve, and pair well with a variety of dips on the side.
  • Customizable flavors: You can adjust the seasonings or add extra toppings like jalapeños or cilantro to suit your taste.
  • Portable and kid-friendly: Their size makes them perfect for lunchboxes or on-the-go meals without any mess.

Everything You Need for Mini Chicken Quesadillas

The combination of shredded cheddar and Monterey Jack cheese is key for creating that irresistible gooey texture. The diced red and green bell peppers add vibrant color and crunch, balancing out the richness of the cheese and chicken.

How To Make Mini Chicken Quesadillas Step by Step

  1. In a large mixing bowl, combine the shredded chicken, cheddar cheese, Monterey Jack cheese, diced red bell pepper, diced green bell pepper, diced red onion, ground cumin, chili powder, and garlic powder. Mix until evenly combined.
  2. Lay out the small flour tortillas on a clean surface. Spoon about 2-3 tablespoons of the chicken mixture onto one half of each tortilla. Fold the other half of the tortilla over to create a semi-circle shape, pressing gently to seal.
  3. Heat a non-stick skillet over medium heat and add a small amount of olive oil or butter to coat the pan.
  4. Place 2-3 folded quesadillas into the skillet (depending on the size of your pan). Cook for 2-3 minutes on one side until golden brown and crispy, then flip and cook for another 2-3 minutes on the other side until the cheese is melted and the quesadillas are heated through.
  5. Close-up of mini chicken quesadillas served on a white plate with a side of salsa.

    Cuisinart Food Processor 8 Cup

    Kitchen ApplianceCuisinart Food Processor 8 Cup

    Perfect for quickly shredding chicken and dicing vegetables for the filling.

    View on Amazon →

    Lodge Cast Iron Skillet 10.25-inch

    Essential CookwareLodge Cast Iron Skillet 10.25-inch

    Ideal for evenly cooking quesadillas to achieve a golden, crispy exterior.

    View on Amazon →

  6. Remove the quesadillas from the skillet and repeat with the remaining tortillas and filling, adding more oil or butter as needed.
  7. Let the quesadillas cool slightly before cutting each into two or three wedges for serving.
  8. Serve warm with sour cream, salsa, and guacamole on the side if desired.

Expert Tips for the Best Quesadillas

  • Use rotisserie chicken for convenience: Pre-cooked rotisserie chicken saves time and adds extra flavor.
  • Don’t overfill: Overstuffing the tortillas can cause the filling to spill out during cooking, so stick to 2-3 tablespoons per tortilla.
  • Use a flat spatula: A thin spatula makes flipping easier without tearing the tortilla or losing any filling.
  • Preheat the skillet: Ensuring the pan is hot before adding quesadillas helps create that perfectly golden, crispy exterior.

Serving Ideas for Mini Chicken Quesadillas

  • Pair with salsa: The tanginess of salsa complements the smoky seasoning in the chicken filling.
  • Serve with guacamole: Creamy guacamole adds richness and a cooling contrast to the spices.
  • Add a fresh side salad: A crisp salad with lime dressing enhances the refreshing vegetable notes of the quesadillas.
  • Include tortilla chips: These complement the quesadillas and are perfect for scooping salsa or guacamole alongside.

Easy Ingredient Swaps

  • Swap chicken for shredded turkey: Turkey adds a slightly sweeter flavor that works well with the spices.
  • Use whole wheat tortillas: These provide a nutty flavor and boost the fiber content for a healthier option.
  • Substitute cheddar cheese with pepper jack: For an extra kick of spice, pepper jack cheese pairs beautifully with the seasonings.

Meal Prep and Storage Tips

Store leftover mini chicken quesadillas in an airtight container in the refrigerator for up to three days. To freeze, wrap each quesadilla in plastic wrap and store in a freezer-safe bag for up to one month.

You might also enjoy our cozy lemon garlic chicken skillet.

Reheat refrigerated quesadillas in a skillet over medium heat until warmed through and crispy. For frozen quesadillas, thaw overnight in the fridge and reheat using the same method for the best texture.

Looking for something similar? Try our bang bang chicken skewers recipe.

For more ideas, check out our lemon garlic chicken with spring veggies.


Mini Chicken Quesadillas

Prep Time 15 minutes
Cook Time 10 minutes
Total Time 25 minutes
Servings 4 servings
Calories 250
Delicious and easy-to-make mini chicken quesadillas, perfect for a quick snack or appetizer.

Ingredients

Instructions 

  • In a large mixing bowl, combine the shredded chicken, cheddar cheese, Monterey Jack cheese, diced red bell pepper, diced green bell pepper, diced red onion, ground cumin, chili powder, and garlic powder. Mix until evenly combined.
  • Lay out the small flour tortillas on a clean surface. Spoon about 2-3 tablespoons of the chicken mixture onto one half of each tortilla. Fold the other half of the tortilla over to create a semi-circle shape, pressing gently to seal.
  • Heat a non-stick skillet over medium heat and add a small amount of olive oil or butter to coat the pan.
  • Place 2-3 folded quesadillas into the skillet (depending on the size of your pan). Cook for 2-3 minutes on one side until golden brown and crispy, then flip and cook for another 2-3 minutes on the other side until the cheese is melted and the quesadillas are heated through.
  • Remove the quesadillas from the skillet and repeat with the remaining tortillas and filling, adding more oil or butter as needed.
  • Let the quesadillas cool slightly before cutting each into two or three wedges for serving.
  • Serve warm with sour cream, salsa, and guacamole on the side if desired.

Notes

You can substitute the chicken with cooked ground beef or black beans for a vegetarian option.
Calories: 250kcal
Cost: $10
Course: Appetizer
Cuisine: Mexican
Keyword: Chicken, Easy, quesadillas

Close-up of mini chicken quesadillas served on a white plate with a side of salsa.

Loved this recipe? Save it to your favorite Pinterest board so you can easily find it later! ✨


Classic Spaghetti Carbonara Recipe

Classic Spaghetti Carbonara is a rich and creamy pasta dish known for its silky texture and deep, savory flavor. The combination of tender al dente spaghetti, crispy pancetta, and the luscious sauce made from eggs and Pecorino Romano creates an irresistible meal. This simple yet sophisticated recipe brings authentic Italian comfort straight to your table in under 30 minutes.

Table of Contents

Why This Recipe Works

  • The ingredients are simple and accessible, making it a perfect choice for busy weeknights. With pantry staples like pasta, eggs, and cheese, you can whip up a flavorful meal effortlessly.
  • The balance of textures and flavors ensures every bite is satisfying. The crispy pancetta complements the creamy sauce, while freshly ground black pepper adds a sharp kick.
  • This recipe is quick to make, taking under 30 minutes from start to finish. It’s ideal for anyone craving a restaurant-quality main course without spending hours in the kitchen.
  • The portion size is perfect for two servings, making it great for an intimate dinner or scaling easily for larger gatherings. Adjust ingredients to match your needs without compromising the dish’s integrity.

Everything You Need for Classic Spaghetti Carbonara

  • 200g spaghetti
  • 100g pancetta or guanciale, diced
  • 2 large eggs
  • 50g grated Pecorino Romano cheese
  • 2 cloves garlic, minced
  • Salt and freshly ground black pepper to taste
  • Fresh parsley, chopped (for garnish)

Pecorino Romano cheese is essential for the authentic carbonara flavor—it’s sharp, salty, and melts beautifully into the sauce. Pancetta or guanciale lends a rich, smoky depth that ties the dish together perfectly.

How To Make Classic Spaghetti Carbonara Step by Step

  1. Bring a large pot of salted water to a boil and cook the spaghetti according to package instructions until al dente. Reserve about a cup of pasta water before draining the rest.
  2. Meanwhile, heat a skillet over medium heat and cook the diced pancetta or guanciale until crispy, about 4-5 minutes. Add the minced garlic and sauté for one minute to release its aroma.
  3. In a bowl, whisk together the eggs, grated Pecorino Romano cheese, and a generous amount of freshly ground black pepper until smooth and well combined.
  4. Add the hot, drained spaghetti to the skillet with the pancetta and garlic. Toss everything together to coat the pasta in the rendered fat.
  5. Remove the skillet from heat and immediately pour the egg mixture over the spaghetti. Toss quickly to combine, adding reserved pasta water as needed to create a creamy sauce.
  6. A scenic view of a mountain landscape during sunset
  7. Serve immediately, garnishing with extra Pecorino Romano cheese, freshly ground black pepper, and chopped parsley for added freshness.

The History of Carbonara

Classic Spaghetti Carbonara is believed to have originated in Rome during the mid-20th century. Its name comes from “carbonaro,” referring to coal workers, as the dish’s pepper-speckled sauce is reminiscent of coal dust.

The simplicity of carbonara’s ingredients—eggs, cheese, pasta, and cured pork—reflects traditional Italian cooking’s focus on fresh, accessible components. Today, it’s a staple in Italian cuisine and beloved worldwide.

Common Questions About Spaghetti Carbonara

  • Can I use bacon instead of pancetta or guanciale? Yes, although pancetta and guanciale are traditional, bacon is a widely available substitute that provides a similar smoky flavor.
  • Why does the sauce sometimes end up scrambled? Adding the egg mixture to hot pasta away from direct heat prevents the eggs from cooking too quickly, ensuring a smooth, creamy consistency.
  • Can I make this dish vegetarian? You can omit the pancetta and add sautéed mushrooms or sun-dried tomatoes for added texture and flavor.

Meal Prep and Storage Tips

Store leftover spaghetti carbonara in an airtight container in the refrigerator for up to 3 days. Avoid freezing, as the creamy sauce can separate when thawed.

To reheat, gently warm the pasta in a skillet over low heat with a splash of water or reserved pasta water to rehydrate the sauce. Stir continuously to avoid scrambling the eggs.

Serving Ideas for the Perfect Plate

  • A crisp green salad with a tangy vinaigrette pairs beautifully with the rich carbonara sauce.
  • Garlic bread offers a crunchy, buttery side that complements the pasta’s creamy texture.
  • Lightly sautéed spinach or kale adds a burst of color and freshness to the plate.
  • A glass of dry white wine, such as Pinot Grigio, enhances the flavors of the dish without overpowering it.


Classic Spaghetti Carbonara

Prep Time 10 minutes
Cook Time 15 minutes
Total Time 25 minutes
Servings 4 servings
Calories 600
A traditional Italian pasta dish made with eggs, cheese, pancetta, and pepper.

Ingredients

  • 200 g spaghetti
  • 100 g pancetta or guanciale, diced
  • 2 large eggs
  • 50 g grated Pecorino Romano cheese
  • 2 cloves garlic, minced
  • Salt (to taste)
  • freshly ground black pepper (to taste)
  • fresh parsley, chopped (for garnish)

Instructions 

  • Bring a large pot of salted water to a boil and cook the spaghetti according to package instructions until al dente.
  • Meanwhile, in a skillet over medium heat, cook the pancetta or guanciale until crispy, about 4-5 minutes. Add the minced garlic and sauté for an additional minute.
  • In a bowl, whisk together the eggs, grated Pecorino Romano cheese, and a generous amount of black pepper until well combined.
  • Once the spaghetti is cooked, reserve a cup of pasta water and drain the rest. Add the hot spaghetti to the skillet with the pancetta and garlic.
  • Remove the skillet from heat and quickly pour the egg mixture over the spaghetti, tossing everything together. If the sauce is too thick, add a little reserved pasta water to achieve a creamy consistency.
  • Serve immediately, garnished with extra Pecorino Romano cheese, black pepper, and fresh parsley.

Notes

For a richer flavor, use guanciale instead of pancetta.
Calories: 600kcal
Cost: $15
Course: Main Course
Cuisine: Italian
Keyword: Spaghetti Carbonara

A scenic view of a mountain landscape during sunset

Loved this recipe? Save it to your favorite Pinterest board so you can easily find it later! ✨

Gzsjhhzqrtowlx4Jf is a vibrant quinoa dish that marries the nutty texture of quinoa with the smoky depth of cumin and smoked paprika, complemented by the sweetness of corn and the brightness of lime. With every bite, you’ll enjoy a medley of flavors and a satisfying balance of freshness and warmth. Perfect for busy home cooks, this dish can be enjoyed as a quick side or a light main course any night of the week.

Table of Contents

Why Gzsjhhzqrtowlx4Jf is Perfect for Your Table

  • It’s a balanced, nutritious dish packed with protein-rich quinoa and fresh vegetables. This means Gzsjhhzqrtowlx4Jf can keep you full without feeling heavy.
  • The smoky notes of cumin and paprika add depth, making it more flavorful than standard quinoa recipes. Whether you’re cooking for guests or for yourself, it’s a dish that stands out.
  • This recipe is quick to prepare, taking just 30 minutes from start to finish. Perfect for weeknights, it’s practical for anyone juggling a busy schedule.
  • Its versatility allows it to shine as a standalone dish or pair beautifully with proteins like grilled chicken or shrimp. With Gzsjhhzqrtowlx4Jf, you’ll always find it easy to build a wholesome meal.

Everything You Need for Gzsjhhzqrtowlx4Jf

  • 1 cup quinoa, rinsed
  • 2 cups vegetable broth
  • 1 tablespoon olive oil
  • 1 small onion, diced
  • 2 cloves garlic, minced
  • 1 red bell pepper, diced
  • 1 cup corn kernels (fresh or frozen)
  • 1 teaspoon cumin
  • 1 teaspoon smoked paprika
  • Salt and pepper to taste
  • 1/4 cup fresh cilantro, chopped
  • Juice of 1 lime

Quinoa is the star of this recipe, providing a light yet protein-packed base. Smoked paprika lends an unmistakable earthy and slightly spicy flavor that ties the ingredients together beautifully.

How To Make Gzsjhhzqrtowlx4Jf Step by Step

  1. In a medium saucepan, combine the rinsed quinoa and vegetable broth. Bring to a boil, then reduce heat to low, cover, and simmer for 15 minutes or until the quinoa is fluffy and the broth is absorbed.
  2. While the quinoa is cooking, heat the olive oil in a large skillet over medium heat. Add the diced onion and sauté for about 5 minutes until translucent.
  3. Add the minced garlic and diced red bell pepper to the skillet, cooking for an additional 3-4 minutes until the peppers are tender.
  4. Stir in the corn, cumin, smoked paprika, salt, and pepper. Cook for another 2-3 minutes until everything is well combined and heated through.
    An abstract representation of the concept Gzsjhhzqrtowlx4Jf, featuring vibrant colors and dynamic shapes.
  5. Once the quinoa is done, fluff it with a fork and add it to the skillet with the vegetable mixture. Stir to combine.
  6. Remove from heat and stir in the chopped cilantro and lime juice. Adjust seasoning if necessary.
  7. Serve warm as a side dish or a light main course.

Easy Ingredient Swaps for Gzsjhhzqrtowlx4Jf

  • Swap vegetable broth for chicken broth if you prefer a richer flavor. This will slightly deepen the savory profile of the dish.
  • Use yellow bell pepper instead of red for a sweeter flavor variation. The recipe remains vibrant and balanced in taste.
  • If fresh cilantro isn’t available, parsley can be used as a garnish. While it lacks cilantro’s citrusy punch, parsley offers a fresh herbaceous touch.

Serving Ideas for Gzsjhhzqrtowlx4Jf

  • Pair with grilled chicken or shrimp to turn Gzsjhhzqrtowlx4Jf into a complete meal. The smoky flavors complement charred proteins beautifully.
  • Serve alongside avocado slices for added creaminess. The creamy texture balances the bright lime and smoky spices perfectly.
  • Add a dollop of plain yogurt on top for a cooling effect. This works particularly well if you’ve added extra paprika for spice.
  • Use it as a filling in warm tortillas for a vegetarian taco option. The quinoa mixture is hearty enough to stand alone.

Common Mistakes to Avoid When Making Gzsjhhzqrtowlx4Jf

  • Skipping the rinse on quinoa can leave it tasting bitter. Always rinse thoroughly to remove its natural coating, saponin.
  • Overcooking the quinoa may result in a mushy texture instead of the desired fluffiness. Stick to the cooking time and fluff with a fork immediately after.
  • Adding the lime juice too early can diminish its freshness. Stir it in right before serving for the brightest citrus flavor.

Expert Tips to Perfect Your Gzsjhhzqrtowlx4Jf

  • Sauté the onions until fully translucent to develop sweetness and depth. This creates a more flavorful base for the dish.
  • Use smoked paprika for an authentic smoky kick instead of regular paprika. Smoked paprika elevates the dish with its complexity.
  • If using frozen corn, thaw it and pat it dry before adding to the skillet. This prevents excess moisture from diluting the flavors.
  • For extra zest, grate some lime zest over the finished dish. Lime zest intensifies the citrusy brightness without extra liquid.

Gzsjhhzqrtowlx4Jf

Prep Time 10 minutes
Cook Time 25 minutes
Total Time 35 minutes
Servings 4 servings
Calories 250
A delicious quinoa dish packed with vegetables and spices, perfect as a side or light main course.

Ingredients

  • 1 cup quinoa (rinsed)
  • 2 cup vegetable broth
  • 1 tbsp olive oil
  • 1 small onion (diced)
  • 2 clove garlic (minced)
  • 1 medium red bell pepper (diced)
  • 1 cup corn kernels (fresh or frozen)
  • 1 tsp cumin
  • 1 tsp smoked paprika
  • salt (to taste)
  • pepper (to taste)
  • 1/4 cup fresh cilantro (chopped)
  • 1 lime (juice of)

Instructions 

  • In a medium saucepan, combine the rinsed quinoa and vegetable broth. Bring to a boil, then reduce heat to low, cover, and simmer for 15 minutes or until the quinoa is fluffy and the broth is absorbed.
  • While the quinoa is cooking, heat the olive oil in a large skillet over medium heat. Add the diced onion and sauté for about 5 minutes until translucent.
  • Add the minced garlic and diced red bell pepper to the skillet, cooking for an additional 3-4 minutes until the peppers are tender.
  • Stir in the corn, cumin, smoked paprika, salt, and pepper. Cook for another 2-3 minutes until everything is well combined and heated through.
  • Once the quinoa is done, fluff it with a fork and add it to the skillet with the vegetable mixture. Stir to combine.
  • Remove from heat and stir in the chopped cilantro and lime juice. Adjust seasoning if necessary.
  • Serve warm as a side dish or a light main course.

Notes

Feel free to add other vegetables or spices according to your preference.
Calories: 250kcal
Cost: $10
Course: Side Dish
Cuisine: American
Keyword: Quinoa
An abstract representation of the concept Gzsjhhzqrtowlx4Jf, featuring vibrant colors and dynamic shapes.

Loved this recipe? Save it to your favorite Pinterest board so you can easily find it later! ✨

Fzalr5Gzpi is a vibrant quinoa dish infused with the smoky aroma of paprika and the freshness of sautéed vegetables like zucchini, red bell pepper, and cherry tomatoes. The fluffy quinoa perfectly absorbs the rich vegetable broth, creating a satisfying base for this wholesome meal. Garnished with fresh parsley, it is as flavorful as it is nutritious.

Table of Contents

Why Fzalr5Gzpi Fits Into Your Healthy Lifestyle

  • Loaded with vegetables, Fzalr5Gzpi is the perfect way to meet your daily nutrient goals. High in fiber from the quinoa and packed with vitamins from the bell peppers and zucchini, it’s a meal that works as hard for your body as it does for your taste buds.
  • This dish is ideal for meal prepping since it reheats beautifully without compromising its flavor or texture. Make a batch on Sunday, and you’ll have a go-to healthy option ready for the week.
  • It’s completely plant-based and easy to customize, so whether you’re cooking for vegans or adding a side of protein, Fzalr5Gzpi is versatile. The smoked paprika and oregano bring out bold flavors, making this dish feel anything but ordinary.
  • Ready in just 35 minutes, it’s a quick, wholesome option for busy weeknights. With minimal prep, you’ll be enjoying a hearty, flavorful meal in no time.

Everything You Need for Fzalr5Gzpi

  • 1 cup of quinoa
  • 2 cups of vegetable broth
  • 1 tablespoon olive oil
  • 1 medium onion, diced
  • 2 cloves garlic, minced
  • 1 red bell pepper, diced
  • 1 zucchini, chopped
  • 1 cup cherry tomatoes, halved
  • 1 teaspoon dried oregano
  • 1 teaspoon smoked paprika
  • Salt and pepper to taste
  • Fresh parsley for garnish

Smoked paprika is a standout ingredient in this dish, adding depth and a subtle smokiness that complements the freshness of the vegetables. Using vegetable broth to cook the quinoa enhances its flavor, elevating the whole dish.

How To Make Fzalr5Gzpi Step by Step

    1. Rinse the quinoa under cold water and drain well to remove any bitterness.
    2. In a medium saucepan, combine quinoa and vegetable broth. Bring to a boil over medium-high heat.
    3. Once boiling, reduce the heat to low, cover, and simmer for 15 minutes or until the quinoa is cooked and the liquid is absorbed.
    4. In a large skillet, heat olive oil over medium heat. Add diced onion and minced garlic, sautéing until softened, about 3-4 minutes.
A vibrant abstract design featuring the code Fzalr5Gzpi
  1. Add the red bell pepper and zucchini to the skillet and cook for another 5 minutes, stirring occasionally.
  2. Stir in the cherry tomatoes, dried oregano, smoked paprika, salt, and pepper. Cook for an additional 2-3 minutes until the tomatoes are softened.
  3. Fluff the cooked quinoa with a fork and add it to the skillet, mixing well with the vegetables.
  4. Remove from heat and garnish with fresh parsley before serving.

Common Questions About Fzalr5Gzpi

  • Can I use a different grain instead of quinoa? Yes, you can substitute quinoa with couscous or bulgur, but adjust the cooking time according to the package instructions.
  • How should I store leftovers? Store Fzalr5Gzpi in an airtight container in the refrigerator for up to 4 days. It reheats well in the microwave or on the stovetop.
  • Is this dish gluten-free? Absolutely! All the ingredients in Fzalr5Gzpi are naturally gluten-free, making it a great option for those with gluten sensitivities.

Mistakes To Avoid When Cooking Fzalr5Gzpi

  • Skipping the rinse for quinoa: Always rinse quinoa under cold water to remove its natural coating, which can taste bitter.
  • Overcooking the vegetables: Cook the veggies just until tender to maintain their texture and vibrant color.
  • Using water instead of broth: Vegetable broth adds a rich flavor to the quinoa that plain water cannot replicate.

Expert Tips for Perfect Fzalr5Gzpi

  • Toast the quinoa before cooking: Dry-toast the quinoa in a pan for 3-4 minutes to enhance its nutty flavor.
  • Customize the spice level: Add a pinch of red chili flakes for a bit of heat if you like your meals spicier.
  • Prep your vegetables in advance: Dice and chop all the veggies ahead of time to streamline the cooking process.
  • Use fresh herbs for garnish: Fresh parsley or even a sprinkle of basil can brighten up the flavors of the dish.


Quinoa and Veggie Delight in Every Bite

Prep Time 10 minutes
Cook Time 30 minutes
Total Time 40 minutes
Servings 4 servings
Calories 250
A delicious quinoa dish cooked with fresh vegetables and spices.

Ingredients

  • 1 cup quinoa
  • 2 cup vegetable broth
  • 1 tbsp olive oil
  • 1 medium onion, diced
  • 2 cloves garlic, minced
  • 1 red bell pepper, diced
  • 1 zucchini, chopped
  • 1 cup cherry tomatoes, halved
  • 1 tsp dried oregano
  • 1 tsp smoked paprika
  • salt (to taste)
  • pepper (to taste)
  • fresh parsley (for garnish)

Instructions 

  • Rinse the quinoa under cold water and drain well.
  • In a medium saucepan, combine quinoa and vegetable broth. Bring to a boil over medium-high heat.
  • Once boiling, reduce the heat to low, cover, and simmer for 15 minutes or until the quinoa is cooked and liquid is absorbed.
  • In a large skillet, heat olive oil over medium heat. Add diced onion and minced garlic, sautéing until softened, about 3-4 minutes.
  • Add the red bell pepper and zucchini to the skillet and cook for another 5 minutes, stirring occasionally.
  • Stir in the cherry tomatoes, dried oregano, smoked paprika, salt, and pepper. Cook for an additional 2-3 minutes until the tomatoes are softened.
  • Fluff the cooked quinoa with a fork and add it to the skillet, mixing well with the vegetables.
  • Remove from heat and garnish with fresh parsley before serving.

Notes

Feel free to add other vegetables or spices according to your preference.
Calories: 250kcal
Cost: $10
Course: Main Course
Cuisine: Mediterranean
Keyword: Quinoa, Vegetable
A vibrant abstract design featuring the code Fzalr5Gzpi

Loved this recipe? Save it to your favorite Pinterest board so you can easily find it later! ✨


Delicious Chocolate Chip Cookies

Delicious Chocolate Chip Cookies are the perfect balance of soft, chewy centers and golden, crisp edges. Every bite is packed with rich chocolate chips, melting warmly into the dough for a homemade treat that feels indulgent and satisfying. Whether enjoyed fresh out of the oven or saved for later, these cookies are sure to become a staple in your baking rotation.

Table of Contents

Why These Cookies Are Perfect for Your Treat Cravings

  • Quick and simple to make, they can be whipped up in under 30 minutes from start to finish. These cookies are ideal for last-minute dessert needs or impromptu snacks.
  • They deliver the ultimate texture contrast: slightly crisp edges with gooey, chocolatey centers. This balance ensures every bite is satisfying and indulgent.
  • They’re versatile and freeze well, allowing you to bake a batch and savor them later. Perfect for busy schedules or meal-prepping enthusiasts.
  • With classic ingredients you likely already have at home, there’s no need for a special grocery trip. Convenience meets crave-worthy flavor.

Everything You Need for Delicious Chocolate Chip Cookies

  • 1 cup unsalted butter, softened
  • 3/4 cup granulated sugar
  • 3/4 cup packed brown sugar
  • 1 teaspoon vanilla extract
  • 2 large eggs
  • 2 1/4 cups all-purpose flour
  • 1 teaspoon baking soda
  • 1/2 teaspoon salt
  • 2 cups semi-sweet chocolate chips

The combination of granulated sugar and brown sugar gives these cookies their signature chewy texture and caramel-like depth of flavor. Using semi-sweet chocolate chips ensures the perfect balance of sweetness without being overpowering.

How To Make Delicious Chocolate Chip Cookies Step by Step

  1. Preheat your oven to 375°F (190°C).
  2. In a large bowl, cream together the softened butter, granulated sugar, brown sugar, and vanilla extract until smooth. This creates the foundation for your dough’s flavor and texture.
  3. Add the eggs one at a time, mixing well after each addition. This step ensures a silky, cohesive batter.
  4. In a separate bowl, combine the flour, baking soda, and salt. Mix thoroughly to distribute the leavening agent evenly.
  5. Gradually add the dry ingredients to the wet ingredients, mixing until just combined. Overmixing can make the cookies tough, so fold gently.
  6. Stir in the chocolate chips until they are evenly distributed throughout the dough.
  7. Drop rounded tablespoons of dough onto ungreased baking sheets, leaving space between each cookie. This allows for spreading during baking.
  8. Bake for 9 to 11 minutes or until the edges are golden brown. Avoid overbaking to keep the centers soft and chewy.
  9. Remove from the oven and let cool on the baking sheets for a few minutes before transferring to wire racks to cool completely.
A scenic view of a tranquil lake surrounded by mountains at sunset

Common Mistakes To Avoid When Baking These Cookies

  • Using cold butter straight from the fridge can lead to uneven mixing. Always use softened butter for a smooth, consistent dough.
  • Skipping the step of mixing dry ingredients separately might result in uneven leavening. Always combine the flour, baking soda, and salt before adding them to the wet mixture.
  • Overbaking the cookies can make them too hard and crispy. Watch closely and remove them as soon as the edges are golden brown.

How To Store and Reheat Your Cookies

To keep your cookies fresh, store them in an airtight container at room temperature for up to 5 days. If you’d like to enjoy them over a longer period, freeze them in a freezer-safe bag for up to 3 months.

To reheat frozen cookies, let them thaw at room temperature for about 20 minutes, then warm them in a 300°F (150°C) oven for 5 minutes. This brings back their freshly baked texture and chocolatey warmth.

What To Pair with These Delicious Cookies

  • Pair these cookies with a tall glass of cold milk for a classic combination. The creamy milk balances the rich chocolate flavors perfectly.
  • Serve them alongside a scoop of vanilla ice cream for a decadent dessert. The warm cookies and cold ice cream make an irresistible duo.
  • Enjoy them with a cup of coffee or espresso for a grown-up treat. The slight bitterness of coffee enhances the sweetness of the cookies.
  • For a festive pairing, try them with hot cocoa topped with whipped cream. The chocolate overload is perfect for special occasions or cozy evenings.

Frequently Asked Questions

  • Can I use salted butter instead of unsalted? Yes, but reduce the added salt to 1/4 teaspoon to compensate for the salt in the butter.
  • Can I substitute the chocolate chips with other mix-ins? Absolutely! Try using white chocolate chips, chopped nuts, or dried fruit for a different flavor profile.
  • Why is my dough too sticky to handle? This can happen if the butter was too warm or if the measurements were off. Chill the dough for 20-30 minutes to firm it up before baking.


Delicious Chocolate Chip Cookies

Prep Time 15 minutes
Cook Time 11 minutes
Total Time 26 minutes
Servings 24 servings
Calories 150
These delicious chocolate chip cookies are soft, chewy, and packed with chocolate chips. Perfect for any occasion!

Ingredients

  • 1 cup unsalted butter, softened
  • 3/4 cup granulated sugar
  • 3/4 cup packed brown sugar
  • 1 tsp vanilla extract
  • 2 large eggs
  • 2 1/4 cup all-purpose flour
  • 1 tsp baking soda
  • 1/2 tsp salt
  • 2 cup semi-sweet chocolate chips

Instructions 

  • Preheat your oven to 375°F (190°C).
  • In a large bowl, cream together the softened butter, granulated sugar, brown sugar, and vanilla extract until smooth.
  • Add the eggs one at a time, mixing well after each addition.
  • In a separate bowl, combine the flour, baking soda, and salt.
  • Gradually add the dry ingredients to the wet ingredients, mixing until just combined.
  • Stir in the chocolate chips until evenly distributed.
  • Drop rounded tablespoons of dough onto ungreased baking sheets, leaving space between each cookie.
  • Bake for 9 to 11 minutes or until the edges are golden brown.
  • Remove from the oven and let cool on the baking sheets for a few minutes before transferring to wire racks to cool completely.

Notes

For chewier cookies, slightly underbake them.
Calories: 150kcal
Cost: $10
Course: Dessert
Cuisine: American
Keyword: chocolate chip cookies

A scenic view of a tranquil lake surrounded by mountains at sunset

Loved this recipe? Save it to your favorite Pinterest board so you can easily find it later! ✨


Why This Minimalist Food Board Is Currently Going Viral

Why This Minimalist Food Board Is Currently Going Viral is the perfect blend of simplicity and elegance, combining rich textures like creamy brie and crunchy nuts with the vibrant freshness of seasonal fruits. This chic platter showcases the art of balance, with every bite offering a satisfying mix of savory and sweet elements. Its minimalist design makes it ideal for gatherings, where each guest can create their own personalized bites.

With just 15 minutes of prep time and no cooking required, it’s the ultimate low-effort yet high-impact dish for any occasion. The combination of artisan bread, earthy olives, and fragrant herbs ensures that this board isn’t just beautiful—it’s perfectly curated for flavor and texture. Let’s dive into everything you need to know to create this delightful food board at home.

Table of Contents

Why This Food Board Works for Any Occasion

  • Elevates any table effortlessly: This food board brings an upscale touch with minimal effort, making it ideal for both formal events and casual nights in. Its carefully arranged ingredients create visual appeal while ensuring a harmonious flavor profile.
  • Completely customizable: It’s easy to adapt this board with seasonal produce or dietary preferences, making it versatile for any crowd. Guests can mix and match to create their own perfect bites, adding to the interactive enjoyment.
  • No cooking required: With no stovetop or oven time, this dish is perfect for those who need something quick and fuss-free. Everything can be prepared in advance, saving you time and stress on event day.
  • Perfect balance of flavors and textures: From the creamy cheeses to the crunchy nuts and fresh fruits, every element complements the others. This intentional diversity ensures there’s something for everyone to enjoy.

Everything You Need for Why This Minimalist Food Board Is Currently Going Viral

  • 1 cup of assorted nuts (almonds, walnuts, cashews)
  • 1 cup of seasonal fruits (grapes, apple slices, berries)
  • 1 cup of assorted cheeses (cheddar, brie, gouda)
  • 1/2 cup of olives (green and black)
  • 1/2 cup of hummus or dip of choice
  • 1 baguette or artisan bread, sliced
  • Fresh herbs for garnish (optional, such as rosemary or thyme)

The combination of creamy cheeses and crunchy nuts creates the perfect base for this board, while fresh fruits add a touch of sweetness to balance out the savory elements. Don’t skip the herbs—they provide a fragrant aroma and elevate the board’s presentation.

Looking for something similar? Try our easy dirty spaghetti recipe (viral.

For more ideas, check out our viral dirty spaghetti recipe.

You might also enjoy our viral dirty spaghetti.

How To Make Why This Minimalist Food Board Is Currently Going Viral Step by Step

  1. Select a large wooden board or platter to serve as the base for your food board.
  2. Arrange the assorted nuts in a small bowl and place it on one corner of the board.
  3. Wash and prepare the seasonal fruits, then slice or keep them whole, and arrange them artistically on the board.
  4. Cut the cheeses into cubes or wedges, and place them in another section of the board, ensuring a variety of textures and flavors.
  5. Add the olives in a small bowl or directly onto the board, making sure to leave some space for the other elements.
    A beautifully arranged minimalist food board featuring fresh fruits, vegetables, and artisanal cheeses.
  6. Spoon the hummus or dip into a small dish and place it on the board for easy access.
  7. Slice the baguette or artisan bread and arrange the slices around the other ingredients, creating a welcoming display.
  8. Garnish the board with fresh herbs for an added touch of color and aroma.
  9. Serve immediately and encourage guests to mix and match their favorite combinations.

Expert Tips for Perfecting This Viral Food Board

  • Use a mix of textures: Combining crunchy nuts, creamy cheeses, and juicy fruits ensures every bite offers contrast and balance.
  • Keep the arrangement intentional: Group similar items together but leave enough space for everything to stand out visually.
  • Serve at room temperature: Allow the cheeses and dips to sit out for 20-30 minutes before serving for optimal flavor.
  • Choose high-quality bread: A crusty baguette or fresh artisan loaf pairs perfectly with the creamy and savory elements of the board.

Easy Ingredient Swaps

  • Cheeses: Swap out brie or gouda with goat cheese or blue cheese for a tangier flavor profile.
  • Nuts: If you’re out of cashews or walnuts, pistachios or pecans work beautifully as substitutes.
  • Dips: Replace hummus with guacamole, tzatziki, or a creamy spinach dip for a refreshing twist.

Common Mistakes to Avoid

  • Overcrowding the board: Leave a bit of space between each item to give the presentation a clean and organized look.
  • Not balancing flavors: Ensure there’s a mix of sweet, savory, and salty elements to keep your guests’ palates engaged.
  • Skipping the garnish: Fresh herbs may seem like a small detail, but they make the board feel complete and add a pop of color.

FAQ About This Minimalist Food Board

  • Can I make this board ahead of time? Yes, you can prepare the elements a few hours in advance, but wait to assemble the board until just before serving to keep everything fresh.
  • What’s the best way to transport this board? Assemble it at your destination or use a large tray with edges to prevent items from sliding.
  • How do I store leftovers? Store leftover nuts, fruits, and cheese in separate airtight containers in the fridge to keep them fresh.


Why This Minimalist Food Board Is Currently Going Viral

Prep Time 20 minutes
Total Time 20 minutes
Servings 6 servings
Calories 300
This minimalist food board is a delightful and visually appealing way to serve a variety of snacks, perfect for gatherings or casual entertaining.

Ingredients

  • 1 cup assorted nuts (almonds, walnuts, cashews)
  • 1 cup seasonal fruits (grapes, apple slices, berries)
  • 1 cup assorted cheeses (cheddar, brie, gouda)
  • 1/2 cup olives (green and black)
  • 1/2 cup hummus or dip of choice
  • 1 baguette or artisan bread sliced
  • Fresh herbs for garnish (optional, such as rosemary or thyme)

Instructions 

  • Select a large wooden board or platter to serve as the base for your food board.
  • Arrange the assorted nuts in a small bowl and place it on one corner of the board.
  • Wash and prepare the seasonal fruits, then slice or keep them whole, and arrange them artistically on the board.
  • Cut the cheeses into cubes or wedges, and place them in another section of the board, ensuring a variety of textures and flavors.
  • Add the olives in a small bowl or directly onto the board, making sure to leave some space for the other elements.
  • Spoon the hummus or dip into a small dish and place it on the board for easy access.
  • Slice the baguette or artisan bread and arrange the slices around the other ingredients, creating a welcoming display.
  • Garnish the board with fresh herbs for an added touch of color and aroma.
  • Serve immediately and encourage guests to mix and match their favorite combinations.

Notes

Feel free to customize the ingredients based on seasonal availability or personal preferences.
Calories: 300kcal
Cost: $25
Course: Appetizer
Cuisine: International
Keyword: food board

A beautifully arranged minimalist food board featuring fresh fruits, vegetables, and artisanal cheeses.

Loved this recipe? Save it to your favorite Pinterest board so you can easily find it later! ✨


Kbxi8Ipmorx9Pjr9O

Kbxi8Ipmorx9Pjr9O

Kbxi8Ipmorx9Pjr9O is a moist and tender loaf cake featuring the buttery richness of a classic recipe with a subtle nuttiness from optional chopped walnuts. Its delicate crumb pairs beautifully with a hint of vanilla, making it the perfect treat for breakfast or an afternoon snack. Whether enjoyed freshly baked or slightly toasted with butter, this loaf is a satisfying, versatile addition to your baking repertoire.

Table of Contents

Why Make This Loaf

  • Quick and easy preparation: Kbxi8Ipmorx9Pjr9O takes just 15 minutes to prepare and uses basic pantry ingredients. It’s perfect for bakers of any skill level looking for a no-fuss recipe.
  • Perfect for any occasion: This loaf works as a breakfast treat, afternoon snack, or even a sweet gift for a loved one. Its buttery base and nutty optional twist make it universally appealing.
  • Customizable to your taste: Fold in walnuts for a subtle crunch or leave them out for a smooth, classic loaf. Either way, the flavor and texture remain outstanding.
  • Stays fresh: Kbxi8Ipmorx9Pjr9O stays moist and tender for days, making it an excellent make-ahead option. Enjoy it fresh or save some for later—it’s always a crowd-pleaser.

Everything You Need for Kbxi8Ipmorx9Pjr9O

  • 2 cups of all-purpose flour
  • 1 teaspoon baking powder
  • 1/2 teaspoon baking soda
  • 1/4 teaspoon salt
  • 1/2 cup unsalted butter, softened
  • 1 cup granulated sugar
  • 2 large eggs
  • 1 teaspoon vanilla extract
  • 1/2 cup buttermilk
  • 1/2 cup chopped walnuts (optional)

The buttermilk is key to the loaf’s moist and tender crumb, balancing the sweetness with a slight tang. For an extra layer of flavor, the walnuts add a nutty depth and subtle crunch that elevate the texture beautifully.

How To Make Kbxi8Ipmorx9Pjr9O Step by Step

  1. Preheat the oven to 350°F (175°C) and grease a 9×5-inch loaf pan with butter or non-stick spray.
  2. In a medium bowl, whisk together the flour, baking powder, baking soda, and salt until evenly combined. Set aside.
  3. In a large mixing bowl, cream the softened butter and granulated sugar together with a hand or stand mixer until the mixture is light and fluffy, about 2-3 minutes.
  4. Add the eggs one at a time, beating well after each addition to ensure the batter is smooth. Mix in the vanilla extract until fully incorporated.
  5. Gradually add the dry ingredients to the butter mixture, alternating with the buttermilk. Begin and end with the dry ingredients, mixing just until combined after each addition to avoid overmixing.
  6. Fold in the chopped walnuts if using, being careful not to overwork the batter.
  7. Pour the batter into the prepared loaf pan and smooth the top with the back of a spoon or spatula.
  8. Bake for 55-60 minutes, or until a toothpick inserted into the center comes out clean. Check for doneness starting at the 55-minute mark to prevent overbaking.
  9. Let the loaf cool in the pan for 10 minutes before transferring it to a wire rack to cool completely.
A vibrant abstract design featuring the code Kbxi8Ipmorx9Pjr9O

How To Store and Reheat Kbxi8Ipmorx9Pjr9O

Store Kbxi8Ipmorx9Pjr9O in an airtight container at room temperature for up to 3 days. For longer storage, wrap the loaf tightly in plastic wrap and freeze it for up to 3 months.

Reheat individual slices in the microwave for 10-15 seconds or toast them for a slightly crispy edge. Always allow the loaf to cool completely before storing to maintain its texture and flavor.

Expert Tips for Perfect Results

  • Use room-temperature ingredients: Room-temperature butter and eggs mix more evenly, leading to a lighter and fluffier loaf.
  • Don’t overmix the batter: Overmixing can activate gluten in the flour, making the loaf dense rather than tender.
  • Cool completely before slicing: Cutting the loaf while it’s still warm may result in crumbled slices. Let it cool for the best texture.
  • Test for doneness early: Ovens vary, so start checking your loaf at the 55-minute mark to prevent overbaking.

Frequently Asked Questions

  • Can I substitute the buttermilk?
    Yes, you can use 1/2 cup of regular milk mixed with 1/2 tablespoon of vinegar or lemon juice as a substitute for buttermilk. Let it sit for 5 minutes before using.
  • Do I have to add the walnuts?
    No, the walnuts are optional. The loaf turns out equally tender and flavorful without them if you prefer a smoother texture.
  • Can I double the recipe?
    Absolutely! Double all ingredient quantities and divide the batter between two loaf pans. Bake as directed, but check for doneness a few minutes early.


Kbxi8Ipmorx9Pjr9O

Prep Time 15 minutes
Cook Time 1 hour
Total Time 1 hour 15 minutes
Servings 8 servings
Calories 250
This delicious loaf is perfect for breakfast or as a snack, featuring a moist texture and rich flavor.

Ingredients

  • 2 cup all-purpose flour
  • 1 tsp baking powder
  • 1/2 tsp baking soda
  • 1/4 tsp salt
  • 1/2 cup unsalted butter, softened
  • 1 cup granulated sugar
  • 2 large eggs
  • 1 tsp vanilla extract
  • 1/2 cup buttermilk
  • 1/2 cup chopped walnuts (optional)

Instructions 

  • Preheat the oven to 350°F (175°C) and grease a 9x5 inch loaf pan.
  • In a medium bowl, whisk together the flour, baking powder, baking soda, and salt.
  • In a large bowl, cream the softened butter and sugar together until light and fluffy.
  • Add the eggs one at a time, beating well after each addition, then mix in the vanilla extract.
  • Gradually add the dry ingredients to the butter mixture, alternating with the buttermilk, starting and ending with the flour mixture.
  • Fold in the chopped walnuts if using.
  • Pour the batter into the prepared loaf pan and smooth the top.
  • Bake for 55-60 minutes, or until a toothpick inserted into the center comes out clean.
  • Let the loaf cool in the pan for 10 minutes before transferring it to a wire rack to cool completely.

Notes

You can substitute the buttermilk with regular milk mixed with a little vinegar for a similar effect.
Calories: 250kcal
Cost: $10
Course: Breakfast
Cuisine: American
Keyword: loaf cake

A vibrant abstract design featuring the code Kbxi8Ipmorx9Pjr9O

Loved this recipe? Save it to your favorite Pinterest board so you can easily find it later! ✨