I remember the sound of the freezer door sliding open and my youngest giggling as she reached for a tray of bright, jewel-like grapes. The kitchen smelled faintly of lemon and something fruity from a packet that always seemed like a small, secret pleasure. That afternoon felt like a little ritual: quick, colorful, and so easy that everyone could take part. Kool-Aid Grapes are one of those treats that turn ordinary fruit into a shared, joyful moment—one you can make in a spare half hour and enjoy all week.
Why This Kool-Aid Grapes Feels Like Home
There is something about the bright, sweet snap of a frozen grape that reaches back to my childhood. My grandmother kept a tin of Kool-Aid packets in the pantry for surprise treats, and she would let us choose a color when company came. That playful edge is exactly why Kool-Aid Grapes feel like a small celebration in our home.
This recipe is quick, low-mess, and perfect for busy evenings when you want something fun but not fussy. It reminds me of warm summer nights where simple things—kids with pops of color on their lips, the clink of ice in glasses—were all that mattered. Meanwhile, the grapes themselves stay crisp and refreshing, turning store-bought fruit into something that tastes special.
Kool-Aid Grapes are also wonderfully adaptable. Use red grapes for a deep, sunset color or green grapes for a brighter pop. The flavored Kool-Aid coats each grape with an instant nostalgia that makes snack time feel like a tiny party. 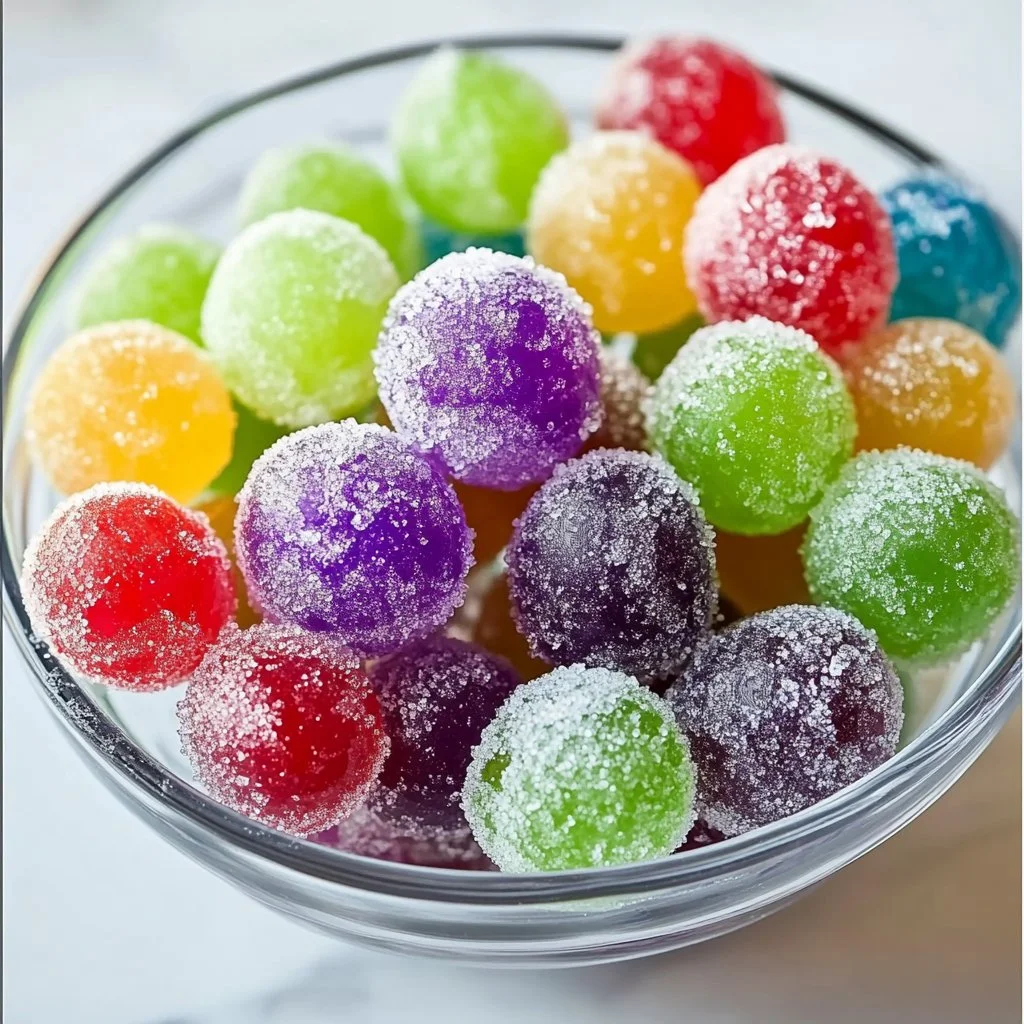
Why Kool-Aid Grapes is Our New Family Favorite
We started making these on a whim one afternoon when the children wanted something sweet after school. It took us less than 20 minutes from start to freezer, and the reward was immediate: excited faces at snack time and a recipe that everyone could help with.
What makes Kool-Aid Grapes work for busy families is how minimal the prep is. There are no complicated steps, no hands-on cooking over heat, and the results are reliable. Once frozen, these grapes last well in the freezer which means you can make a batch and pull a few out as you need them. It’s a treat that stretches through the week and brings a little cheer to ordinary days.
There is also a small teaching moment here. Kids learn about flavors, colors, and the science of freezing. Letting them help dip the grapes is a tactile joy, and the mess from sticky fingers is part of the memory. Give it a try; you might surprise yourself at how many smiles a little colored sugar can buy.
The Simple Magic Behind Kool-Aid Grapes
What’s happening in this recipe is simple and clever. The Kool-Aid provides concentrated flavor and color. The sugar gives it structure so the flavor sticks to the grape. A small amount of water turns the mix into a slurry that clings to the fruit, then freezing locks that flavored coating in place.
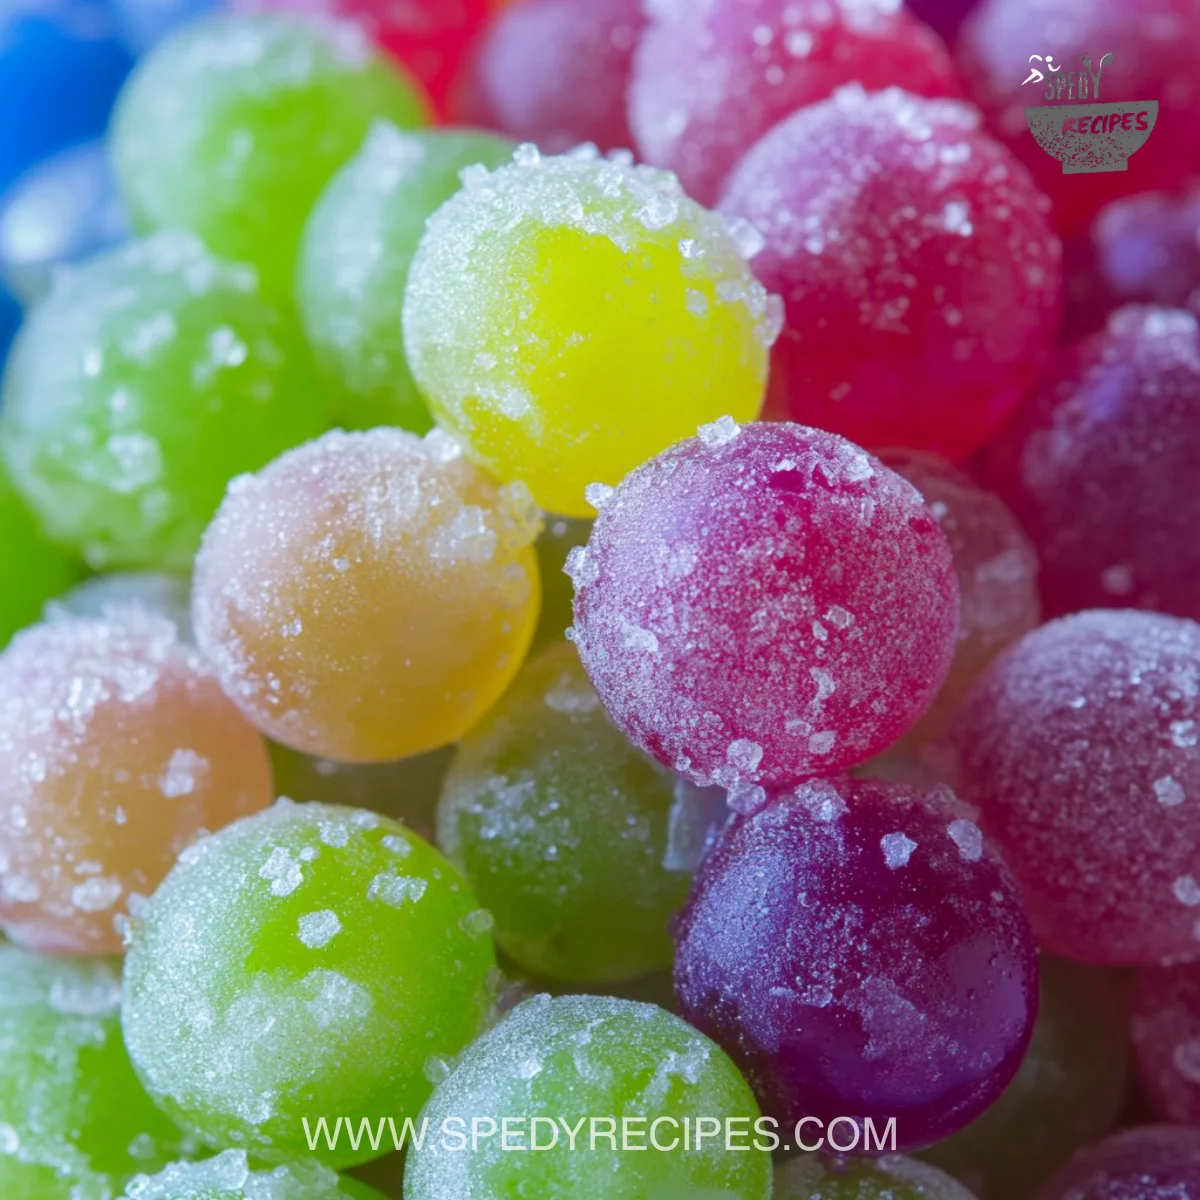
From there, the texture shifts. Fresh grapes are juicy and slightly firm. Once frozen, they become that delightful mix of chew and crunch—almost like a candy with a fruit heart. The bright color changes how we see a simple fruit, making it feel indulgent without adding processed junk. That small transformation is the kind of kitchen magic I love.
Why this matters in a practical sense: it is fast, low-cost, and kid-approved. It makes fruit feel like dessert and gives parents an easy way to add sweetness without full-blown candy. If you want a refreshing, portable snack that travels well to picnics or after-school soccer, Kool-Aid Grapes are a winner.
How to Make Kool-Aid Grapes, The Heartwarming Way
Step-by-step, the method is forgiving and fun. You do not need special equipment—just a bowl, a tray, and patience for the freezer. I like to have the kids help with the coating because stirring and dipping is the best part for them. And if you’re doing this with friends or family, the process becomes social like a little assembly line.
“This is where the magic happens—when the aroma fills the kitchen and my kids come running in, asking ‘Is it ready yet?’”
Take note of how the grapes should look after coating. The slurry will cling to them in a thin layer that dries into a sweet shell as it freezes. Color cues are handy: a bright purple for grape Kool-Aid, rosy pinks for strawberry, and neon yellow for citrus flavors. Texture cues are just as helpful: grapes should be firm before coating and frozen solid before serving.
Step-by-Step Overview: Keeping It Simple
Here’s the quick view so you can see how little time it takes. Wash, mix, dip, freeze, and enjoy. No hot pots, no long simmering. If you are making a big batch, use two trays and rotate them in the freezer so they freeze evenly. If kids are around, hand them tongs or a fork for dipping—it’s safe and they love it.
Ingredients You’ll Need
What goes into the recipe is short and simple. Gather this before you start so the process flows and you can enjoy the making as much as the eating.
- 1 pound of green or red grapes
- 1 package of Kool-Aid mix (any flavor)
- 1 cup of sugar
- Water
A friendly note from my kitchen: use firm, juicy grapes and rinse them carefully. If your grapes are small, they become perfect bite-size frozen treats. If they are large, they are still great and feel more like a dessert. Use what you have and let the kids pick the Kool-Aid packet for an extra bit of fun. Do not skip the rinse—clean fruit is essential and it helps the coating stick better.
Step-by-Step Directions
-
Wash the grapes thoroughly and remove the stems.
Rinse them under cool water and give them a gentle shake to dry. Removing stems makes them easy to eat and helps keep the coating consistent.
-
In a bowl, mix the Kool-Aid powder and sugar together.
Use a whisk or fork to break up any clumps. This is where kids can help; they love mixing bright powders.
-
Add a small amount of water to the dry mixture, just enough to create a slurry.
Add water slowly—think tablespoons at a time—until you have a syrupy paste. It should coat but not drown the grapes.
-
Dip the grapes into the Kool-Aid mixture, making sure they are well-coated.
Use a fork or tongs to lift each grape, shake off excess, and place it on the tray. If you like a thicker coating, dip twice once the first layer sets.
-
Place the coated grapes on a baking sheet lined with parchment paper.
Spread them in a single layer so they do not stick together. Parchment helps with removal and cuts down on cleanup.
-
Freeze the grapes for at least 2 hours before serving. Enjoy as a sweet and tangy snack!
Once frozen solid, transfer them to a freezer-safe bag for longer storage. The first bite is the best part—cold, slightly crisp, and bursting with flavor.
Quick tip from my experience: If you see small drips of Kool-Aid pooling on the tray, gently blot them with a paper towel; that helps keep the coating neat. And if the slurry seems too thin, add a little more sugar—this balances the stickiness for better frozen texture.
Serving Kool-Aid Grapes with Love
When we serve Kool-Aid Grapes, we put a bowl in the center of the table and let everyone reach in. They go beautifully next to simple sandwiches, a platter of cheese, or a scoop of plain yogurt for dipping. In my house, they often end up as the sweet finish after a weekday dinner.
I like to use a shallow bowl so the grapes are easy to grab. Adding a small dish of plain Greek yogurt or mascarpone on the side can make the plate feel a bit more grown-up. For kids, a small paper cup each keeps things tidy and cheerful. 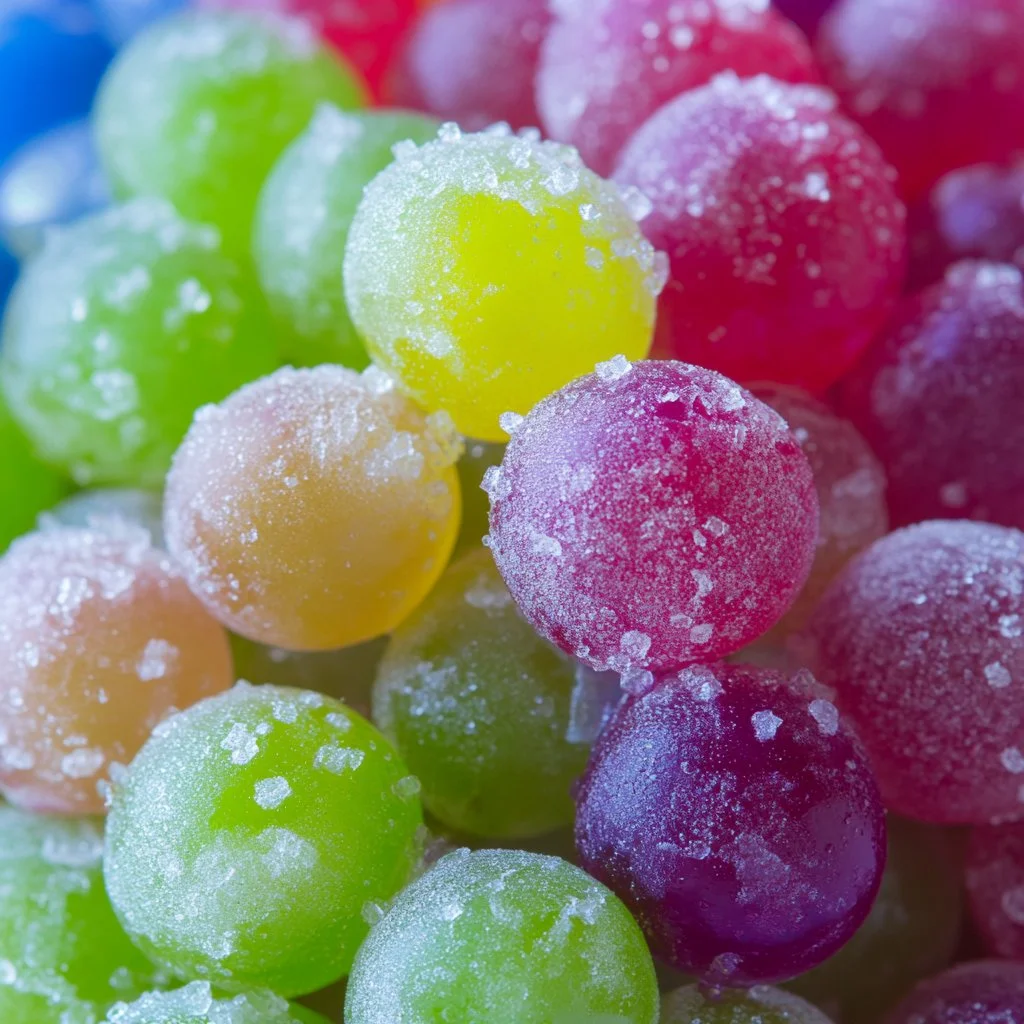
Sometimes we make a little charcuterie-style snack by pairing Kool-Aid Grapes with crackers and mild cheeses. The tartness and color lift the whole board. Other times, they are the star: a frozen, fruity treat passed around after soccer practice that cools everyone down and brings a little happiness.
Storage & Reheat Tips (Keeping the Goodness)
Kool-Aid Grapes are forgiving in the way they store. The freezer is their friend.
- Short term: keep them in a single layer on a tray in the freezer for two hours, then move them to a freezer bag. This prevents big clumps.
- Long term: stored in an airtight bag or container, they will keep well for up to 3 months. After that, they are still edible but lose some of their bright texture.
- Thawing: if you like them slightly softened, leave them at room temperature for 5 minutes. For a faster thaw, the microwave is fine for 10-15 seconds, but I prefer thawing because microwave heat can make them lose some of their crispness.
Honest note: there is no real "reheat" here. These are meant to stay frozen. If you try to warm them, they will turn into a syrupy snack rather than a crisp treat. Embrace the cold and serve them straight from the freezer for the best texture.
My Kitchen Notes & Shortcuts
- Buy seedless grapes for the easiest snacking experience. Seedless grapes also freeze more pleasantly.
- If you want a slower, cleaner coating, chill the grapes in the fridge for 30 minutes before dipping. Cooler grapes help the slurry set faster.
- For less sugar, use half the sugar and a bit more Kool-Aid powder. The texture will be slightly different but still tasty.
- Use a fork and a tray with parchment or silicone mats for very quick cleanup.
- Make it a family event: hand the kids tongs or let them sprinkle the sugar. The little hands-on moments become part of the recipe’s memory.
These are practical shortcuts that save time and keep the making joyful. I often pre-measure the mix and sugar in a small bowl so the process feels like a quick ceremony rather than a chore.
Family-Friendly Variations
There are so many ways to play with this idea without complicating things.
- Lighter version: reduce sugar to 1/2 cup and add a splash of lemon juice to brighten the flavor.
- Extra tang: mix a bit of citric acid or powdered lemonade Kool-Aid for a tart pop.
- Mix-and-match packs: use two different Kool-Aid packets for a multicolored bowl that looks festive.
- Add texture: toss in a few mini marshmallows for kids after serving for a short-lived fluff contrast.
- Theme bowls: make a red theme with cherry or strawberry Kool-Aid for birthday parties, or a summer citrus mix for pool days.
The invitation here is to experiment. Start with the basic recipe and riff from there. You can create a signature family version that always makes everyone smile.
FAQs About Kool-Aid Grapes
Can I make this ahead for a busy week?
Absolutely. Make a full tray and store the grapes in a freezer bag. They are easy to grab for after-school snacks or a quick dessert. They stay best if moved to a bag after they are fully frozen.
Are any Kool-Aid flavors better than others?
Pick what your family likes. Classic grape is nostalgic, but cherry, strawberry, and tropical punch are fun too. If you want less artificial color, choose lighter flavors or reduce the Kool-Aid amount.
Will the coating fall off when frozen?
If you mix the slurry thick enough and allow the grapes to freeze solid, the coating adheres well. If it gets too thin, add a touch more sugar to help it stick.
Is this healthy?
This is a treat. Using real fruit as the base is a plus, and you can reduce sugar if you prefer. For an even fresher version, try a light dusting instead of a thick coat. Balance it with whole meals during the day.
Can I use other fruit?
Yes. Blueberries and small chunks of pineapple can work, but grapes are ideal because of their size, texture, and natural sweetness.
One Final Thought from My Kitchen
Making Kool-Aid Grapes feels like making small moments. It is one of those recipes that is quick enough for the weekday and charming enough for the weekend. I hope you try it with your family and that it becomes one of those easy, colorful treats everyone asks for.
I love how something so simple can pull people together—a small bowl on the table, sticky little fingers, and laughter as everyone reaches in. If this recipe finds its way into your home, then a bit of my kitchen’s joy has made it to yours.
Conclusion
If you want to pick up the exact grape-flavored mix I reach for when I write about these memories, you can find it through this retailer: Kool-Aid Grape Unsweetened Drink Mix Same-Day Delivery or Pickup. For another version of this idea and a nostalgic recipe note, see this collection here: Kool-Aid Grapes | Punchfork.
Thank you for letting me share this little recipe. Give it a try and let the kids help—the smiles are worth the sugar. Happy cooking and happy snacking.
Kool-Aid Grapes
Ingredients
Main Ingredients
- 1 pound green or red grapes Use firm, juicy grapes for the best texture.
- 1 package Kool-Aid mix (any flavor) Choose your favorite flavor for a fun variation.
- 1 cup sugar Adjust for a lighter version if desired.
- as needed amount water Add slowly to create a syrupy slurry.
Instructions
Preparation
- Wash the grapes thoroughly and remove the stems.
- Rinse them under cool water and give them a gentle shake to dry.
- In a bowl, mix the Kool-Aid powder and sugar together. Use a whisk or fork to break up any clumps.
- Add a small amount of water to the dry mixture, just enough to create a slurry.
Coating
- Dip the grapes into the Kool-Aid mixture, ensuring they are well-coated.
- Place the coated grapes on a baking sheet lined with parchment paper in a single layer.
Freezing
- Freeze the grapes for at least 2 hours before serving.
- Once frozen solid, transfer them to a freezer-safe bag for longer storage.