I can still hear the clink of spoons against the old glass dish as my kids tiptoed in, drawn by the sweet, warm smell of vanilla and bananas. My grandmother kept her recipe card folded in her apron pocket, the edges soft from years of sticky fingers and kitchen laughter. Today, that same scent means comfort, and when I pull a spoon through a layer of wafer-crisp and custard-silky banana pudding, everyone gathers—no fuss, just smiles and small talk about whose turn it is to do the dishes.
Why This Old-Fashioned Homemade Banana Pudding – Southern Comfort at Its Sweetest Feels Like Home
This banana pudding feels like home because it folds simple, honest ingredients into something that smells like family. The vanilla custard warms the kitchen, while fresh bananas bring a mellow sweetness that kids and grandparents both love. It is a dessert that invites conversation and remembering.
Meanwhile, the recipe is forgiving. You can make the custard on the stovetop without a mixer, and the layers will come together even if your bananas are not picture-perfect. I often pair this with easy weekday dinner sides, much like the way I pair hearty soups with flaky biscuits. If you ever want to explore different meal ideas alongside this dessert, take a peek at a quick guide to fresh, pantry-friendly sandwiches like these pita pocket recipes for simple weeknight feeding.
Why Old-Fashioned Homemade Banana Pudding – Southern Comfort at Its Sweetest is Our New Family Favorite
This recipe quickly became our favorite because it can be both a company-worthy dessert and a no-fuss family treat. It checks all the boxes: creamy, cool, golden custard, soft bananas, and the playful crunch of vanilla wafers. Kids love assembling the layers. Adults love the nostalgia and the balance of textures.
From experience, the best versions are the ones where you let the pudding rest long enough for the wafers to soften a bit but not so long that everything turns mushy. That pause—while the dessert chills—gives everyone time to clear the table and set the mood for relaxed eating. If you like desserts that are comforting and return-warm later, this one holds up nicely.
The Simple Magic Behind Old-Fashioned Homemade Banana Pudding – Southern Comfort at Its Sweetest
“This is where the magic happens—when the aroma fills the kitchen and my kids come running in, asking ‘Is it ready yet?’”
The magic is in the custard. It starts bright and milky and ends glossy and thick. Look for a pale yellow color and a consistency that coats the back of a spoon. The wafers should be slightly softened after chilling, and the banana rounds should still be visible and not completely turned into jam.
Once cooled, the custard will firm up a touch. If it separates or looks curdled, a quick whisk over low heat brings it back to smoothness. That simple touch is the kind of kitchen trick my grandmother taught me and one I now share with friends.
How to Make Old-Fashioned Homemade Banana Pudding – Southern Comfort at Its Sweetest, The Heartwarming Way
This is an easy, step-forward recipe that rewards attention, not talent. You make the custard gently on the stove, temper in the eggs so they do not scramble, and assemble in layers. The colors should be creamy pale yellow, soft banana beige, and the golden brown of a small oven-top browning if you choose to add meringue.
Next up, set aside enough time for chilling if you want the clean slices; if you are short on time, serve it warm and rustic straight from the dish. Either way, the taste is homey and satisfying.
Ingredients You’ll Need
- 4 ripe bananas (sliced into 1/4-inch rounds)
- 2 1/2 cups whole milk
- 3 large eggs (separated)
- 3/4 cup granulated sugar
- 2 tablespoons unsalted butter
- 1/2 teaspoon vanilla extract
- 3 tablespoons all-purpose flour
- 1/8 teaspoon salt
- 1 box vanilla wafers (about 45–50 wafers)
- Optional: Whipped cream or meringue for topping
A friendly note: ripe bananas give the best flavor, but if yours are very spotted, slice them last to keep the color pretty. And remember, this recipe is more about heart than perfection—swap the wafers for your favorite cookie if that’s what you have on hand. If you enjoy baking sweet breads and muffins, you might like to try a similar flavor pairing with these banana pumpkin muffins on a chilly morning.
Step-by-Step Overview: Keeping It Simple
Step 1: Prepare the Custard
- In a medium saucepan, whisk together 2 cups of milk with the flour and salt until smooth.
- Warm over medium heat, stirring constantly, until it thickens slightly and coats the spoon.
- Remove from heat and stir in butter and vanilla to melt and brighten the flavor.
Step 2: Temper the Eggs
- In a bowl, whisk the egg yolks with 1/4 cup sugar until pale.
- Slowly add about 1/2 cup of the hot milk mixture to the yolks, whisking constantly to avoid cooking the eggs.
- Return the tempered yolk mixture to the saucepan and cook briefly over low heat until thick and glossy.
Step 3: Layer the Pudding
- In a 9×13 dish, lay down a single layer of vanilla wafers, add a layer of banana slices, then pour a layer of warm custard.
- Repeat the layers, finishing with custard on top to seal everything in.
- Smooth the top and let it cool slightly before chilling or adding a topping.
Step 4: (Optional) Top with Meringue or Whipped Cream
- For meringue: beat the egg whites with the remaining 1/2 cup sugar to stiff peaks, spread over the warm custard, and brown quickly under a broiler or with a kitchen torch.
- For whipped cream: whip heavy cream with a tablespoon sugar and a splash of vanilla, then dollop on top before serving.
Step 5: Chill or Serve Warm
- Chill the assembled pudding for at least 2 hours for neat slices and softer wafers.
- Serve warm if you prefer a rustic scoop—both ways bring great comfort.
A quick tip from my kitchen: have the kids place the wafer layer. They feel proud, and it keeps tiny hands busy. Also, if you see the custard thinning as you cook, a little extra gentle heat and steady whisking will bring it back. For a sweet biscuit to serve alongside, try making a small batch of spiced apple pie biscuits for a lively contrast to the pudding in texture and spice.
The Cooking Process, Made Joyful
The process should feel like a relaxed conversation with your stove. Stir patiently, taste carefully, and let the pudding cool before you decide whether it needs a touch more vanilla. Look for glossy custard and bananas cut in crisp rounds; that visual will tell you the dessert is coming together.
Once the meringue goes on, it transforms the dessert into something celebratory. If you choose whipped cream, add it just before serving to keep it fresh and light. The whole thing is easier than it looks, and the aroma makes the wait worth it.
Preparing Old-Fashioned Homemade Banana Pudding – Southern Comfort at Its Sweetest Without the Stress
Make the custard ahead and cool it in the refrigerator. Store the bananas sliced in lemon water for a few minutes so they keep their color until you layer. Assemble an hour before guests arrive for a fresh look with a little set time.
This recipe fits well into weekend plans because you can break it into parts: custard on Saturday, assembly Sunday. Or treat it like a midweek delight—custard in the evening and assemble after dinner for tomorrow’s sweet finish.
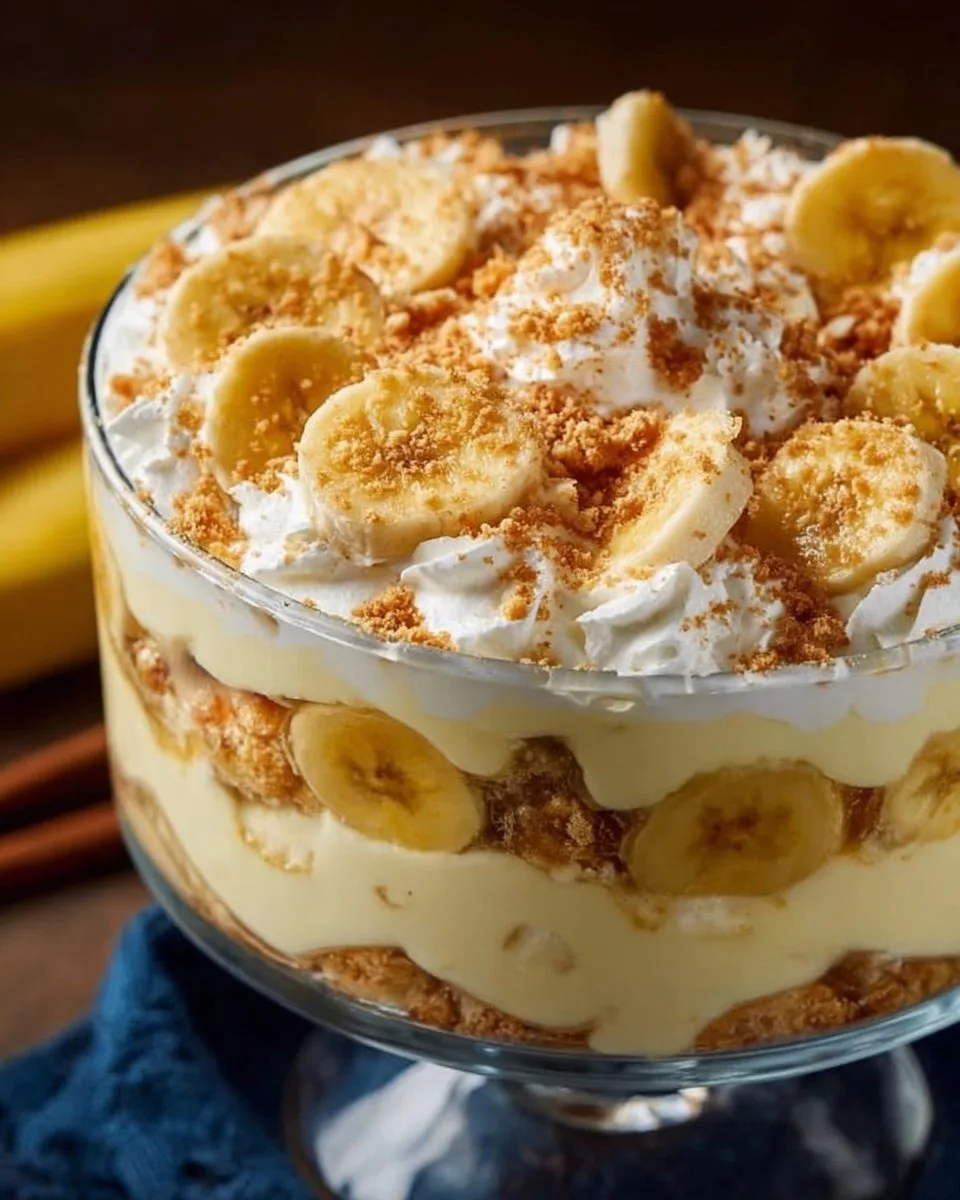
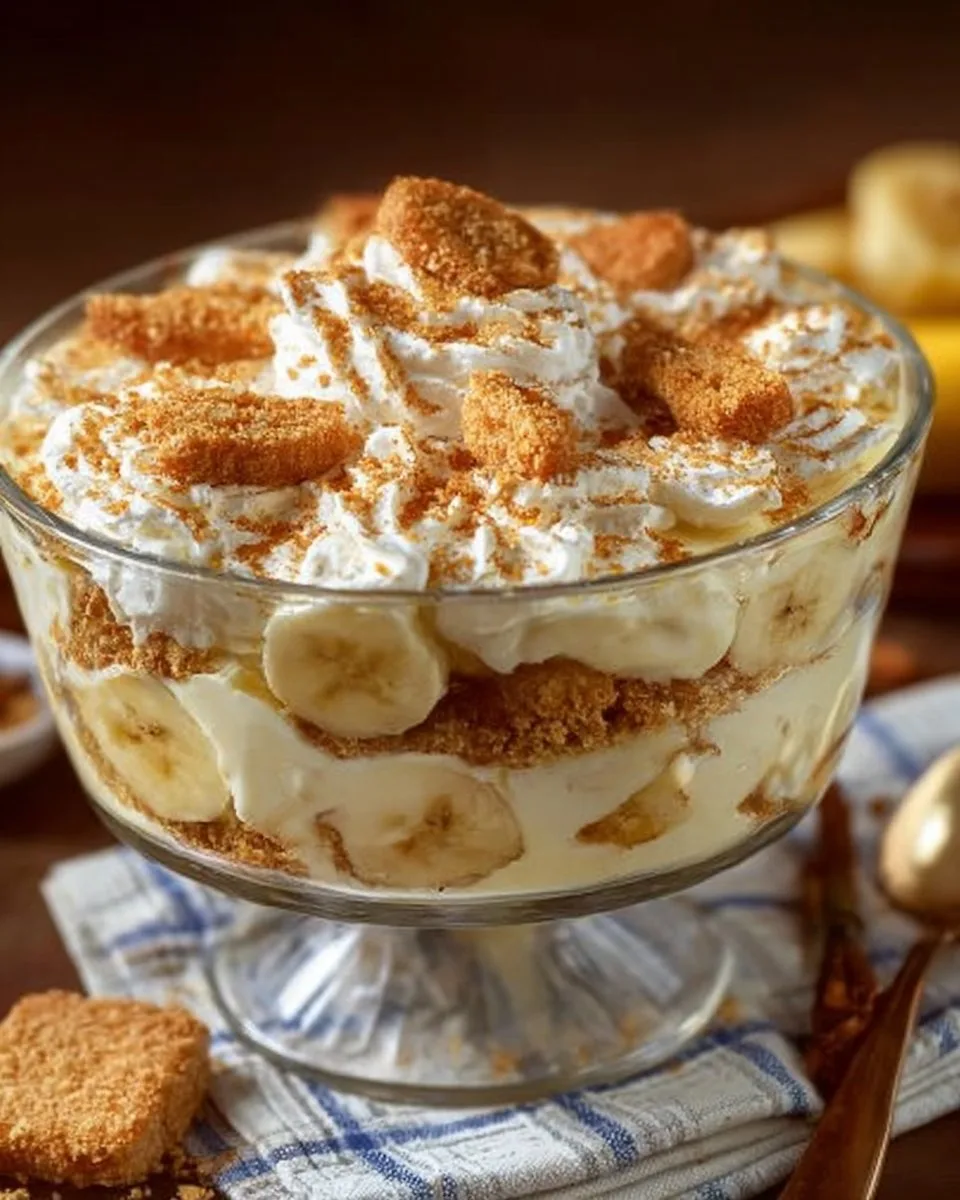
Serving Old-Fashioned Homemade Banana Pudding – Southern Comfort at Its Sweetest with Love
We serve this pudding family-style in the middle of the table, everyone with a small bowl and a spoon, passing plates for seconds. Sometimes I add a drizzle of caramel on top for those who want extra sweetness, or a sprinkle of chopped toasted pecans for crunch.
Often, one child will ask for extra wafers, another for more custard on the side. That’s the charm: it’s flexible. Pair it with a simple cup of coffee for adults or a cold glass of milk for kids and watch the small rituals begin. Before we move to the FAQ, here’s a little visual cue we always include when we set the dish out.
Storage & Reheat Tips (Keeping the Goodness)
Leftover banana pudding keeps well for a day or two in the fridge. Cover it tightly so the bananas do not brown too much and the custard does not absorb fridge smells.
For a quick warm-up, the microwave works for single servings—heat gently to avoid watering out the custard. For a fuller revival, place the dish in a low oven, covered, to bring back gentle warmth without drying. If you plan to keep it longer, separate the custard and bananas: custard freezes best in a shallow, airtight container, but textures change after thawing.
If you like planning meals and making the most of your fridge, this dessert pairs well with meal-prep ideas and easy breakfasts, though it’s not a breakfast itself. For inspiration on planning ahead, you might enjoy some fresh-start meal planning tips like those in a simple 7-day juice fast guide, which shows how a little prep goes a long way.
My Kitchen Notes & Shortcuts
- Use what you have: If you lack vanilla wafers, try a similar crunchy cookie. The heart of the dish is the custard and banana.
- Prep ahead: Make the custard a day ahead. It saves time and deepens flavor.
- Kid-friendly step: Let the kids layer the wafers and bananas. It’s an easy job and makes them proud.
- Texture tip: If you like a firmer custard, cook it a bit longer until it coats the spoon well. For silkier custard, take it off the heat sooner.
- Swap safely: Use 2% milk for a lighter version, though whole milk gives the best creamy mouthfeel.
These shortcuts keep flavor and cut stress. I learned them when company was on the way and I realized both comfort and speed matter.
Family-Friendly Variations
- Lighter option: Use 2% milk and swap whipped cream for a dollop of Greek yogurt sweetened with a touch of honey.
- Chocolate twist: Add a thin layer of chocolate pudding or drizzle melted chocolate between layers for a grown-up touch.
- Tropical version: Replace vanilla wafers with toasted coconut flakes for a nutty, island feel.
- Nutty upgrade: Sprinkle chopped pecans between layers to add crunch and a toasty flavor.
- No-bake meringue-free: Top with chilled whipped cream if you prefer to skip baking or broiling.
These ideas invite your family to add their own notes to the recipe. Play with textures and toppings and watch the dessert become part of your family’s story.
FAQs About Old-Fashioned Homemade Banana Pudding – Southern Comfort at Its Sweetest
Can I make this ahead for a busy week?
Absolutely. Make the custard a day ahead and slice the bananas just before assembly for the best color. The flavors mingle beautifully when given time.
What if my custard looks lumpy or curdled?
Don’t worry. Return it to low heat and whisk gently until smooth. A little patience brings it back together.
How ripe should the bananas be?
They should be ripe but not overripe. Look for spots for more sweetness, but avoid fully black bananas that will turn mushy quickly.
Can I skip the eggs?
You can use a cornstarch-thickened pudding if you prefer an eggless version. It will be different in richness but still tasty.
How long will leftovers last?
Keep covered in the fridge for 1 to 2 days. The texture will slowly change, so fresh is best.
One Final Thought from My Kitchen
This banana pudding is about more than a dessert. It’s a reason to gather, to pass spoons, to make small memories. It’s the kind of recipe that shows up on Sundays and on ordinary Tuesdays because comfort does not ask for a special occasion.
Until next time, give it a try—let the kids help, and if it gets a little messy, that’s part of the story. I hope this recipe finds its way into your family’s laughter and small rituals. If it does, know that somewhere a grandmother is smiling.
Conclusion
If you want another version without meringue, take a look at this friendly guide to Southern Old Fashioned Banana Pudding – Farm to Jar for a straightforward take.
For a classic, step-by-step how-to with lots of helpful photos, try this clear recipe at Homemade Banana Pudding-Classic Southern Recipe with … that walks through custard tips.
If you prefer a baked spin with a browned top, this version offers that Southern touch: Southern-Style Baked Banana Pudding Recipe.
For another easy home cook’s approach to creamy banana pudding, see Easy Homemade Banana Pudding | 365 Days of Baking and More.
Finally, if you love old fashioned recipes and regional notes, this piece gives a lovely, traditional perspective: Old Fashioned Banana Pudding – Southern Bite.

Old-Fashioned Homemade Banana Pudding
Ingredients
For the Custard
- 2.5 cups whole milk
- 3 large eggs (separated) Keep yolks and whites separate.
- 3/4 cup granulated sugar Divide sugar for custard and meringue/whipped cream if used.
- 2 tablespoons unsalted butter To enhance the custard flavor.
- 1/2 teaspoon vanilla extract
- 3 tablespoons all-purpose flour For thickening the custard.
- 1/8 teaspoon salt
For Assembling
- 4 ripe bananas (sliced into 1/4-inch rounds) Ripe bananas give the best flavor.
- 1 box vanilla wafers (about 45–50 wafers) Can be swapped for any preferred cookie.
Optional Toppings
- 1/2 cup whipped cream For topping.
- 1/2 cup granulated sugar For meringue if used.
Instructions
Preparation of Custard
- In a medium saucepan, whisk together 2 cups of milk with the flour and salt until smooth.
- Warm over medium heat, stirring constantly, until it thickens slightly and coats the spoon.
- Remove from heat and stir in butter and vanilla to melt them.
Tempering the Eggs
- In a bowl, whisk the egg yolks with 1/4 cup sugar until pale.
- Slowly add about 1/2 cup of the hot milk mixture to the yolks, whisking constantly to avoid cooking the eggs.
- Return the tempered yolk mixture to the saucepan and cook briefly over low heat until thick and glossy.
Layering the Pudding
- In a 9×13 dish, lay down a single layer of vanilla wafers, add a layer of banana slices, then pour a layer of warm custard.
- Repeat the layers, finishing with custard on top to seal everything.
- Smooth the top and let it cool slightly before chilling or adding toppings.
Topping (Optional)
- For meringue: beat the egg whites with the remaining 1/2 cup sugar to stiff peaks, spread over the warm custard, and brown quickly under a broiler.
- For whipped cream: whip heavy cream with a tablespoon sugar and a splash of vanilla, then dollop on top before serving.
Serving
- Chill the assembled pudding for at least 2 hours for neat slices and softer wafers or serve warm if preferred.