There’s something magical about the familiar sounds that fill our kitchen during preparation for a family feast. The rhythmic clinking of cutlery and the giggles of my kids finding their seats brings warmth to my heart. As comforting aromas fill the air, I can almost hear the laughter of generations before me, reminding me of family gatherings, love, and the joy of sharing good food. Today, we’re diving into a special treat: Peanut Butter Easter Eggs, a recipe that’s perfect for celebrating togetherness and sweet indulgence.
Why This Peanut Butter Easter Eggs Feels Like Home
Peanut Butter Easter Eggs hold a special place in my family’s heart. It’s not just about the delicious flavors but also about what the process brings. This recipe takes me back to my childhood, where the kitchen was often a hub of laughter, storytelling, and creativity. It was here that we would craft delicious treats together, each bite stirring up family memories.
As a busy mom, I know the whirlwind that is life, especially with kids buzzing around. Yet, making these Peanut Butter Easter Eggs feels like a warm hug at the end of a long day. They come together quickly and require minimal cleanup, allowing us to focus on what truly matters—family connection.
Why Peanut Butter Easter Eggs is Our New Family Favorite
When it comes to family favorites, Peanut Butter Easter Eggs ranks high for several reasons. First, kids love them. The creamy peanut butter and chocolate combination is irresistible, capturing their hearts (and taste buds) every time. Moreover, making these eggs together becomes a family affair—my kids love helping shape the eggs and getting creative with the toppings.
This delightful dessert isn’t just for Easter. It’s a year-round treat that allows us to embrace moments of sweetness, whether it’s a holiday, a simple family dinner, or just because. The simplicity of this recipe, combined with the joy it brings, makes it a cherished tradition in our home.
The Simple Magic Behind Peanut Butter Easter Eggs
As a passionate home cook, I appreciate recipes that are both straightforward and magical. Peanut Butter Easter Eggs strike that balance beautifully. At the heart of this recipe is the creamy peanut butter that blends perfectly with a hint of sweetness from maple syrup. Together, these ingredients create a rich, smooth filling that’s hard to resist.
Crafting these treats can feel daunting, but I promise you, it’s easier than it looks. You’ll see the transformations from simple ingredients to delightful creations. It’s these little moments where the magic truly happens, awakening the joys of cooking together.
Why This Recipe Works for Our Busy, Joyful Nights
When the dinner hour rolls around in our household, the last thing I want is to feel overwhelmed. That’s where this recipe shines. It’s straightforward yet impressively delicious, meaning I can whip them up quickly during the week or save them for a special weekend treat.
As we gather around the dinner table, the excitement is palpable. The table is laid out family-style, and even my pickiest eater gets swept up in the moment when they see the colorful options. The joy comes not just from eating but from sharing these special moments together, and Peanut Butter Easter Eggs are a delicious part of that experience.
How to Make Peanut Butter Easter Eggs, The Heartwarming Way
Creating Peanut Butter Easter Eggs is a delightful process that invites you and your loved ones into the kitchen. It’s a chance to bond over measuring ingredients and shaping the ovals into perfect egg shapes. You’ll find that the texture is wonderfully creamy inside, while the outside offers a delightful crunch thanks to the chocolate coating.
“This is where the magic happens—when the aroma fills the kitchen and my kids come running in, asking ‘Is it ready yet?’”
Gather together and let’s jump into this simple, joyful cooking process that will leave everyone smiling.
Step-by-Step Overview: Keeping It Simple
-
Mixing It Up: In a mixing bowl, beat together the peanut butter, maple syrup, powdered sugar, almond flour, vanilla extract, and pinch of salt until they are well combined. It should be creamy with a smooth texture.
-
Portioning: Portion the peanut butter filling into 2-tablespoon sized portions. Roll each portion into a ball, then shape it into an oval, resembling an egg shape, using your hands.
-
Freezing: Place the shaped eggs on a parchment paper-lined baking sheet and pop them in the freezer while you prepare the coating. This helps them set nicely and makes coating easier.
-
Preparing the Coating: In a small bowl, whisk together cocoa powder and water, setting it aside. In a microwave-safe bowl, combine the white chocolate melting wafers and coconut oil. Microwave in 15-20 second intervals, stirring well between each interval, until completely melted.
-
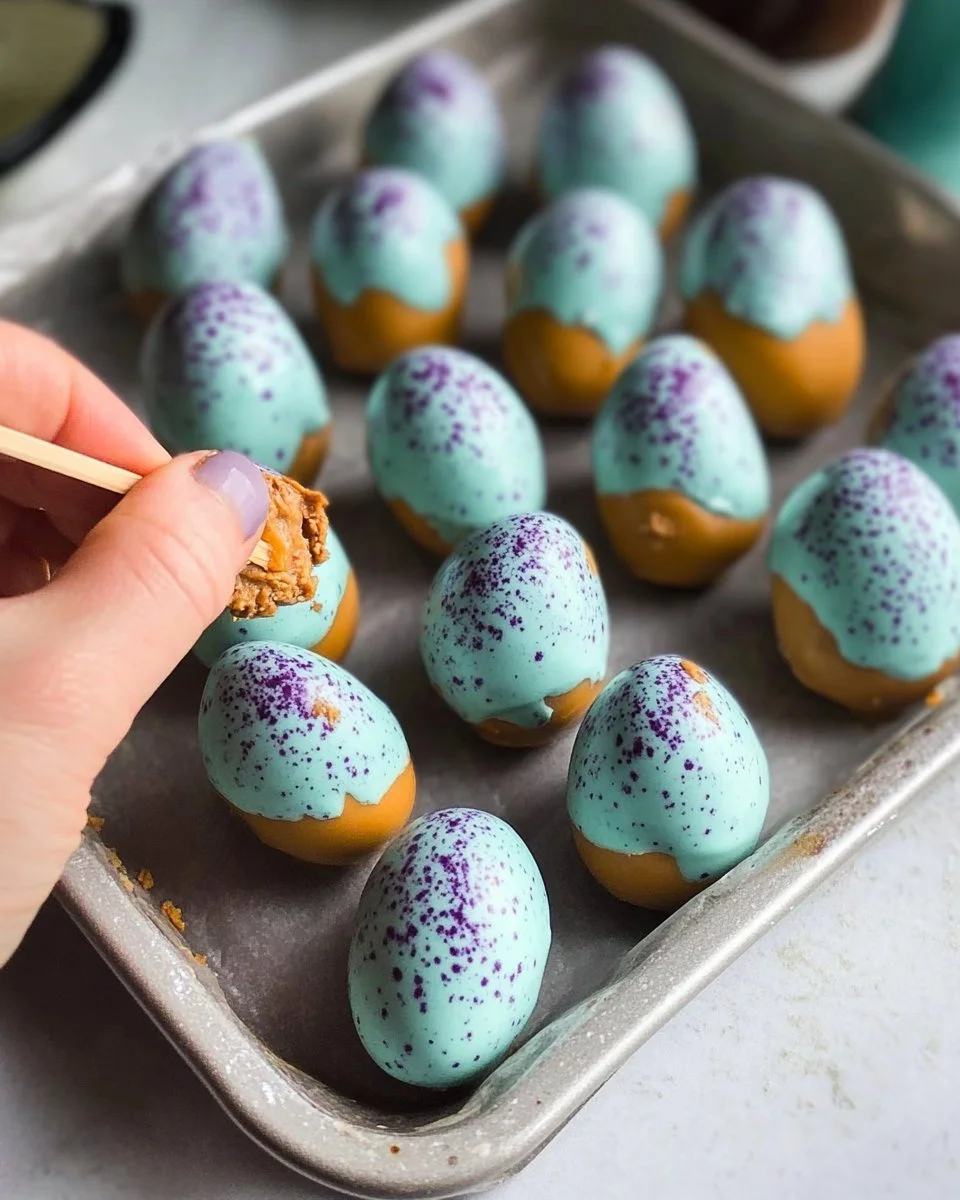
Coloring: Once melted, mix in the spirulina and matcha, or your preferred food coloring, adjusting colors as desired.
-
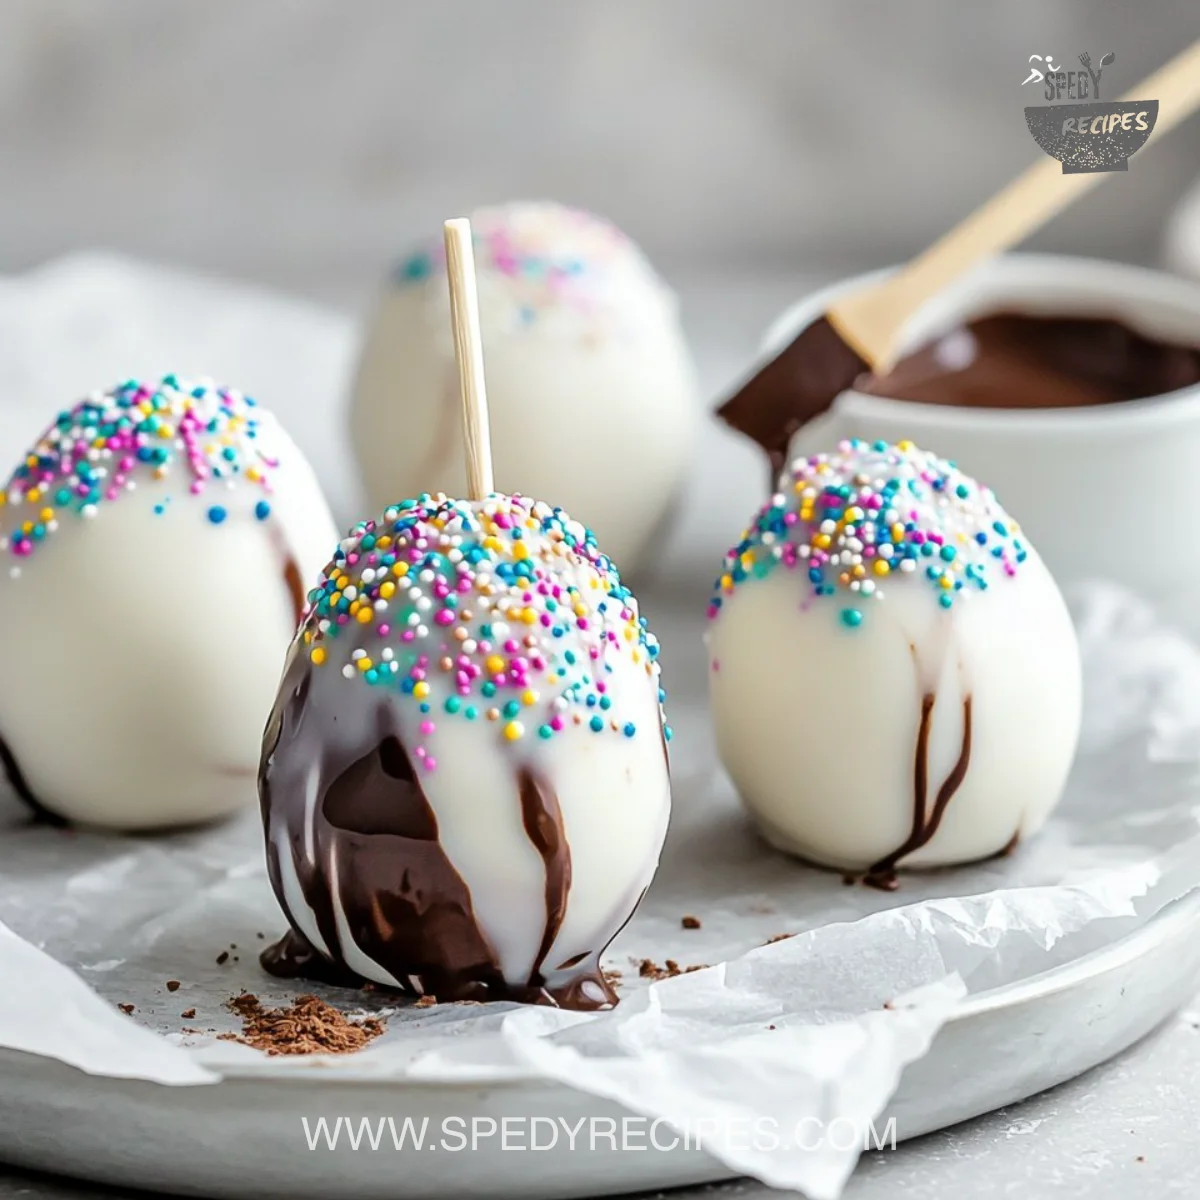
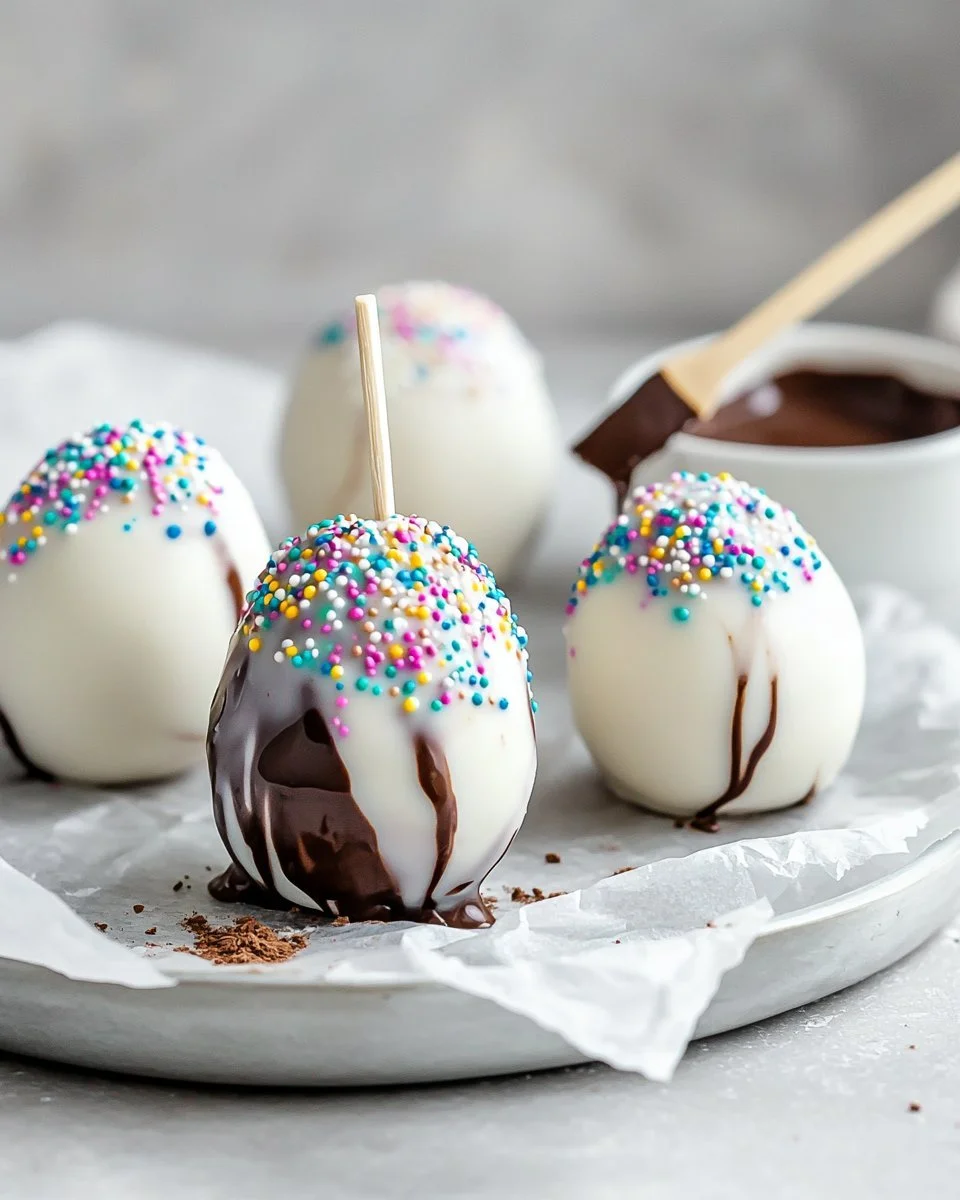
Dipping: Coating works best when the eggs are semi-frozen. Insert a toothpick into the bottom of an egg, dip it into the white chocolate mixture, and let the excess drip off. Allow the chocolate to firm up slightly before placing it back on the parchment paper. Remove the toothpick gently to avoid cracking.
-
Creating Speckles: To add delightful speckles, dip a pastry brush into the cocoa powder and water mixture, holding it above the baking sheet flicking the brush tip to create those cute, little dots. Get messy here and enjoy!
-
Chilling: A quick trip to the fridge will help the chocolate set and dry out—about 10 minutes does the trick.
Each step brings you closer to creating a treat that’s perfect for any occasion, and don’t worry—cooking is all about having fun!
Ingredients You’ll Need
To make these scrumptious Peanut Butter Easter Eggs, gather the following ingredients:
- 1 1/4 cup natural, runny peanut butter (no sugar added)
- 1/4 cup maple syrup
- 1/4 cup powdered sugar
- 1/3 cup almond flour
- 1/2 teaspoon vanilla extract
- Pinch of salt
- 8 ounces white chocolate melting wafers (I love to use the Ghirardelli brand)
- 2 teaspoons coconut oil
- 1/2 teaspoon blue spirulina + 1/4 teaspoon matcha powder (or use a 2:1 ratio of any blue and green food dye)
- For the speckles: 1 teaspoon cocoa powder + 1 tablespoon water
These ingredients create a creamy, tasty filling enveloped in a rich chocolate exterior that kids and adults love.
Don’t hesitate to swap ingredients based on your preferences. It’s about making it yours, and I encourage you to use what’s available in your kitchen.
Step-by-Step Directions
-
In a mixing bowl, beat together the peanut butter, maple syrup, powdered sugar, almond flour, vanilla extract, and salt until well combined.
-
Portion the peanut butter filling into 2-tablespoon portions. Roll each one into a ball using your hands, then shape the ball into an oval (egg-shaped) form.
-
Place on a parchment paper-lined baking sheet and freeze while you prepare the coating.
-
In a small bowl, whisk together the cocoa powder and water and set aside.
-
Add the white chocolate melting wafers and coconut oil to a microwave-safe bowl. Microwave in 15-20 second intervals, stirring well between each interval, until fully melted.
-
Whisk in the spirulina and matcha (or food coloring) and adjust colors as desired. Then, pour the mixture into a short drinking glass or similar vessel.
-
Stick a toothpick in the bottom of an egg, then dip it in the white chocolate. Let the excess chocolate drip off. Wait until the white chocolate is mostly hardened, then return the egg to the parchment paper and immediately remove the toothpick. If you wait too long, the coating may crack.
-
To make the speckles, dip a pastry brush in the cocoa powder/water mixture. Holding it about 8 inches above the baking sheet, flick the tip of the pastry brush over the eggs to create speckles. Note: this can get messy, so wear an apron!
-
Refrigerate until the chocolate dries out, approximately 10 minutes, then enjoy!
Nacho flavors, textures, and colors come together, creating a dish that brings joy in every bite.
Serving Peanut Butter Easter Eggs with Love
When it comes to serving Peanut Butter Easter Eggs, we do it family-style. I love to arrange the eggs on a big platter at the center of the table. Everyone gets to choose their favorites, and laughter fills the air as we share stories and makeshift traditions.
These treats pair beautifully with a tall glass of cold milk or perhaps a delightful cup of hot cocoa. Watching both my kids and adults savor these sweets is a joy I look forward to every time we make them.
What really makes the experience special is encouraging family participation. We take turns rolling the eggs, coating them in chocolate, and—yes—sometimes even making a fun mess in the kitchen along the way. That’s what it’s all about: creating delicious moments together and cherishing the time spent at the table.
Storage & Reheat Tips (Keeping the Goodness)
To keep these Peanut Butter Easter Eggs fresh and delicious, store them in an airtight container in the refrigerator. They’re usually best enjoyed fresh, but truthfully, I often find the flavors deepening after a night in the fridge.
If you happen to have any leftovers, they can be stored for up to a week. The chocolate coating will remain intact, and I find that they get a delightful chill that makes them even better.
Reheating is simple, but I prefer not to heat them at all. If you must, a quick brief blast in the microwave should do—just remember, too much heat can ruin that hard chocolate exterior that everyone loves.
My Kitchen Notes & Shortcuts
-
Substitutions: You can use crunchy peanut butter for a delightful twist that adds texture. Consider adding a sprinkle of sea salt for a sweet-and-salty combo.
-
Nut-Free Option: If allergies are a concern, feel free to swap the peanut butter for sunflower seed butter or any other nut-free alternative.
-
Prep Ahead: These eggs can be made ahead of time and will only get better with slight chilling in the fridge.
-
Kid Involvement: Let the kids help dip the eggs and sprinkle with the speckles! This makes them feel proud and connected to the creation.
-
Experiment with Flavors: Swap out almond flour with finely crushed graham crackers for a delicious s’mores version, or even consider adding a hint of cinnamon for a warm twist.
Family-Friendly Variations
Getting creative in the kitchen is part of the fun! Here are a few twists on the classic Peanut Butter Easter Eggs:
-
Chocolate Variations: You can use dark chocolate or milk chocolate coating instead of white chocolate for a different flavor profile.
-
Add Ins: Consider folding in miniature chocolate chips or crushed pretzels to the peanut butter filling for added crunch and surprise.
-
Colorful Coatings: Get playful with your colors! Use different food dyes or even sprinkles on top for a festive touch that the kids will love.
Feel free to adapt the recipe to suit your family’s tastes, creating new traditions and memories each time.
FAQs About Peanut Butter Easter Eggs
Can I make this ahead for a busy week?
Absolutely! In fact, letting them sit for a bit allows the flavors to meld beautifully, much like an old family recipe.
How long do they last in the fridge?
These tasty treats will stay fresh in an airtight container for about a week. They might even taste better after a day or two!
Can I use a different nut butter?
Sure! Almond butter or cashew butter work just as well in this recipe. The creamy texture will still give you that delightful bite.
What can I serve with these eggs?
A classic glass of milk or some fresh fruit can complement the rich flavor beautifully. You could also get creative and serve them with a scoop of ice cream.
One Final Thought from My Kitchen
Creating Peanut Butter Easter Eggs is more than just a delightful recipe; it’s about capturing those joyful moments around the family table. I hope this recipe brings laughter, sweetness, and togetherness to your home as it has to mine.
Until next time, happy cooking! May these treats lead to joyful gatherings filled with love and connection. Let them weave their sweetness into your life’s tapestry, ensuring that the laughter continues long after the last egg is devoured.

Peanut Butter Easter Eggs
Ingredients
For the Peanut Butter Filling
- 1 1/4 cup natural, runny peanut butter (no sugar added)
- 1/4 cup maple syrup
- 1/4 cup powdered sugar
- 1/3 cup almond flour
- 1/2 teaspoon vanilla extract
- 1 pinch salt
For the Chocolate Coating
- 8 ounces white chocolate melting wafers Ghirardelli brand recommended
- 2 teaspoons coconut oil
- 1/2 teaspoon blue spirulina Optional for coloring
- 1/4 teaspoon matcha powder Optional for coloring
For the Speckles
- 1 teaspoon cocoa powder
- 1 tablespoon water
Instructions
Preparation of Filling
- In a mixing bowl, beat together the peanut butter, maple syrup, powdered sugar, almond flour, vanilla extract, and salt until well combined.
- Portion the peanut butter filling into 2-tablespoon portions. Roll each one into a ball using your hands, then shape the ball into an oval (egg-shaped) form.
- Place on a parchment paper-lined baking sheet and freeze while you prepare the coating.
Preparation of Coating
- In a small bowl, whisk together the cocoa powder and water and set aside.
- Add the white chocolate melting wafers and coconut oil to a microwave-safe bowl. Microwave in 15-20 second intervals, stirring well between each interval, until fully melted.
- Whisk in the spirulina and matcha (or food coloring) and adjust colors as desired.
Dipping and Decorating
- Stick a toothpick in the bottom of an egg, then dip it in the white chocolate. Let the excess chocolate drip off.
- Wait until the white chocolate is mostly hardened, then return the egg to the parchment paper and immediately remove the toothpick. If you wait too long, the coating may crack.
- To make the speckles, dip a pastry brush in the cocoa powder/water mixture. Holding it about 8 inches above the baking sheet, flick the tip of the pastry brush over the eggs to create speckles.
Finishing Touch
- Refrigerate until the chocolate dries out, approximately 10 minutes.
- Enjoy your Peanut Butter Easter Eggs!