I can still hear the little crunch when my kids bite into a Rice Krispies ball right after I pull them from the fridge. The smell of warm peanut butter and honey fills the kitchen, and someone always asks if they can have "just one" before dinner. That small moment, sticky fingers and all, is why I keep this recipe on repeat. It is the kind of simple treat that makes the day feel a little softer and the table feel more like home. If you’re here, you probably want something quick, reliable, and loved by everyone. Welcome to my kitchen.
Why You’ll Love This Peanut Butter Rice Krispies Balls

This recipe is the kind of small win you can count on when life is loud and the days are full. It takes a handful of pantry staples and turns them into a snack that feels homemade and thoughtful, even on a busy weeknight. Use what you have and make it your own; try honey or maple syrup depending on what’s in the jar and your sweet tooth.
It’s low fuss, and the cleanup is kind. Meanwhile, the flavor balance is simple and true: salty peanut butter, bright vanilla, and the light crunch of cereal. If you want a quick change, pair them with simple fruit or a glass of milk and you’ve got a comforting, shareable plate. If you’re curious about other simple pantry-forward recipes I love, check out this cowboy butter steak recipe for another easy weeknight idea.
How I Make Peanut Butter Rice Krispies Balls Without Overthinking It
“When it smells this good halfway through, you know dinner’s already on your side.”
Before we get into the ingredients, here’s how the process goes in one calm breath. You warm and bind the sticky parts, fold in the cereal, shape into small bites, and let them rest in the fridge until firm. The textures tell you what to do: the mixture should be tacky but not runny, and the cereal should be fully coated and puffed with flavor.
From there, you can leave them plain, roll them in extra powdered sugar, or give them a quick chocolate dip. I often make a double batch and stash half away for a weeknight dessert or a school lunch surprise. If you like simple flavor combos, this method follows the same logic as other quick pantry favorites like this garlic butter beef, where you let a few strong ingredients carry the dish.
What Goes Into Peanut Butter Rice Krispies Balls
Ingredients You’ll Need
1 cup peanut butter
1/2 cup honey or maple syrup
3 cups Rice Krispies cereal
1/2 cup powdered sugar
1 teaspoon vanilla extract
Optional: chocolate chips or melted chocolate for coating
Each of these ingredients pulls its weight. The peanut butter is the backbone, powdered sugar helps set and sweeten, vanilla gives the flavor lift, and the cereal gives the crunch that makes these fun to eat. If you want, swap the honey for maple syrup for a deeper sweetness, or use a natural peanut butter for a less sweet, more earthy bite. Don’t skip the powdered sugar if you like a more set texture; it helps the balls hold their shape.
Step by Step Directions
-
In a large bowl, mix peanut butter and honey (or maple syrup) until well combined.
Start with room temperature peanut butter so it mixes smoothly. If it’s cold and stiff, let it sit a few minutes or microwave for 10 seconds to soften. -
Add in powdered sugar and vanilla extract, mixing until smooth.
The powdered sugar makes the mixture thicker and less sticky. Mix just until it looks even; overworking it won’t help. -
Stir in the Rice Krispies until fully coated.
Fold gently so the cereal keeps some of its crisp. The mixture should be evenly dotted with cereal and still a bit tacky. -
Once mixed, form the mixture into small balls (about 1 inch in diameter).
Wet your hands slightly or use a cookie scoop to keep things neat. Press gently to make compact balls so they hold together. -
If desired, dip or drizzle with melted chocolate.
A quick dip into melted chocolate turns these into a party treat. Let the chocolate set on parchment. -
Place on a baking sheet lined with parchment paper and refrigerate until firm, about 30 minutes.
The fridge helps them set and keeps them from being too soft. If you plan to store longer, the freezer works great too. -
Enjoy your no-bake peanut butter balls!
Let them sit at room temperature for a few minutes before serving so they soften slightly. These are best within a week when kept cool.
Serving Peanut Butter Rice Krispies Balls at the Table
The Best Way to Serve Peanut Butter Rice Krispies Balls
Serve these casually and let everyone pick their favorite. Put a bowl of balls on the counter with extra napkins and a small dish for stray crumbs. They’re great alongside sliced apples or a cup of yogurt, and they travel well to school sports or road trips.
If you want to make them look a little fancier, drizzle melted chocolate and sprinkle flaky salt on top. For a kid-friendly twist, press a few chocolate chips into the outside before chilling. We often make them family style: a platter in the center of the table and a steady rotation of hands, quiet smiles, and “just one more” requests. 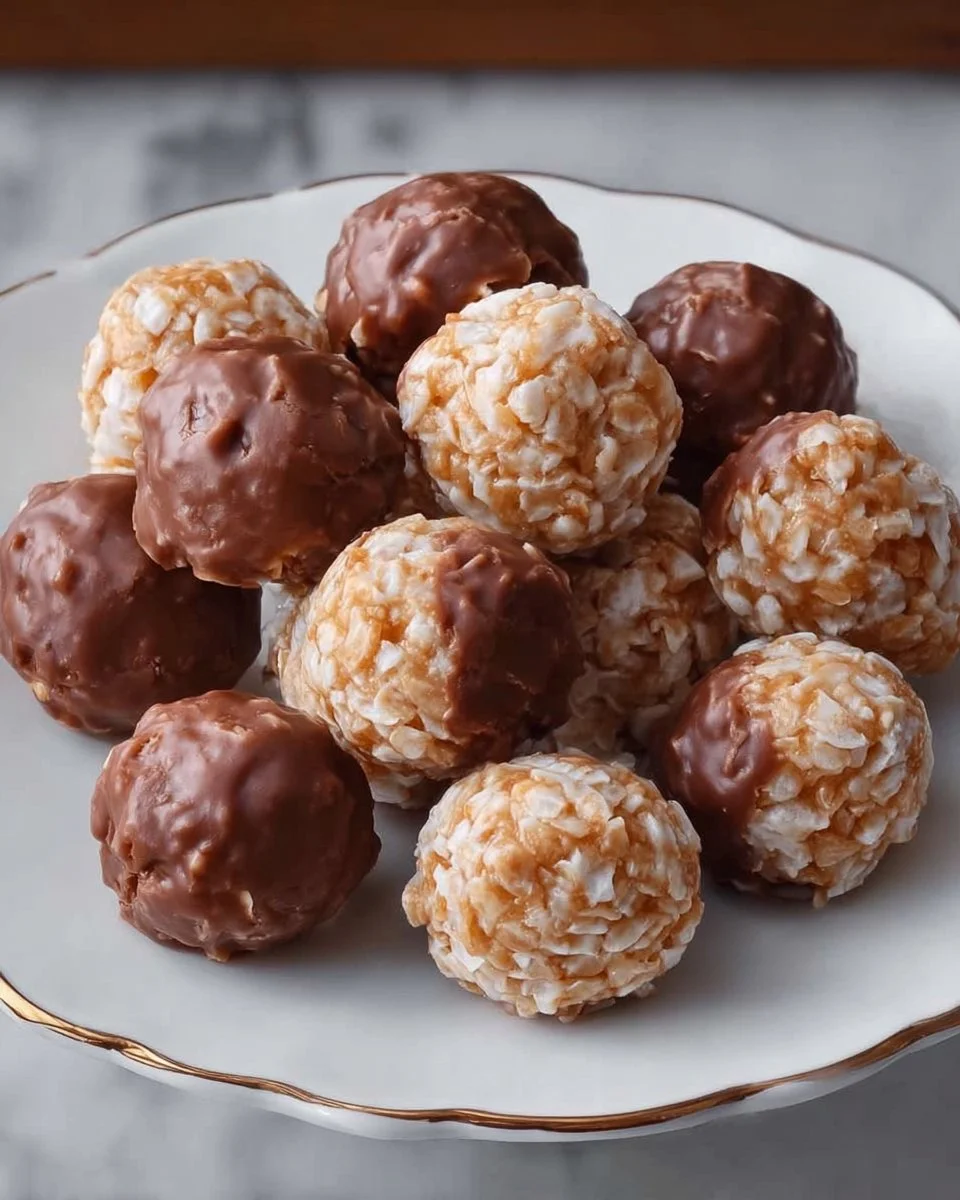
Meanwhile, if you need a cozy main dish to go with snack time, that cowboy butter steak recipe is a hearty companion for a weekend table.
Saving Peanut Butter Rice Krispies Balls for Tomorrow
Storage and Reheating Without Losing Flavor
Store them in an airtight container in the fridge for up to one week. If you want to keep them longer, flash-freeze the balls on a baking sheet, then transfer to a freezer bag; they last up to three months that way. From the freezer, pull a few out and let them thaw in the fridge or on the counter for 15 to 30 minutes before serving.
If you coated them in chocolate, keep them cool and avoid stacking too many to prevent smudging. When reheating a chilled ball for a few seconds, warm hands usually do the trick. They are no-bake treats, so reheating in the microwave is unnecessary and can make them soft. Be honest: these are best cool and slightly tender, not hot.
Notes From My Kitchen
What I’ve Learned After Making This a Few Times
- Use a cookie scoop to keep the balls even. It saves time and makes them look tidy.
- If the mixture feels too wet, add a little more powdered sugar, a tablespoon at a time. This keeps the texture right without overcomplicating things.
- For a less sweet version, use natural or lightly salted peanut butter and reduce the powdered sugar by a quarter cup. I do this when I want something more grown up.
- Clean up is easier if you line your work surface with parchment. You can shape directly on it and move the whole sheet to the fridge.
- If kids are helping, pre-measure ingredients and let them press the balls into shape. It keeps the mess manageable and lets them be part of the rhythm.
A small extra tip: if your Rice Krispies get stale, give them a short toast in a 300 F oven for 3 minutes to perk them up. Just watch them closely.
Family Twists on Peanut Butter Rice Krispies Balls
Easy Ways to Change It Up
Swap the peanut butter for almond butter or sunflower butter if someone has an allergy. Add a tablespoon of cocoa powder to the mix for a chocolate peanut butter vibe. Fold in a handful of mini marshmallows for extra chew. Add a pinch of cinnamon for autumn warmth or a teaspoon of flaky sea salt on top to lift the flavors.
If you like texture, toss in a quarter cup of chopped peanuts or seeds for crunch. For a fruity angle, dip half the ball in melted chocolate and press a dried cranberry on top. These small changes keep the recipe exciting while staying easy enough for busy nights. For more inspiration that leans into simple, family-friendly swaps, I often look back at pantry dishes like my garlic butter beef, where tiny tweaks make a big difference.
FAQs About Peanut Butter Rice Krispies Balls
Questions I Get About This Recipe
Q: Can I make this ahead?
A: Yes. In fact, the flavors settle beautifully overnight, which makes them even better the next day. Store in the fridge in a single layer or stacked with parchment between layers.
Q: My mixture is too sticky. What should I do?
A: Add powdered sugar a tablespoon at a time until it firms up enough to shape. You can also chill the mixture for 10 minutes to make it easier to handle.
Q: Can I use crunchy peanut butter?
A: Absolutely. Crunchy peanut butter adds more texture and a nice contrast to the cereal. Just expect a slightly more rustic bite.
Q: Are these safe to leave out at room temperature?
A: If your kitchen is cool, a few hours out is fine. But if it is warm, keep them refrigerated. Peanut butter and honey are shelf-stable, but the texture is better kept cool.
Q: How do I keep chocolate-coated balls from getting sticky?
A: Work in a cool room and allow the chocolate to set before stacking. A quick chill in the fridge helps the coating become firm without sweating.
A Final Bite
One Last Thought From My Kitchen
I make these when I want a small ritual that’s easy and satisfying. They are forgiving, quick, and kid-approved. When the day feels busy and the table needs a moment of connection, a plate of Peanut Butter Rice Krispies Balls does the job with little fuss and a lot of heart. Keep the ingredients simple, let the kids help when you can, and remember that the best recipes are the ones that fit into your life, not the other way around.
Conclusion
If you want to compare versions or see step-by-step photos from other cooks, these resources are helpful. For a chocolate-dipped take with clear photos, try Peanut Butter Balls with Rice Krispies – Chocolate with Grace. For a family-friendly approach and extra tips from a busy kitchen, check Peanut Butter Balls with Rice Krispies – Kitchen Fun With My 3 Sons. If you like variations and a clean layout of options, see Peanut Butter Balls with Rice Krispies – Build Your Bite. For a no-bake method and a simple, clear writeup, visit No Bake Peanut Butter Balls with Rice Krispies – If You Give a Blonde a Kitchen. And for another home cook’s perspective with useful swaps, look at Peanut Butter Balls with Rice Krispies – Meaningful Eats.
Thank you for spending a little time in my kitchen. I hope these Peanut Butter Rice Krispies Balls give you a calm, tasty moment in the middle of a busy day.

Peanut Butter Rice Krispies Balls
Ingredients
Base Ingredients
- 1 cup peanut butter Use natural for less sweetness.
- 1/2 cup honey or maple syrup Choose based on preference.
- 3 cups Rice Krispies cereal Make sure they are fresh.
- 1/2 cup powdered sugar Helps set the texture.
- 1 teaspoon vanilla extract
Optional Coating
- 1/2 cup chocolate chips or melted chocolate For dipping or drizzling.
Instructions
Preparation
- In a large bowl, mix peanut butter and honey (or maple syrup) until well combined.
- Add in powdered sugar and vanilla extract, mixing until smooth.
- Stir in the Rice Krispies until fully coated.
- Once mixed, form the mixture into small balls (about 1 inch in diameter).
- If desired, dip or drizzle with melted chocolate.
Setting
- Place on a baking sheet lined with parchment paper and refrigerate until firm, about 30 minutes.
Serving
- Let the balls sit at room temperature for a few minutes before serving.