
I remember the day my little one put a paper heart on the kitchen table and announced we would make a cake for no reason at all. The oven hummed, the scent of cocoa curled up into the air, and for a moment the world felt perfectly quiet and safe. That small memory sits behind every Valentine’s Day Cake I bake now, and it’s why I want this recipe to be easy for you too. If you need a gentle reminder that a special dessert can be simple, see this guide on juice cleanse safety for a laugh about how food rituals can be both strict and silly.
Why This Valentine’s Day Cake Feels Like Home
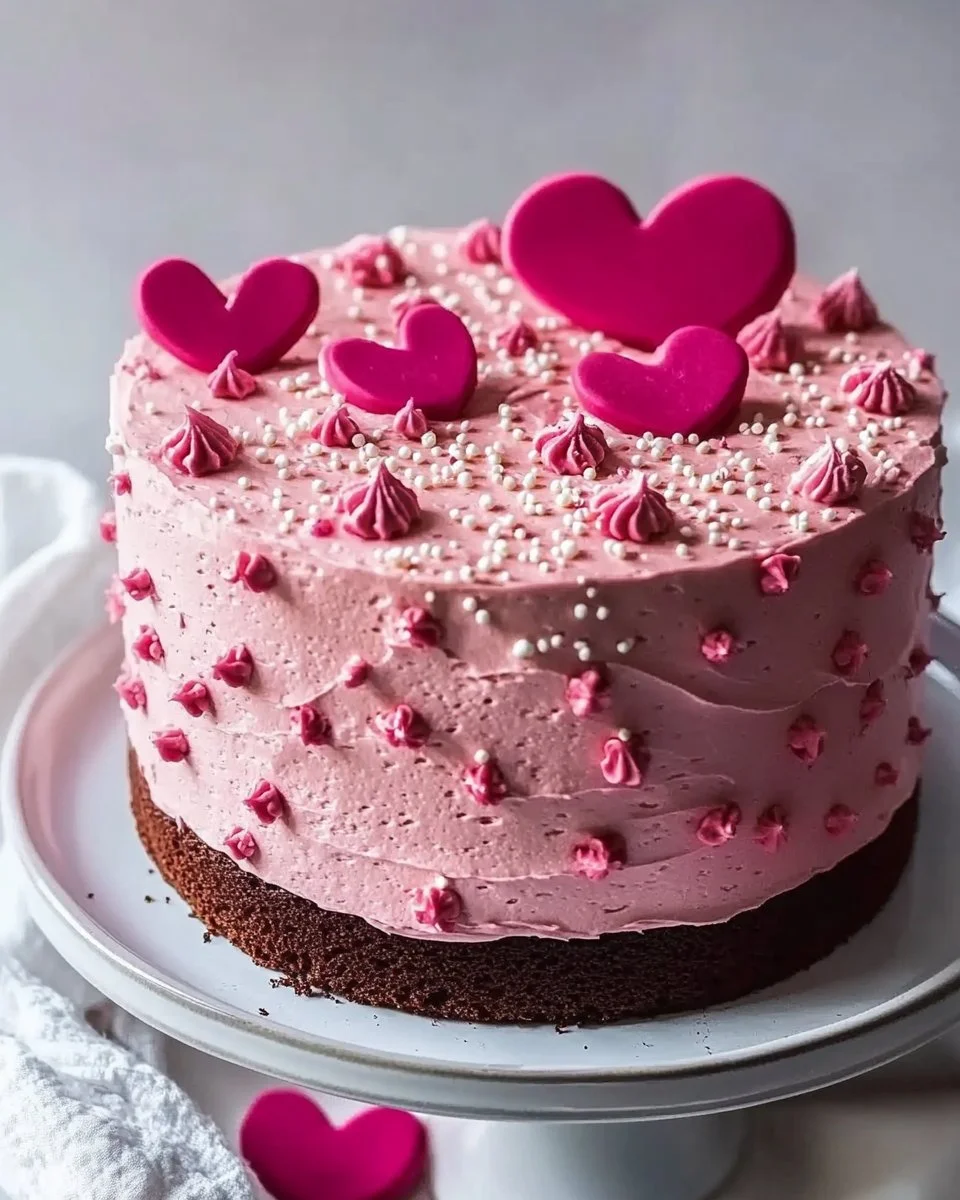
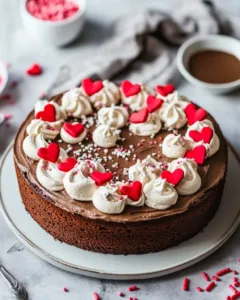
This cake is the sort of thing that arrives warm from the oven and makes everyone pause what they are doing. It looks like a celebration but comes together like a weeknight classic. The crumb is tender and moist, the chocolate scent is warm and mellow, and a simple buttercream turns it into something festive without fuss.
I love this recipe because it asks for ingredients you probably already have and asks for only a little patience. It is the kind of dessert that sits at the center of the table and draws people in. Meanwhile, it reminds me of holidays at my grandmother’s kitchen where chocolate always meant company.
How to Make Valentine’s Day Cake, The Heartwarming Way
“This is where the magic happens—when the aroma fills the kitchen and my kids come running in, asking ‘Is it ready yet?’”
Here’s the short version: you whisk together dry ingredients, add the wet ones, stir in boiling water to make a thin batter, and bake until a toothpick comes out clean. The batter will look runny when you add the hot water, but that’s expected. The finished cakes have a deep, dark color and a tender, springy texture when you press the center lightly.
A few cues to watch for: the edges will pull slightly from the pan when the cakes are ready. The toothpick should come out clean or with a few moist crumbs, not wet batter. Once cooled, a slightly domed top levels easily with a serrated knife or a cake leveler.
Ingredients You’ll Need
2 cups all-purpose flour
1 and 1/2 cups granulated sugar
1/2 cup unsweetened cocoa powder
1 and 1/2 teaspoons baking powder
1 and 1/2 teaspoons baking soda
1 teaspoon salt
2 large eggs
1 cup whole milk
1/2 cup vegetable oil
2 teaspoons vanilla extract
1 cup boiling water
Buttercream frosting (for decoration)
Sprinkles or edible decorations (optional)
A friendly note: you can use whatever cocoa you like—Dutch-process will deepen the color; natural cocoa will add a bright chocolate tang. And if you do not have whole milk, 2% works fine. I sometimes bookmark recipes like these alongside treats like Boston cream pie cupcakes when I want to mix up celebrations.
Step-by-Step Directions
-
Preheat the oven to 350°F (175°C).
Grease and flour two 9-inch round cake pans.
A small trick: line the bottom with parchment for an easy release. -
In a large bowl, combine the flour, sugar, cocoa powder, baking powder, baking soda, and salt.
Whisk until evenly blended and you see no lumps.
This ensures even rise and a smooth texture. -
Add the eggs, milk, oil, and vanilla extract to the dry ingredients and beat on medium speed for about 2 minutes.
The batter will look smooth and glossy after beating.
Let the kids help with this step if you like—they love the whir of the mixer. -
Stir in the boiling water (the batter will be thin).
Mix until just combined; the heat wakes up the cocoa and deepens flavor.
Don’t be alarmed by the thin batter—this makes a moist crumb. -
Pour the batter evenly into the prepared pans.
Tap the pans gently on the counter to settle the batter.
This removes large air pockets and helps an even bake. -
Bake for 30 to 35 minutes, or until a toothpick inserted in the center comes out clean.
Check at 28 minutes if your oven runs hot.
A little browning around the edges is fine; it adds flavor. -
Let the cakes cool in the pans for 10 minutes, then remove from pans to cool completely on a wire rack.
If the tops dome slightly, level them once cooled.
Cooling fully before frosting avoids a melty mess. -
Once cooled, frost with buttercream and decorate as desired for Valentine’s Day.
I like a simple swirl topped with sprinkles or shaved chocolate.
For a fun twist, add fresh berries between layers for a bright, tart note.
Quick tip: if you want a deeper chocolate hit, fold a handful of mini chocolate chips into the batter, or try a slice with something fudgier like a brownie cake to compare textures.
Serving Valentine’s Day Cake with Love

We set this cake in the middle of the table, family-style, and let everyone take the first slice. One of my kids always reaches for a plate with a napkin like it is a tiny treasure. Serve with a small scoop of vanilla ice cream, extra berries, or a drizzle of warmed chocolate sauce for the extra dramatic moment.
For a simple tea or coffee pairing, brighten the table with a pot of hot tea and a tiny pitcher of cream. If you want a playful side, try small cookies or bars so little hands have choices. I sometimes set out a stack of extra napkins and forks and let the kids decorate their slice with sprinkles or heart candies.
I like to offer a glass of cold milk for the kids and a small espresso for the grown-ups. If you want a printable mood, this cake pairs nicely with soft music and low lighting to make any evening feel like a small holiday.
Storage & Reheat Tips (Keeping the Goodness)
Store the frosted cake at room temperature for up to 24 hours if your home is cool.
For longer storage, cover well and refrigerate for up to 4 days.
Let refrigerated slices come to room temperature before serving for the best texture.
If you froze a layer or un-frosted cake, wrap tightly and freeze for up to 2 months.
Thaw in the fridge overnight, then return to room temperature before frosting.
To reheat a slice, the microwave works for a quick warm bite: 10 to 15 seconds usually does it.
If you want that oven-warm quality, place slices on a baking sheet and heat at 300°F for 6 to 8 minutes.
The oven brings back the just-made warmth and a slight crisp to the edges.
My Kitchen Notes & Shortcuts
- Swap whole milk for buttermilk if you have it; it adds a gentle tang and keeps the crumb tender.
- Make the cake layers a day ahead and wrap them tightly; frosting the next day is less stressful.
- Use store-bought buttercream in a pinch and jazz it with a splash of vanilla or a teaspoon of espresso powder.
- Let kids handle the sprinkles. It’s messy, but their joy is worth it.
- For a speedier dinner-to-dessert transition, bake the cake earlier in the day and keep it covered on the counter.
These little cheats help me keep the heart of the recipe—the taste and the company—without the stress.
Family-Friendly Variations
If you want something lighter, swap half the oil for unsweetened applesauce.
For a richer dessert, spread a layer of raspberry jam between the cakes before frosting.
Make mini cakes in muffin tins for individual treats; bake 15 to 18 minutes instead of the full bake time.
For a nutty note, fold in 1/2 cup chopped toasted hazelnuts or almonds.
Think of this recipe as a base. Once you see how the simple chocolate batter behaves, you can riff with flavors and mix-ins that tell your family’s story.
FAQs About Valentine’s Day Cake
Can I make this ahead for a busy week?
Absolutely. Bake the layers a day or two ahead and keep them wrapped in plastic. Frost on the day you plan to serve for the best texture.
My cake sunk in the middle. What happened?
A common cause is opening the oven door while the cake is baking. Another is overmixing the batter or too much leavening. Check oven temperature and measure carefully.
Can I use a different pan size?
Yes. For a 9×13 pan, bake around 30 to 35 minutes and watch for the toothpick test. For 6-inch pans, decrease bake time and check earlier.
How to fix a dry cake?
Trim the edges and brush layers lightly with simple syrup or a flavored syrup before frosting. The syrup adds moisture and a touch of flavor.
Is the boiling water step necessary?
Yes. The hot water blooms the cocoa and helps create a moist crumb. It makes the batter thin, but that thinness is part of the cake’s charm.
One Final Thought from My Kitchen
I hope this Valentine’s Day Cake becomes one of those recipes you pull out when you want a small ritual. It is forgiving, quick enough for a weeknight lift, and pretty enough for a special day. Give it a try—you might surprise yourself with how proud you feel handing over a warm slice to the people you love.
Conclusion
If you want another take on a Valentine’s cake, I often look at a tested version from a trusted kitchen blog for technique notes and decoration ideas. For a vintage style presentation that leans into classic charm, consider the inspiration found at an old-fashioned Valentine’s Day cake gallery.
Valentine's Day Cake
Ingredients
Dry Ingredients
- 2 cups all-purpose flour
- 1.5 cups granulated sugar
- 0.5 cups unsweetened cocoa powder Dutch-process or natural cocoa can be used
- 1.5 teaspoons baking powder
- 1.5 teaspoons baking soda
- 1 teaspoon salt
Wet Ingredients
- 2 large eggs
- 1 cup whole milk 2% milk can be used as a substitute
- 0.5 cups vegetable oil Can be replaced with unsweetened applesauce for a lighter version
- 2 teaspoons vanilla extract
- 1 cup boiling water This step is necessary for moist crumb
For Decoration
- Buttercream frosting (for decoration) You can use store-bought in a pinch
- Sprinkles or edible decorations (optional)
Instructions
Preparation
- Preheat the oven to 350°F (175°C). Grease and flour two 9-inch round cake pans, optionally lining the bottom with parchment for easy release.
- In a large bowl, combine the flour, sugar, cocoa powder, baking powder, baking soda, and salt. Whisk until evenly blended.
- Add the eggs, milk, oil, and vanilla extract to the dry ingredients and beat on medium speed for about 2 minutes until smooth and glossy.
- Stir in the boiling water. Don't be alarmed by the thin batter—it makes a moist crumb.
- Pour the batter evenly into the prepared pans and tap gently to settle.
Baking
- Bake for 30 to 35 minutes, or until a toothpick inserted in the center comes out clean. Check at 28 minutes if your oven runs hot.
- Let the cakes cool in the pans for 10 minutes, then remove from pans to cool completely on a wire rack.
Decoration
- Once cooled, frost with buttercream and decorate as desired for Valentine's Day.
- Serve with a small scoop of vanilla ice cream or extra berries.