")
There’s something extraordinary about the sounds that fill a family kitchen during meal prep. It’s the soft clatter of dishes being arranged, the rhythm of laughter and playful chatter, and the sweet scent of fresh strawberries wafting through the air. I can almost hear my kids discussing who gets to help and who just wants to sneak a taste. This is exactly the kind of joyful chaos that makes cooking so special. Today, I want to share a delightful recipe that embodies this spirit: Deviled Strawberries made with a luscious cheesecake filling. These little beauties are simple to make and bring smiles to faces around the table, making them perfect for any gathering or just an ordinary Tuesday.
Why This Deviled Strawberries (Made with a Cheesecake Filling) Feels Like Home
When I make Deviled Strawberries, I’m reminded of family gatherings filled with laughter and shared stories. There’s a beauty in simplicity, a way that these strawberries can transform a regular meal into something magical. Imagine the bright red berries sitting pretty on the table, each one cradling a cloud of creamy filling. They look enticing, and you can feel the warm love that inspired them.
What I adore about this recipe is how it resonates with everyone. It’s not just the sweetness of the strawberries or the creamy cheesecake blend; it’s the memories that come pouring back as we gather around the table. This dish represents the essence of sharing—sharing flavors, laughter, and moments that linger long after the last bite.
Why Deviled Strawberries (Made with a Cheesecake Filling) is Our New Family Favorite
This delightful dessert blends a classic cheesecake with fresh strawberries, making it an easy favorite in our home. As a busy mom, I appreciate recipes that come together quickly and require minimal cleanup. Deviled Strawberries check both boxes, bringing joy without hours spent in the kitchen. The bright colors and scrumptious flavors provide the perfect backdrop for family moments.
The best part? This recipe is highly adaptable, meaning you can tweak the filling or strawberry variations to suit your family’s preferences. It’s all about creating something special in your kitchen that your family will look forward to, making it an effortless yet impactful dish.
The Simple Magic Behind Deviled Strawberries (Made with a Cheesecake Filling)
Deviled Strawberries can feel like a fancy dessert, but they are surprisingly easy to prepare. The beauty is in the fresh ingredients and a few straightforward steps. The strawberries gain a lovely stability after being hollowed out, allowing them to stand tall and proud on your table. The creamy mixture is not just sweet; it’s soft and airy, contrasting beautifully with the vibrant berries. When you take the first bite, the burst of flavor is simply intoxicating.
You may be wondering what makes this dessert truly shine. It’s the balance between the sweet cream and the natural tartness of fresh strawberries. This delicious pairing creates a popping sensation in your mouth that keeps you wanting more. And trust me, it’s easier than it looks!
How to Make Deviled Strawberries (Made with a Cheesecake Filling), The Heartwarming Way
If you’re ready to dive into making Deviled Strawberries, let’s walk through the process together. Remember, there’s no need for perfection here; it’s about the joy of creating something sweet and sharing it with those you love.
Prep the strawberries: First, wash the strawberries gently and remove the stems. Slice them in half lengthwise, and here’s a tip: take a small sliver off the back of each half to give them a stable base. This makes serving much easier!
Hollow the strawberries: Using a small melon baller or spoon, carefully scoop out a little bit of the center of each strawberry half. You don’t need to remove a lot; just enough to make room for that delicious filling.
“This is where the magic happens—when the aroma fills the kitchen and my kids come running in, asking ‘Is it ready yet?’”
Whip the cream: In a medium mixing bowl, beat the heavy cream until stiff peaks form. This takes about 5 minutes, and you’ll know it’s ready when it holds a shape well.
Mix the filling: In a separate bowl, combine the softened cream cheese, sour cream, white sugar, vanilla extract, and lemon juice (if you’re using it). Mix until smooth and creamy.
Fold in the whipped cream: Gently fold the whipped cream into your cream cheese mixture. The idea here is to keep that lovely airy texture. Be careful not to over-mix.
Fill the strawberries: Grab a piping bag (or a zip-top bag with a corner cut off) and fill it with your cheesecake mixture. Pipe it generously into each hollow strawberry half.
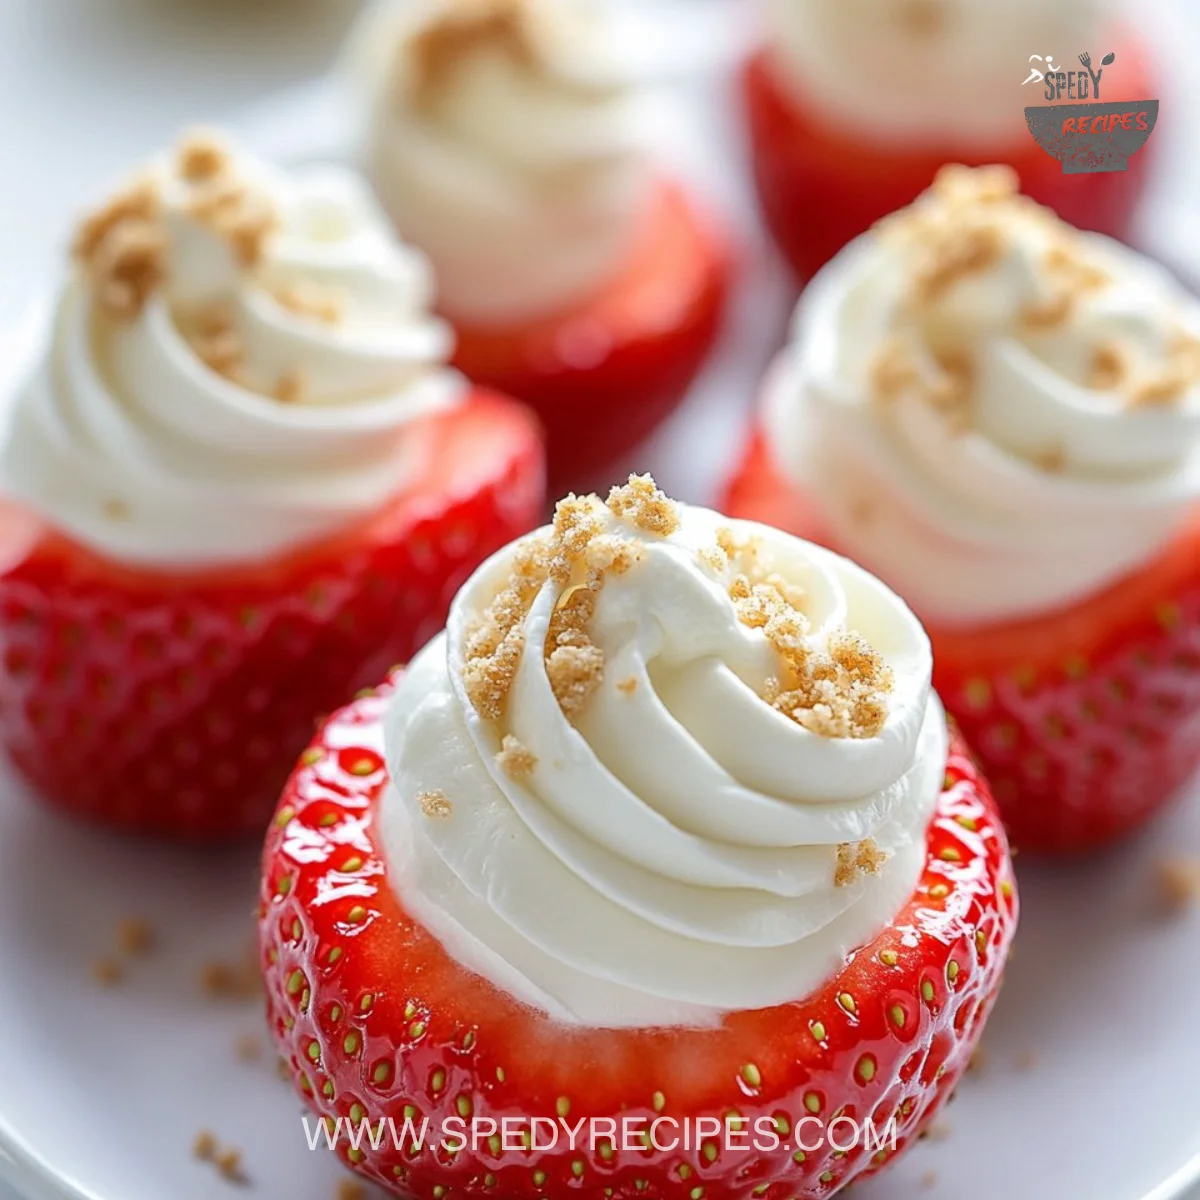
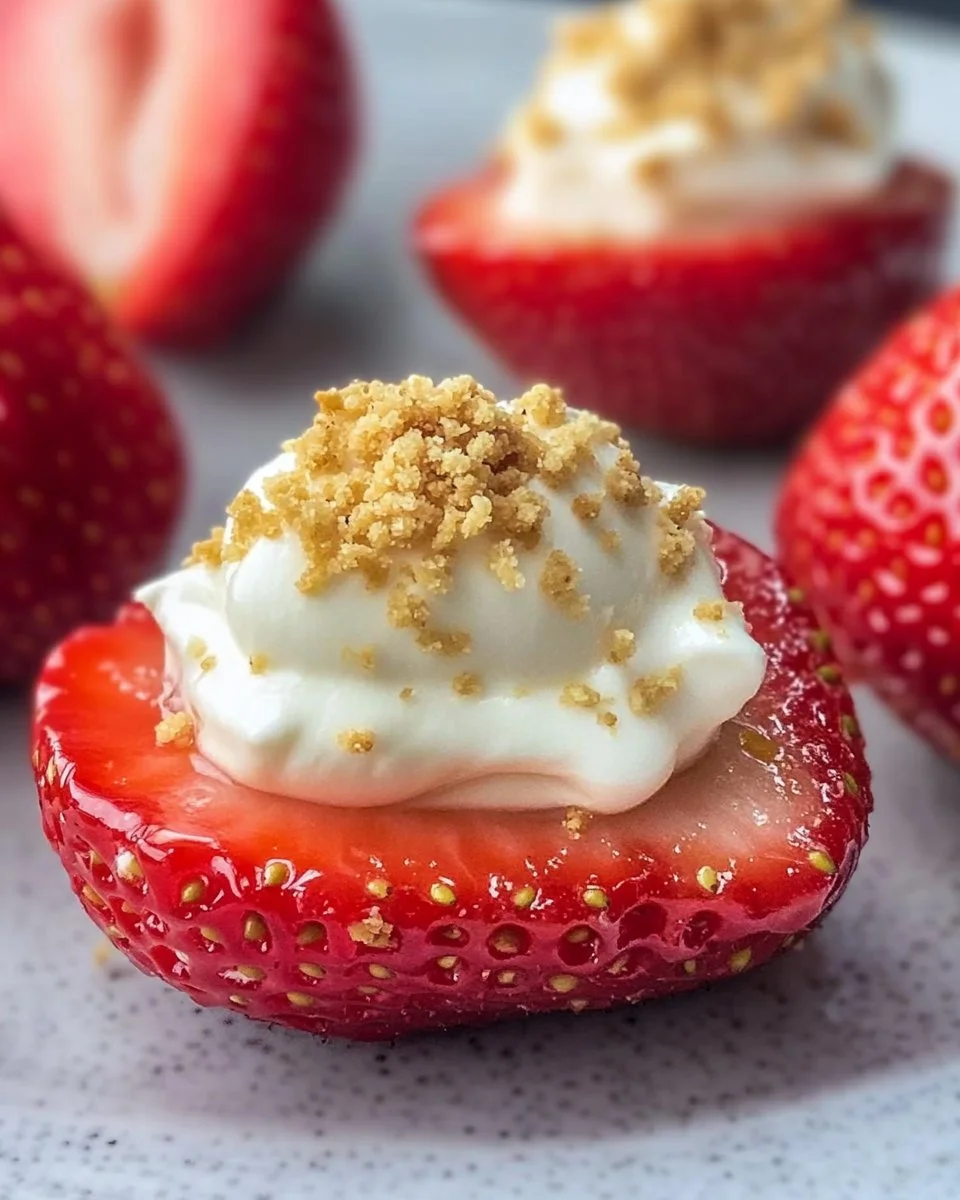
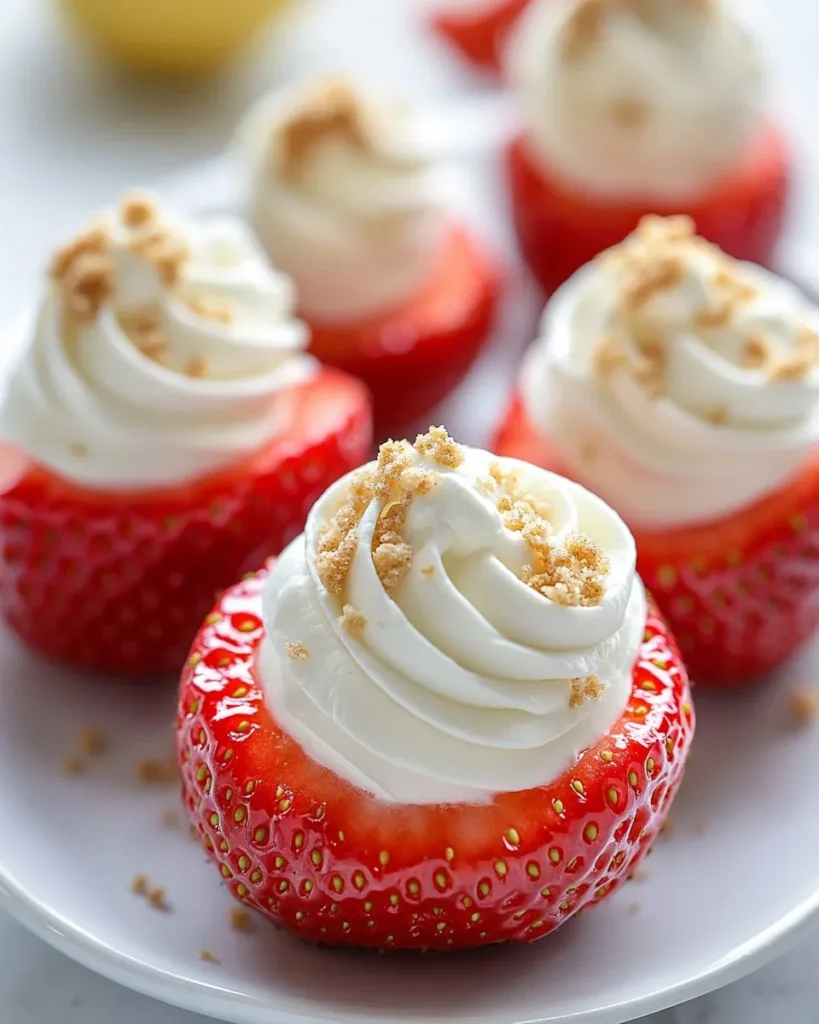
Sprinkle with crumbs: Just before serving, sprinkle a bit of graham cracker crumbs on top for that classic cheesecake crunch.
Serve and enjoy! These strawberries are best enjoyed fresh, so gather your loved ones and dig in!
Ingredients You’ll Need
So, what do you need to whip up these Deviled Strawberries? Let’s gather our delicious ingredients. Here’s what you need to get started:
- 18-24 large strawberries
- 1 cup heavy whipping cream
- 1 (8 ounce) package of cream cheese (softened)
- 1/3 cup sour cream
- 2/3 cup white granulated sugar
- 1 tsp vanilla extract
- 1 tbsp fresh lemon juice (optional)
- 1/2 cup graham cracker crumbs
Don’t hesitate to play around with the flavors! Maybe toss in a sprinkle of cocoa powder or some crushed nuts if that’s your style. The goal here is to make it your own.
Step-by-Step Directions
Prep the strawberries: After washing, cut off the stems and slice them in half. A little slice at the back ensures they sit up straight.
Hollow the strawberries: Use a melon baller to scoop out just a bit from each half, making space for the filling while keeping integrity.
Whip the cream: In a mixing bowl, beat 1 cup of heavy cream until stiff peaks form, which should take about 5 minutes.
Mix the filling: In another bowl, mix together the softened cream cheese, sour cream, sugar, vanilla, and lemon juice until smooth.
Fold in the whipped cream: Transfer the whipped cream into the cream cheese mixture and fold gently. You want it fluffy!
Fill the strawberries: Use a piping bag to fill each strawberry half with the luscious cream mixture, allowing the filling to mound just above the berry.
Finish with graham cracker crumbs: Sprinkle the crumbs on top just before serving to keep them crunchy.
Serve and enjoy! Arrange them on a platter and watch the smiles grow.
Serving Deviled Strawberries (Made with a Cheesecake Filling) with Love
In our family, making meals a shared experience is vital. I typically serve these strawberries in the middle of the table, allowing everyone to help themselves. It’s a lovely moment as we gather to enjoy each other’s company while nibbling on these delightful treats.
We often pair them with a light salad or a simple sandwich platter. The strawberries shine as a sweet ending but can also kick off our gatherings with excitement. I love hearing my youngest daughter’s giggles over her overflowing strawberry as she takes her first bite.

Storage & Reheat Tips (Keeping the Goodness)
Now, let’s talk leftovers. If you happen to have any strawberries left (which rarely happens!), storing them properly is essential. Place any uneaten strawberries in an airtight container and store them in the fridge. They’re best enjoyed fresh, so aim to consume them within a day.
As for reheating, be careful! You won’t want to microwave these beauties; that can affect the strawberries’ texture. Instead, enjoy them cold for a refreshing snack later on.
My Kitchen Notes & Shortcuts
Over the years, I’ve gathered some handy shortcuts that make this recipe even more effortless:
- Buy hulled strawberries: If you’re in a pinch for time, look for pre-hulled strawberries at your local grocery store.
- Have the kids help: Let them wash the strawberries, or even pipe the filling if they’re old enough. It makes for a fun kitchen adventure.
- Make-ahead magic: You can prep the filling a day ahead and fill the strawberries just before serving. It helps flavors meld beautifully.
- Experiment with flavors: Try adding a little almond extract instead of vanilla, or fold in some crushed berries for a different twist.
Family-Friendly Variations
This recipe can be easily adapted to suit different tastes or dietary needs. Here are some fun variations you might enjoy:
- Chocolate lovers unite: Swap some of the cream cheese with melted chocolate for a rich treat. Who can resist chocolate-covered strawberries?
- Lighter version: Use low-fat cream cheese and whipped topping to lighten things up if that’s your goal.
- Fruit fiesta: Instead of just strawberries, consider using a mix of berries or other fruits, such as sliced kiwi or peaches for color and flavor.
Cooking should be fun and filled with personality, so feel free to get creative and make these strawberries uniquely yours.
FAQs About Deviled Strawberries (Made with a Cheesecake Filling)
Can I make this ahead for a busy week?
Absolutely! In fact, letting them sit for an hour allows all the flavors to mingle beautifully. Just leave them in the fridge until you’re ready to serve.
What did I miss if I didn’t add fresh lemon juice?
Lemon juice brightens the flavors and adds a gentle zing that cuts through the sweetness. It’s totally optional, but highly recommended!
How long do these last?
You’ll want to enjoy them within one day for the best taste and texture. The strawberries are delicious when fresh.
Can I use frozen strawberries?
While fresh strawberries are best for this recipe, in a pinch, you can use frozen; just be aware they may be more mushy and won’t hold the filling as well.
One Final Thought from My Kitchen
As we wrap up our time together, I hope you feel inspired to create these Deviled Strawberries. They carry not just flavors but memories waiting to unfold around your table. I encourage you to gather your loved ones, create joyous moments, and enjoy every sweet bite that comes from the heart. My hope is that this dish finds its way into your family’s laughter and stories. If it does, my grandmother’s kitchen would be smiling right along with you. Until next time, happy cooking!
Deviled Strawberries
Ingredients
For the cheesecake filling
- 1 cup heavy whipping cream (Beat until stiff peaks form.)
- 1 8 ounce package cream cheese (Softened.)
- 1/3 cup sour cream
- 2/3 cup white granulated sugar
- 1 tsp vanilla extract
- 1 tbsp fresh lemon juice (Optional.)
For the strawberries
- 18-24 large strawberries (For hollowing and filling.)
For garnishing
- 1/2 cup graham cracker crumbs (For added crunch.)
Instructions
Preparation
- Wash the strawberries gently and remove the stems.
- Slice them in half lengthwise and take a small sliver off the back of each half for stability.
- Using a small melon baller or spoon, scoop out a bit of the center of each strawberry half.
Making the filling
- In a medium mixing bowl, beat the heavy cream until stiff peaks form, about 5 minutes.
- In a separate bowl, combine the softened cream cheese, sour cream, white sugar, vanilla extract, and lemon juice. Mix until smooth.
- Gently fold the whipped cream into the cream cheese mixture.
Assembly
- Fill a piping bag with the cheesecake mixture and pipe it into each hollow strawberry half.
- Sprinkle with graham cracker crumbs just before serving.
Serving
- Serve immediately and enjoy the joyful moments with your loved ones.