
On Sunday afternoons my kitchen fills with a warm hush, the kind that makes everyone slow down a bit. My oldest hums while she sets forks on the table, my little one taps the counter, impatient for a taste. The oven holds something sweet and comforting, and the smell brings back my grandmother’s porch where she used to cool jars of jam and tell stories about the river. That scent is the first hint that this Banana Pudding Cheesecake will turn a regular night into a small celebration. If you like swapping little moments for something homemade and heartfelt, give this a try — it’s easier than it looks and the family will thank you.
Why This Banana Pudding Cheesecake Feels Like Home
There is something about the combination of creamy cheesecake and classic banana pudding that hits the comfort button. The crust gives you a buttery snap, the cream cheese offers a rich, silky base, and the bananas bring that simple, sunlit sweetness that reminds me of summer visits and backyard games. 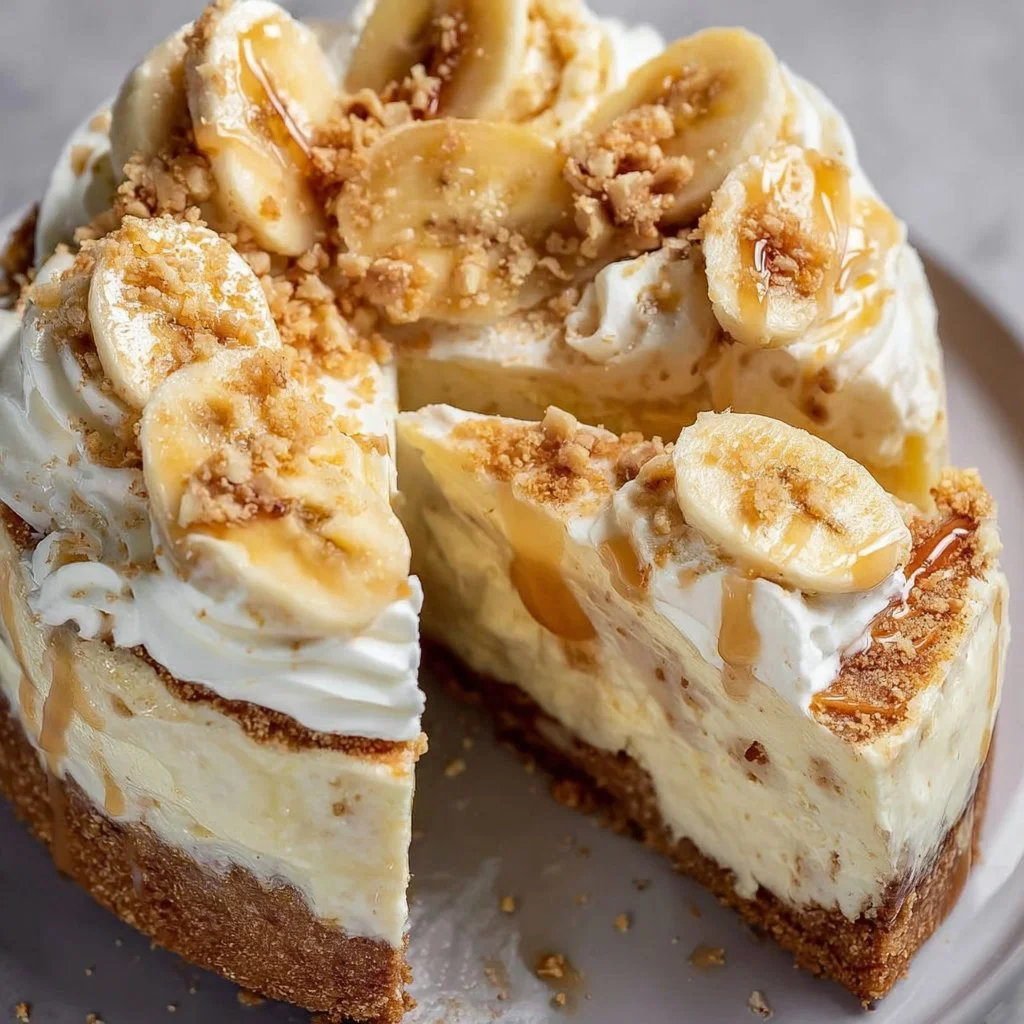
This recipe works because it layers familiar flavors in a way that feels both new and nostalgic. It uses pantry-friendly ingredients and gentle steps that let you relax into the process rather than race through it. Meanwhile, it gives you a dessert that looks special without demanding professional skills.
If you like mixing crowd-pleasing desserts, you might also enjoy trying a muffin or cookie with a twist — I often pull up a quick guide to banana pumpkin muffins when I need baking inspiration for breakfast after a cheesecake night.
Why Banana Pudding Cheesecake is Our New Family Favorite
This cake arrives at the table looking like you spent hours fussing, but it actually saves time. It comes together fast, needs a few simple bowls, and chills while you clean up and set the table. My family loves it because it lets everyone pick their favorite layer — crunchy crust, soft banana, or melting whipped cream on top.
It fits busy nights and weekend deposits of love equally well. I often bake it before a weeknight dinner and let it chill while we finish cooking. The flavors quiet down and settle into one another over a few hours, which makes the dessert taste even better the next day.
The Simple Magic Behind Banana Pudding Cheesecake
This dessert uses three flavor pillars: buttery cookie, tangy-sweet cream cheese, and mellow banana. The instant pudding sets quickly and gives a silky middle layer without complicated custard techniques. The whipped cream tops it off for the cloud-like finish everyone fights for.
Texture is the real party here. The crust should feel firm but not rock-hard, the cheesecake layer smooth and not grainy, and the banana slices fresh with no browning. When you see the pudding glossy and the whipped cream soft peaks, you know you are close.
Why This Recipe Works for Our Busy, Joyful Nights
It requires simple tools: a springform pan, a mixing bowl, a whisk, and a mixer or strong wooden spoon. It needs no water bath and no tempering, which saves you time and worry. You can prep the crust and cheesecake layers early, then let it chill while you attend the rest of the night.
If you want a fuss-free dessert that still looks homemade and is loved by kids and grandparents alike, this is your winner. I usually pair it with a pot of coffee and a small scoop of extra whipped cream for those who want an extra cloud.
How to Make Banana Pudding Cheesecake, The Heartwarming Way
“This is where the magic happens—when the aroma fills the kitchen and my kids come running in, asking ‘Is it ready yet?’”
Here’s a quick, comforting overview: you make a buttery Nilla wafer crust, whip a smooth cream cheese layer, lay down ripe banana slices, then top with instant pudding and clouds of whipped cream. Chill until firm and slice with a hot, clean knife for neat pieces.
You should look for a crust that holds together when pressed, a filling that spreads without lumps, and pudding that looks glossy after whisking. Those are the cues my grandmother used to point out when I was learning, and they still work today.
Ingredients You’ll Need
What makes this recipe so approachable is how few ingredients it asks for. Gather them before you start to keep the process breezy. Use what’s on hand where you can — this is about feeding people and making memories, not perfection.
- 2 cups of Nilla wafers
- 1/2 cup of butter, melted
- 2 (8 oz) packages of cream cheese
- 1 cup of sugar
- 1 teaspoon of vanilla extract
- 3 ripe bananas, sliced
- 1 (3.4 oz) package of instant vanilla pudding mix
- 2 cups of milk
- 1 cup of whipped cream
Friendly note: choose bananas that are ripe but not mushy. If you have an extra hand in the kitchen, let a kid slice the bananas for that small moment of shared work. For more dessert inspiration that pairs well with family baking, I like to glance at a recipe for caramel cheesecake cookies when planning a baking day.
Step-by-Step Directions
-
Preheat the oven to 350°F (175°C).
Give your oven a few minutes to reach temperature so the crust bakes evenly. Set out your springform pan and line it if you prefer easier cleanup. -
Crush the Nilla wafers and mix with melted butter to form a crust. Press this mixture into the bottom of a springform pan.
Use a zip-top bag and a rolling pin for quick crushing. Press firmly so the crust holds together when you cut the cheesecake. -
In a bowl, beat cream cheese, sugar, and vanilla extract until smooth.
Scrape the bowl as you go to avoid lumps. A hand mixer helps, but a sturdy whisk will do if you go slowly and patiently. -
Layer the sliced bananas over the cream cheese mixture.
Arrange the slices in an even layer so every bite gets banana. Freshness matters; slice them just before layering to prevent browning. -
In another bowl, whisk together the pudding mix and milk for 2 minutes and pour it onto the banana layer.
Whisk vigorously until the pudding is thick and glossy. Pour gently and spread with a spatula so you do not mash the banana slices. -
Top with whipped cream.
Spread the cream into soft peaks and dollop or pipe it over the pudding. A light, even layer looks pretty and keeps the pudding from drying out. -
Refrigerate for at least 4 hours, or until set. Serve chilled.
Chill on a level shelf so the layers set evenly. When ready, run a warm knife around the pan for a clean release and slice carefully.
Quick tip: a little browning on the crust edge can add flavor, just like grandma showed me. Let the kids help with steps like crushing cookies or spreading whipped cream; they love it and you get a memorable helper.
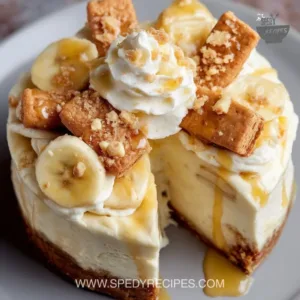
Serving Banana Pudding Cheesecake with Love
I usually bring this cheesecake to the table on a platter, right in the middle, and let everyone help themselves. It feels informal and warm — my favorite way to eat dessert. 
We set out extra whipped cream, a small bowl of crushed Nilla wafers for sprinkling, and a pitcher of cold milk or coffee. My son insists on adding an extra banana slice to his piece, while my neighbor likes a drizzle of salted caramel.
If you want to make it fancier, lightly toast a few wafer crumbs for a crunchy sprinkle on top. My rule is: keep the presentation simple but thoughtful. Family-style makes the moment less about perfect plates and more about shared smiles.
For ideas on other layered desserts that bring the same warmth to the table, I often look at recipes like this pistachio-white chocolate cheesecake for inspiration: heavenly pistachio white chocolate cheesecake.
Storage & Reheat Tips (Keeping the Goodness)
Leftovers keep well in the fridge for up to 3 days. Cover the top with plastic wrap directly on the cream to prevent a skin from forming, or store in a covered container. This dessert is best cold, so avoid long periods at room temperature.
If you want to serve it warmer, the oven works better than the microwave for returning that just-made warmth. Place single slices in a 300°F oven for 5 to 7 minutes on a baking sheet. The microwave is fine for a very quick warm-up for a single slice, but be gentle—cheesecake can turn oily if overheated.
If you must freeze it, wrap individual slices tightly and freeze for up to one month. Thaw in the refrigerator overnight before serving.
My Kitchen Notes & Shortcuts
- Use a food processor to crush the wafers quickly; it saves time and gives even crumbs.
- Make the pudding layer an hour before assembling so it’s slightly set; it spreads more cleanly.
- Freeze overripe bananas for smoothies, but for this cheesecake use bananas that are ripe and firm.
- Prep the crust and cream cheese layer the day before, then add bananas and pudding the next day for fresher fruit.
- Let kids help with safe tasks like stirring pudding or decorating the whipped cream; they love to put their mark on the dish.
These little hacks have saved me time and helped keep the kitchen calm when guests arrive. It’s about making the process manageable and still keeping that homemade feel.
Family-Friendly Variations
Make it your own by swapping or adding small touches. Try using chocolate wafers for a deeper flavor crust if your family loves chocolate. For a lighter feel, replace half the cream cheese with mascarpone or use low-fat options, but keep the texture in mind—richness helps balance the banana sweetness.
Add toasted coconut on top for a tropical twist, or fold a handful of crushed cookies into the whipped cream for texture. For a party version, make this in a trifle bowl and layer additional pudding and wafers to feed a crowd.
If you have dietary needs, substitute gluten-free wafers and a pudding mix labeled gluten-free. The spirit of the recipe is flexible; it invites your family’s tastes to the table.
FAQs About Banana Pudding Cheesecake
Can I make this ahead for a busy week?
Absolutely. In fact, letting it sit overnight makes the flavors friendlier with each other, like an old recipe that keeps getting better. Make sure to cover it well.
What if my bananas brown after slicing?
Brown edges are natural. To slow it, brush the slices with a little lemon juice before layering. Freshness is best, so slice close to assembly time.
Can I use homemade pudding instead of instant?
You can, but instant pudding gives a reliable set without extra cooling or thickening steps. If you use homemade, be sure it is fully cooled before layering.
How do I get clean slices?
Run a sharp knife under hot water, dry it, and slice in one smooth motion. Wipe the knife between slices for neat pieces.
Is it okay to freeze leftovers?
Yes, wrap slices tightly and freeze up to a month. Thaw slowly in the fridge before serving.
One Final Thought from My Kitchen
I hope this Banana Pudding Cheesecake finds a place on your table. It’s the kind of dessert that asks for small hands to help and then rewards everyone with quieter smiles. It has become a thread in our family stories — the one we bring to potlucks and the one we bake when we just want to feel cozy at home. Give it a try; you might surprise yourself with how easy and comforting it is.
Conclusion
If you want a sneaky, reliable recipe that feels both new and familiar, this Banana Pudding Cheesecake fits the bill. For another take on creamy banana pudding with a slightly different approach, check out Creamy Banana Pudding Cheesecake | Life, Love and Sugar for inspiration. For more layered dessert ideas and techniques that pair well with this cheesecake, I also recommend reading Banana Pudding Cheesecake – Live Well Bake Often.
Banana Pudding Cheesecake
Ingredients
For the crust
- 2 cups Nilla wafers Crushed into crumbs
- 1/2 cup butter Melted
For the cheesecake layer
- 2 8 oz packages cream cheese Softened
- 1 cup sugar
- 1 teaspoon vanilla extract
- 3 ripe bananas Sliced
For the pudding layer
- 1 3.4 oz package instant vanilla pudding mix
- 2 cups milk
- 1 cup whipped cream For topping
Instructions
Preparation
- Preheat the oven to 350°F (175°C).
- Crush the Nilla wafers and mix with melted butter to form a crust. Press this mixture into the bottom of a springform pan.
Cheesecake Layer
- In a bowl, beat cream cheese, sugar, and vanilla extract until smooth.
- Layer the sliced bananas over the cream cheese mixture.
Pudding Layer
- In another bowl, whisk together the pudding mix and milk for 2 minutes and pour it onto the banana layer.
- Top with whipped cream.
Final Steps
- Refrigerate for at least 4 hours, or until set. Serve chilled.