I can still hear the clink of the mixing bowl against the counter and my little one asking if dessert can be dinner tonight. There is this warm, vanilla-and-banana smell that wraps the whole house like a familiar blanket, the exact scent my grandmother used to have on Sunday afternoons. I set the table, and everyone comes to the kitchen, napkins in hand, ready to share something silly and sweet. It’s in those small, noisy moments that Banana Pudding Crunch Cheesecake feels like a celebration of ordinary life.
Why This Banana Pudding Crunch Cheesecake Feels Like Home
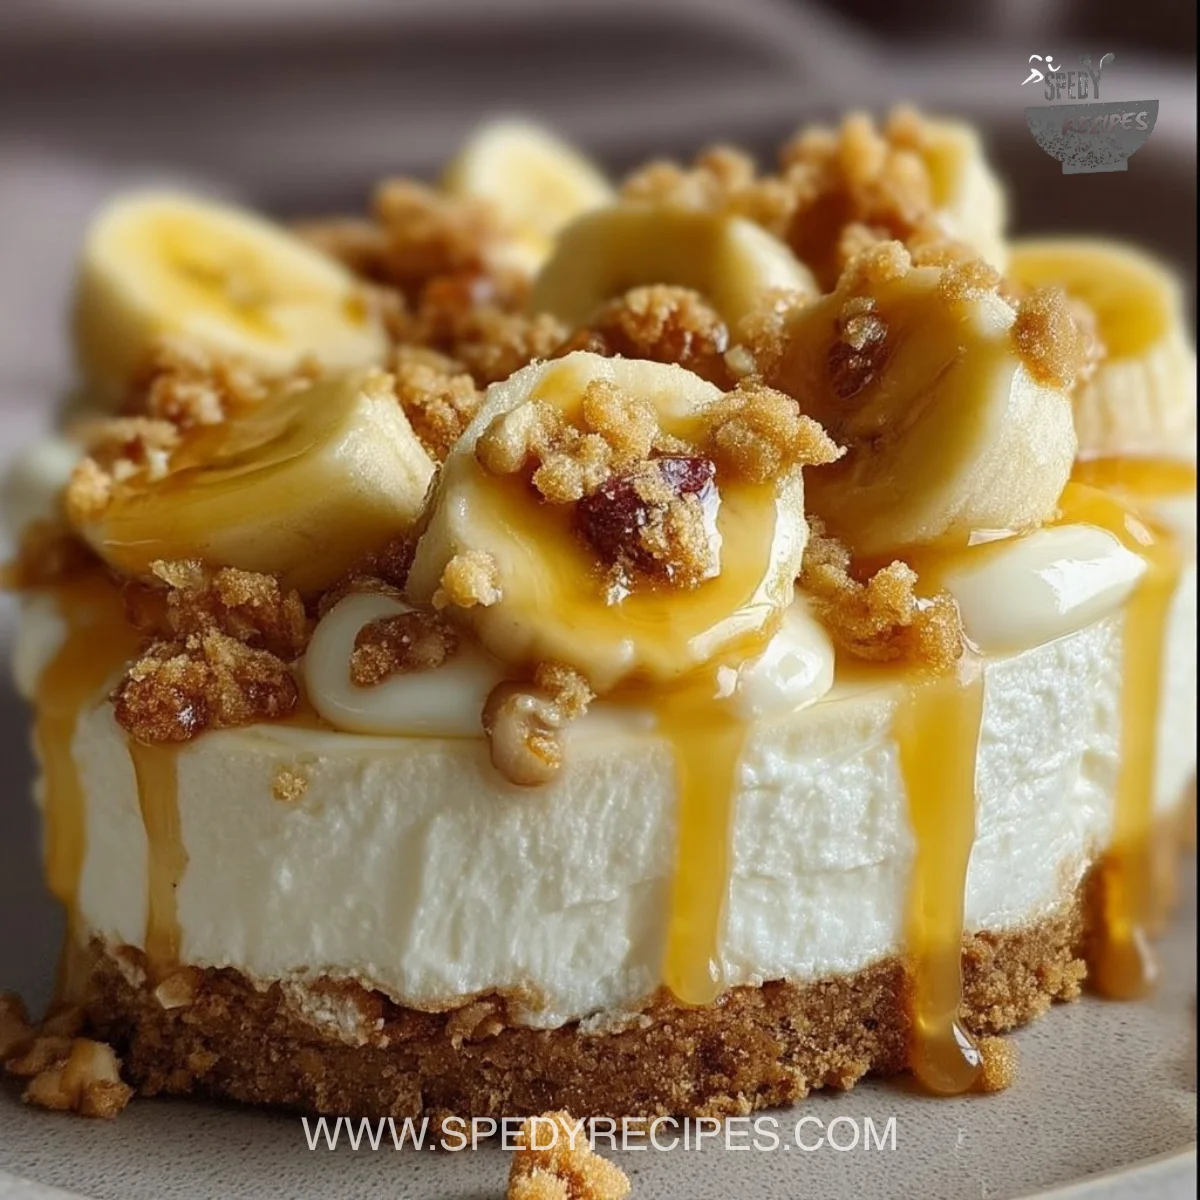
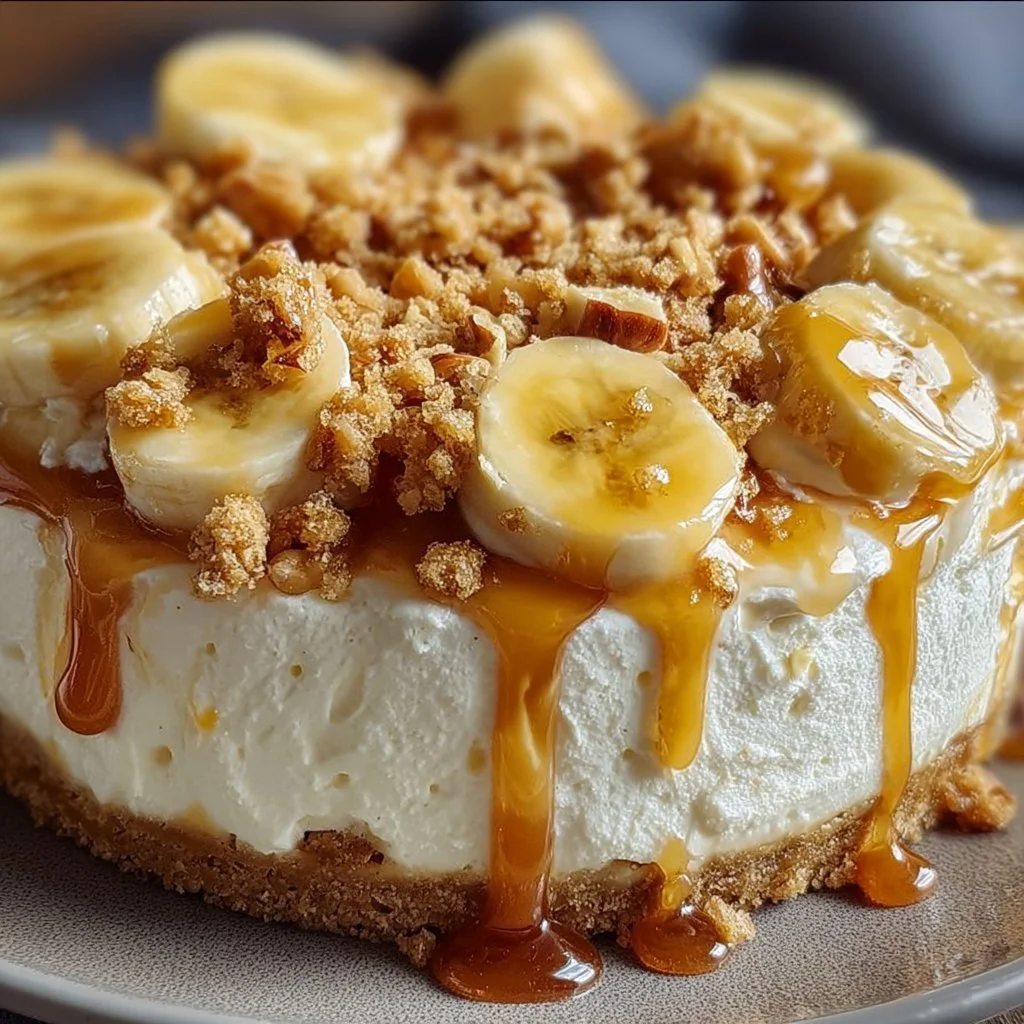
There is a softness to this cheesecake that reminds me of pudding from my childhood, and then a playful crunch that keeps everyone smiling. It lands somewhere between a classic southern banana pudding and a tender baked cheesecake. The textures are comforting and interesting at the same time: creamy filling, a buttery vanilla wafer crust, and a crunchy pecan wafer topping.
This recipe comes together in fewer dishes than you might expect, which makes it ideal for weeknight desserts or weekend baking with the kids. Meanwhile, the aroma as it bakes makes the whole house feel like Sunday. If you love desserts that feel sentimental but look like you spent more time than you did, this is your new go-to.
I often pair it with lighter dinners because the dessert itself is a full-stop kind of treat. If you want another banana-forward idea for busy mornings, my favorite quick muffins are a great companion; try my banana pumpkin muffins for a breakfast treat that echoes these same cozy flavors.
Why Banana Pudding Crunch Cheesecake is Our New Family Favorite
This cheesecake is forgiving, and it rewards simple techniques. The flavors are familiar—vanilla wafers, ripe bananas, a touch of sour cream—and they combine into something that tastes like a memory. It is special enough for guests and gentle enough for weekday celebrations. Kids love breaking the crunchy topping with their forks, and adults love the creamy, dense center.
From a practical side, it is one of those recipes that scales well. You can bake it a day ahead and it only gets better. It’s also a dish that invites little helpers: let them mash bananas or sprinkle the topping. My nephew considers the topping job an honor, and he takes it very seriously.
The Simple Magic Behind Banana Pudding Crunch Cheesecake
“This is where the magic happens—when the aroma fills the kitchen and my kids come running in, asking ‘Is it ready yet?’”
The process is straightforward: a buttery vanilla wafer crust, a banana-scented cream cheese filling, and a crunchy pecan-vanilla-wafer topping. The filling sets while still slightly jiggly, and that gentle wobble is your sign that it will finish perfectly as it cools. Once cooled and chilled, slices hold beautifully and the flavors mellow into something truly nostalgic.
If you enjoy layered treats, this texture play might remind you of other comfort desserts like these creamy cheesecakes with mix-ins; for a different take on nut-forward cheesecake flavors, check out this caramel cheesecake cookie idea that swaps textures and adds a caramel twist.
Ingredients You’ll Need
1 1/2 cups crushed vanilla wafers
1/4 cup granulated sugar
1/4 cup unsalted butter, melted
24 oz cream cheese, softened
1 cup granulated sugar
3 ripe bananas, mashed
3 large eggs
1 tsp vanilla extract
1/4 cup sour cream
1/4 cup all-purpose flour
1 cup crushed vanilla wafers
1/4 cup chopped pecans
2 tbsp unsalted butter, melted
Friendly note: don’t skip the ripe bananas. They carry the dish here. If your bananas are not quite ripe, wrap them in foil and bake at 350°F for 10 minutes until they’re soft and fragrant. Use what’s in your fridge—this recipe is about comfort and creativity, not perfection.
How to Make Banana Pudding Crunch Cheesecake, The Heartwarming Way
Step-by-step, this recipe is comforting and unintimidating. You will make a simple crust, a smooth banana-cream cheese filling, and a buttery crunchy topping. The oven does the heavy lifting so you can tidy up, pour a cup of tea, or set the table. Watch for color cues: the top should be a soft golden, and the center will still have a slight jiggle when you gently nudge the pan.
Next up, read through the steps and gather your ingredients. Having everything at room temperature helps the filling come together silky-smooth. If you like, let a small helper crush the vanilla wafers in a resealable bag. They love the job, and it’s one less bowl for you to wash.
Step-by-Step Overview: Keeping It Simple
-
Preheat oven to 325°F (160°C). Grease a 9-inch springform pan.
Gather the pan and a baking sheet. A greased side will help your cheesecake release cleanly. -
In a mixing bowl, combine crushed vanilla wafers, sugar, and melted butter for the crust. Press the mixture evenly into the bottom of the prepared pan.
Use the bottom of a measuring cup to press the crust firmly and evenly. -
In another bowl, beat softened cream cheese and sugar until smooth.
Scrape the bowl often so no lumps hide—smoothness matters for texture. -
Add mashed bananas, eggs, vanilla, sour cream, and flour to the cream cheese mixture. Beat until creamy and well combined.
Beat just until combined. Overmixing can add air and cause cracking. -
Pour the filling over the crust in the springform pan, spreading it evenly.
Tap the pan gently on the counter to release any large air bubbles. -
For the topping, mix crushed vanilla wafers, chopped pecans, and melted butter in a small bowl. Sprinkle evenly over the cheesecake filling.
The topping should be chunky enough to give contrast—don’t over-process it. -
Place the pan on a baking sheet to catch any drips, and bake for 55-60 minutes, or until edges are set and center is slightly jiggly.
A little jiggle in the center is perfect. The edges will look set and faintly golden. -
Turn off the oven and leave the cheesecake inside with the door slightly ajar for 1 hour.
This gentle cooling helps prevent cracks and keeps the texture creamy. -
Remove from oven and let cool completely, then refrigerate for at least 4 hours or overnight.
Patience here is rewarded—the longer chill develops flavor and makes slicing neater. -
Once chilled, carefully remove from the pan, slice, and serve.
Use a hot, dry knife between slices for clean cuts. Wipe the blade each time.
Quick tip: let the kids help with topping sprinkling. It adds personality and gives them a job that makes them proud. A little browning on the topping is wonderful—it adds flavor, just like grandma showed me.
Serving Banana Pudding Crunch Cheesecake with Love
We serve this cheesecake family-style in the middle of the table and let everyone help themselves. It’s become a ritual in my house: one person slices, another brings plates, and someone else offers coffee. The crunchy top breaks as you cut into the creamy banana filling and vanilla crust, and each bite tells the same warm story.
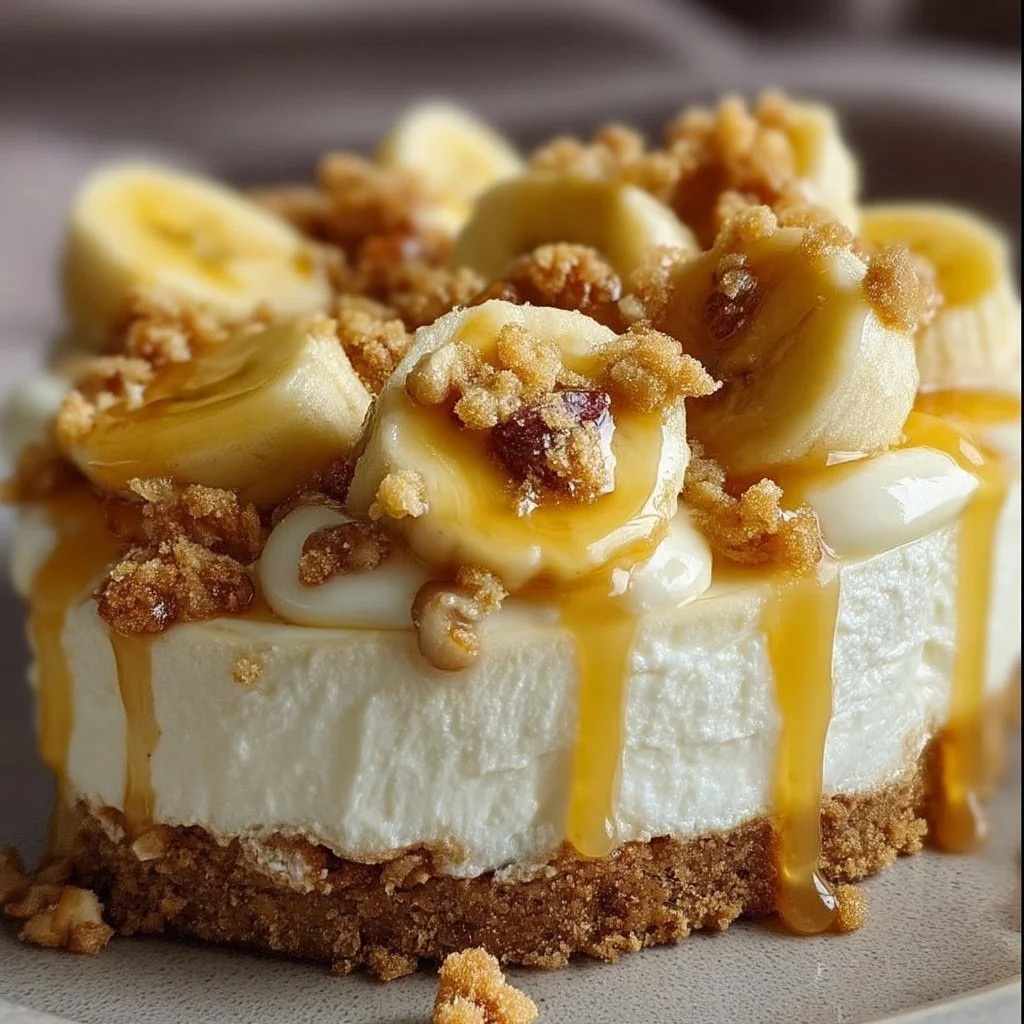
Love pairing: a small scoop of lightly whipped cream or a drizzle of caramel feels indulgent without stealing the spotlight. Fresh banana slices on top add brightness, and a handful of extra pecans gives a satisfying contrast. If you have young eaters, offer a plate without nuts so everyone can enjoy it safely.
If you’re planning a dessert board or want to add other sweets, I like to bring lighter cookies or a small fruit plate. For a playful potluck approach, pair it with other comforting bakes like a nut-forward white chocolate cheesecake for variety; consider my note on a wonderfully rich option heavenly pistachio white chocolate cheesecake for a fancy twin treat.
Storage & Reheat Tips (Keeping the Goodness)
Store leftover cheesecake in the refrigerator, well wrapped with plastic wrap or in an airtight container. It will stay fresh for up to 4 days. If you want the crunch to last, add extra topping just before serving.
For a quick warm bite, the microwave works fine: warm a slice for about 10 to 15 seconds. For a more revived just-baked feeling, place slices on a baking sheet and warm in a 300°F oven for 5-7 minutes. The oven is gentler and helps the textures revive more naturally.
Want to freeze it? Freeze whole or by slices wrapped tightly in plastic and then foil for up to 2 months. Thaw overnight in the fridge. If you plan to freeze, consider adding the crunchy topping after thawing for the best texture.
I once reheated a slice for a late-night treat and found the oven method brought back the creaminess and warmth beautifully. It’s honest comfort food that responds well to gentle reheating. For meal prep ideas that save time and keep flavor, try making extra crust and freezing it, or prep the topping ahead and keep it in an airtight container.
Try a muffin companion for quick breakfasts or boxed lunches that echo the same cozy flavors and save your weekday mornings.
My Kitchen Notes & Shortcuts
- Use room-temperature cream cheese and eggs to avoid lumps. Warm ingredients beat together smoothly and save time.
- If you’re short on time, press the crust into a tart pan and bake a bit less for a smaller dessert. It still holds the same heart.
- Prep the topping a day ahead and keep it in the fridge; sprinkle it right before baking for maximum crunch.
- Get the kids to mash bananas or crush wafers in a bag. It’s a safe, fun task that makes them feel involved.
- Substitute toasted walnuts if you prefer them to pecans. The change gives a different but equally homey flavor.
These small shortcuts keep the soul of the recipe but make the work manageable for busy families. Over the years I learned to make the process more about connection and less about perfection.
Family-Friendly Variations
- Nut-free version: omit pecans and replace with extra crushed vanilla wafers or toasted coconut for crunch.
- Lighter version: swap half the cream cheese for ricotta for a less dense texture. It will be lighter but still satisfy those pudding cravings.
- Boozy twist for adults: fold a tablespoon of dark rum into the filling for an adult night treat. Keep it out of reach of kids and clearly labeled.
- Mini cheesecakes: use a muffin tin with liners to make individual servings. Adjust baking time down to about 18-22 minutes.
- Banana-chip garnish: fry thin banana slices in a little butter and sugar for a crunchy, dramatic topper.
These variations invite you to add your family’s signature touch. It’s an open invitation to make memories.
FAQs About Banana Pudding Crunch Cheesecake
Can I make this ahead for a busy week?
Absolutely. In fact, letting it sit overnight lets the flavors settle and play nicely together. It’s great for parties and busy nights when you want dessert ready to go.
What if my cheesecake cracks?
Don’t worry—cracks happen. Cover the top with whipped cream, extra crushed wafers, or caramel drizzle. A gentle cooling routine (oven with door ajar) reduces cracking risk next time.
How ripe should the bananas be?
The riper the better. Look for bananas with lots of brown speckles. If they are not ripe, put them in foil and bake at 350°F for 10 minutes until soft and fragrant.
Can I make this nut-free for school lunches?
Yes. Skip the pecans and replace them with crushed vanilla wafers or toasted oats. Keep a portion nut-free to be safe for classrooms with nut policies.
How do I get a clean slice?
Use a long, sharp knife warmed in hot water and wiped dry between cuts. A slight chill in the cheesecake helps it slice more neatly.
One Final Thought from My Kitchen
This Banana Pudding Crunch Cheesecake has become a bridge between made-from-scratch comfort and convenient baking. It’s easier than it looks, and it gives you big, comforting flavor with simple steps. I hope this recipe finds its way to your table, to those small noisy moments, and into the stories you tell around dessert.
Conclusion
If you want another recipe that captures the same warm, banana-forward charm in a different form, I recommend this lovely Banana Pudding Cheesecake – Live Well Bake Often which explores a slightly different take on banana pudding in cheesecake form. For a recipe that balances pudding and crunch in a comforting way with helpful tips, see this Banana Pudding Cheesecake Recipe – Fresh April Flours for additional inspiration.

Banana Pudding Crunch Cheesecake
Ingredients
For the crust
- 1.5 cups crushed vanilla wafers
- 0.25 cups granulated sugar
- 0.25 cups unsalted butter, melted
For the filling
- 24 oz cream cheese, softened
- 1 cup granulated sugar
- 3 ripe bananas, mashed
- 3 large eggs
- 1 tsp vanilla extract
- 0.25 cups sour cream
- 0.25 cups all-purpose flour
For the topping
- 1 cup crushed vanilla wafers
- 0.25 cups chopped pecans
- 2 tbsp unsalted butter, melted
Instructions
Preparation
- Preheat oven to 325°F (160°C). Grease a 9-inch springform pan.
- In a mixing bowl, combine crushed vanilla wafers, sugar, and melted butter for the crust. Press the mixture evenly into the bottom of the prepared pan.
Filling
- In another bowl, beat softened cream cheese and sugar until smooth.
- Add mashed bananas, eggs, vanilla, sour cream, and flour to the cream cheese mixture. Beat until creamy and well combined.
- Pour the filling over the crust in the springform pan, spreading it evenly.
Topping and Baking
- For the topping, mix crushed vanilla wafers, chopped pecans, and melted butter in a small bowl. Sprinkle evenly over the cheesecake filling.
- Place the pan on a baking sheet to catch any drips, and bake for 55-60 minutes, or until edges are set and center is slightly jiggly.
- Turn off the oven and leave the cheesecake inside with the door slightly ajar for 1 hour.
Cooling
- Remove from oven and let cool completely, then refrigerate for at least 4 hours or overnight.
Serving
- Once chilled, carefully remove from the pan, slice, and serve.