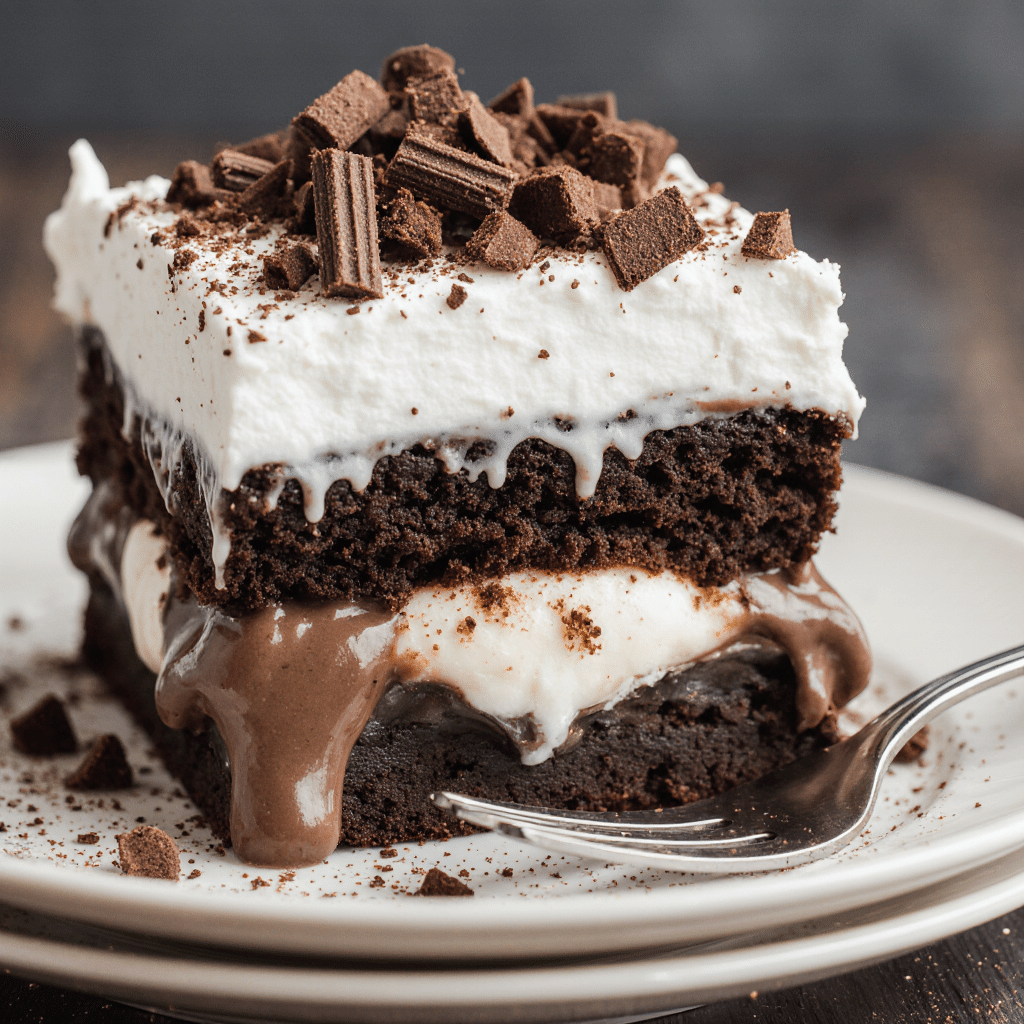
Some desserts feel like home from the very first bite, and this Brownie Refrigerator Cake is one of them cool, creamy layers tucked between fudgy brownie bites, the kind of iced brownie dessert your family will ask for again and again. It’s make-ahead easy, perfect for potlucks and birthdays, and a total keeper for your list of saved desserts. This is one recipe you’ll definitely want to save – Pin it now for later!
Table of Contents
Why You’ll Love This Brownie Refrigerator Cake
- Quick: Simple pantry ingredients and effortless layering.
- Family-Friendly: A guaranteed hit with kids and grown-ups.
- Versatile: Add nuts, fruit, or sauces (chocolate, caramel) to suit your crew.
- Colorful: Layers + toppings make it party-pretty.
- Perfect for Groups: Great for dessert ideas for large groups (hello, 9×13 easy big desserts).
(Psst… this qualifies as one of those “Omg chocolate desserts” and a true “Chocolate Yum Yum Dessert.”)
Tools and Preparation
- 9×13-inch Baking Dish – ideal size for neat, stackable layers (great for desserts for potluck easy to transport).
- Mixing Bowls (2) – one for pudding, one for whipped topping or cream cheese blend.
- Whisk or Hand Mixer – ensures silky pudding and fluffy layers.
- Rubber Spatula – for smooth spreading without disturbing layers.
- Sharp Knife – to cube brownies and cut clean slices for serving.
Ingredients For Brownie Refrigerator Cake
- 1 pan baked brownies (9×13), cooled completely and cut into 1-inch cubes (homemade or boxed use your favorite brownie cake recipe)
- 1 package (3.9 oz / 110 g) instant chocolate pudding
- 2 cups (480 ml) very cold milk (for best pudding set)
- 1 tub (8 oz / 225 g) whipped topping, thawed (or 2 cups lightly sweetened whipped cream)
- 4 oz (115 g) semisweet chocolate, shaved or finely chopped (for garnish perfect for chocolate lovers)
- Optional add-ins: ½ cup chopped walnuts or almonds; sliced strawberries or raspberries; warm fudge or caramel drizzle; crushed chocolate cookies
- Optional “poke cake” twist: ½ cup chocolate sauce to drizzle over the brownie layer (for that brownie poke cake vibe)
Note: Using melted butter in your brownie base and good cocoa powder helps deliver those fudgy brownies that truly melt in your mouth. For a vegetarian chocolate option, choose pudding and topping brands that fit your needs.
Step-by-Step Instructions
- Prep the Base – Bake brownies and let them cool completely. Cut into 1-inch cubes so the layers hold their shape.
- Mix the Pudding – In a bowl, whisk instant chocolate pudding with very cold milk for 1–2 minutes until thick.
- First Layer – In a 9×13 dish, scatter half the brownie cubes. (Optional: drizzle with a little chocolate sauce for “poke cake” richness.)
- Middle Layers – Spread half the pudding over brownies, then half the whipped topping. Repeat with remaining brownies, remaining pudding, and the rest of the topping.
- Finish & Chill – Sprinkle with shaved semisweet chocolate and any optional add-ins. Cover and refrigerate at least 4 hours (overnight = best) until set and sliceable.
- Serve Cold – Cut into squares and enjoy straight from the fridge this is an iced brownie dessert at heart.
How to Serve Brownie Refrigerator Cake
- Classic squares on dessert plates for parties.
- Parfait cups layered with berries for an elegant touch.
- Sundae style: spoon over vanilla ice cream and drizzle with fudge.
- Trifle bowl: double the recipe for easy big desserts when hosting.
- Topping bar: set out nuts, fruit, and sauces for a DIY station (great desserts for potluck easy).
Tips for Perfect Results
- Chill long enough: 4+ hours (overnight best) for clean slices and firm layers.
- Use cold milk: sets the pudding quickly and reliably.
- Cool brownies fully: warm brownies melt layers and turn messy.
- Cut even cubes: uniform pieces stack prettier and slice cleaner.
- Garnish right before serving: keeps chocolate shavings fresh and glossy.
- Make it your own: add fruit for color or a caramel swirl for extra “wow.”
Best Pairings / Side Dishes
- Fresh berry salad (strawberries, raspberries, blueberries) to balance the richness.
- Salted nuts or pretzel bites for salty-sweet contrast.
- Coffee or espresso bitter notes love chocolate.
- Savory lead-in dinner: This chilled dessert is a lovely finale after my Creamy Beef Pasta cozy and balanced!
Check it out here → Creamy Beef Pasta
Common Mistakes to Avoid
- Under-chilling: layers won’t set and slices won’t hold.
- Warm brownie cubes: melt the topping and pudding.
- Watery pudding: always use cold milk and whisk until thick.
- Overloading wet toppings: too many sauces can make it soggy.
Storage & Reheating Instructions
- Fridge: Cover tightly and refrigerate up to 4 days.
- Freezer: Wrap the dish well or portion into freezer-safe containers for up to 1 month; thaw overnight in the fridge.
- Reheating: None this is a chilled dessert and is served cold.
FAQs
Can I use homemade brownies?
Yes! Homemade brownies (with real cocoa powder and melted butter) make it extra rich. Boxed works too.
Can I substitute whipped topping?
Use lightly sweetened whipped cream (stabilize with a spoon of powdered sugar if making ahead).
Can I make it a day in advance?
Absolutely this is one of those easy brownie dessert recipes that tastes even better the next day.
How do I scale for a crowd?
Double the recipe in a trifle bowl for dessert ideas for large groups so beautiful and easy to serve.
Final Thoughts (Emma’s Voice)
This Brownie Refrigerator Cake is pure comfort cool, creamy, and chocolatey in all the right ways. It’s the dish I bring when I want happy faces and empty plates, and I hope it becomes one of your most saved desserts too.
If you try this recipe, let me know in the comments – I love hearing your stories and kitchen wins!
Brownie Refrigerator Cake: Layered, Chilled & Totally Crowd-Pleasing
Equipment
- 9×13″ baking dish
- Mixing Bowls
- Whisk or Hand Mixer
- Rubber Spatula
- Sharp Knife
Ingredients
Base & Layers
- 1 pan baked brownies (9×13, cooled completely and cut into 1-inch cubes)
- 1 package instant chocolate pudding mix (3.9 oz / 110 g)
- 2 cups very cold milk (for best pudding set)
- 1 tub whipped topping (8 oz / 225 g, thawed (or 2 cups whipped cream))
- 4 oz semisweet chocolate (shaved or finely chopped for garnish)
Optional Add-ins
- 1/2 cup chopped walnuts or almonds (optional)
- sliced strawberries or raspberries
- fudge or caramel drizzle
- crushed chocolate cookies (optional topping)
- 1/2 cup chocolate sauce (optional drizzle for poke cake twist)
Instructions
- Bake brownies, let them cool fully, and cut into 1-inch cubes.
- In a bowl, whisk pudding mix with cold milk for 1–2 minutes until thickened.
- Scatter half the brownie cubes into a 9×13 dish. (Optional: drizzle with chocolate sauce for poke cake style.)
- Spread half the pudding, then half the whipped topping over brownies. Repeat layers with remaining brownies, pudding, and topping.
- Sprinkle with shaved chocolate and any extras (nuts, fruit, cookies). Cover and refrigerate 4+ hours or overnight.
- Slice into squares and serve cold, straight from the fridge.
