In the kitchen, the sound of a metal spoon against a mixing bowl is the same as a small drumroll for me. I remember my children laying out napkins while the oven hummed and the scent of cocoa and butter rose, a warm promise that dessert would pull the family close. If you like quick, comforting sweets, you might also enjoy this brownie cake recipe I often make on busy Sundays.
Why This Red Velvet Cake Feels Like Home
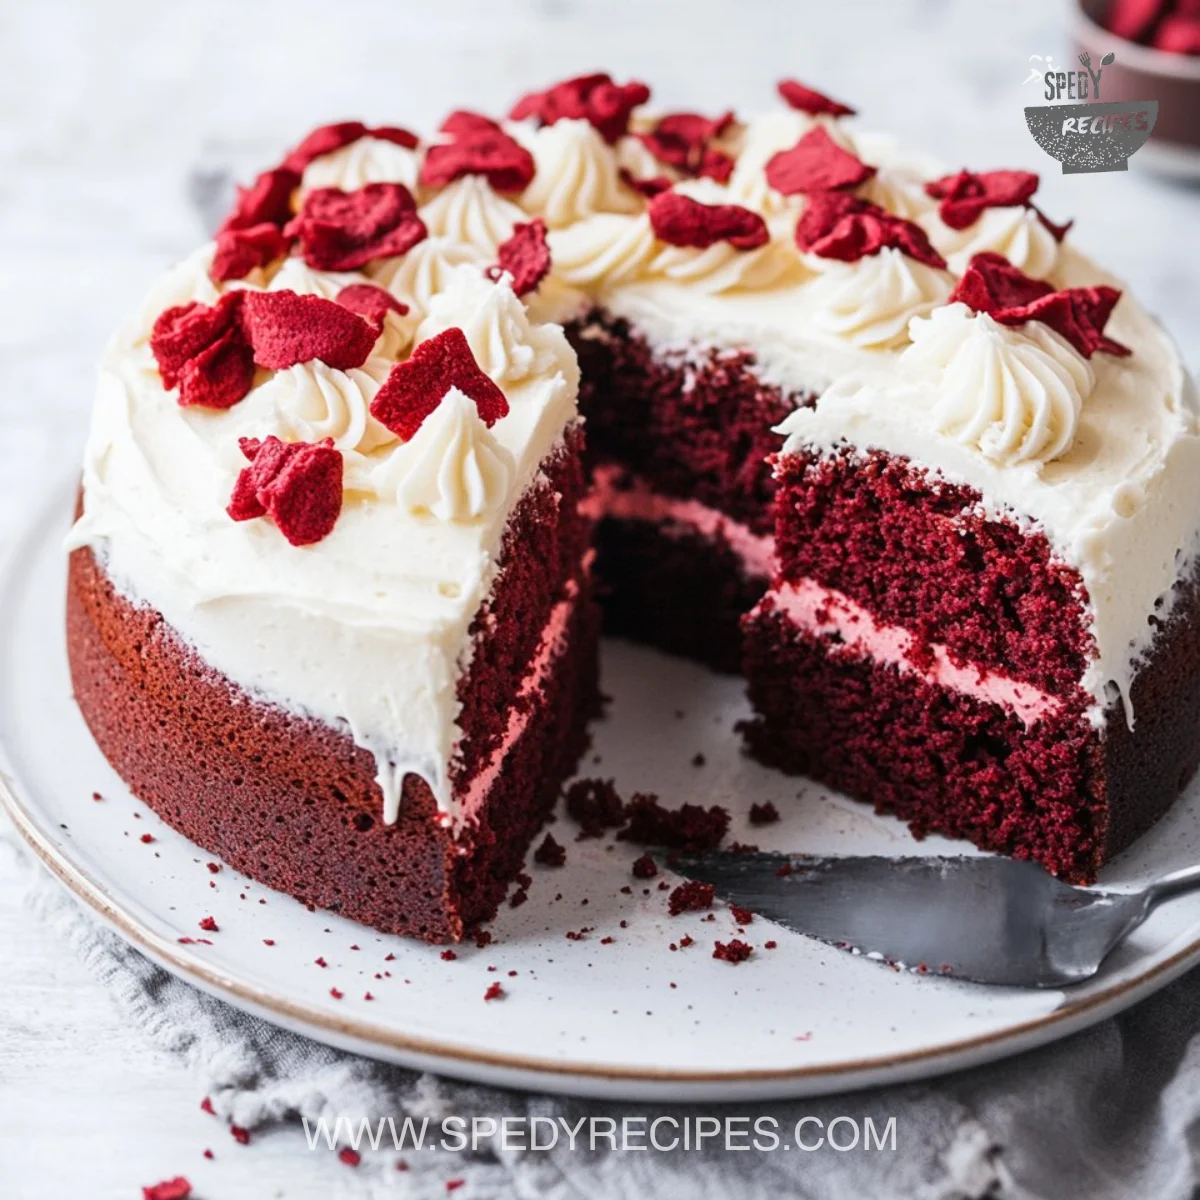
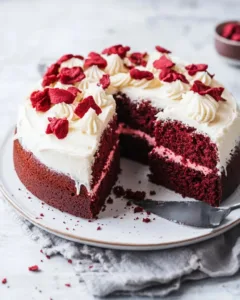
There is something quietly comforting about a Red Velvet Cake. It looks festive with its deep red crumb and white cream cheese frosting. But it also eats like a hug. It is rich without being heavy, and it slices cleanly, which is a small miracle at family gatherings.
What I love most is how it brings people together. The color makes it feel special without extra fuss. I served this cake after a weekday dinner once, and my daughter declared it "celebration cake" even though we had no holiday that day. That kind of joy is exactly why I keep this recipe in my regular rotation.
This cake matters because it is forgiving. It uses pantry basics, bakes in a reasonable time, and the cream cheese filling gives a little surprise in the middle. It is a cake you can make when you want to celebrate something or when you simply want a sweet, comforting end to a busy day.
How to Make Red Velvet Cake, The Heartwarming Way
“This is where the magic happens—when the aroma fills the kitchen and my kids come running in, asking ‘Is it ready yet?’”
Here is the brief heart of the process. We whisk the dry ingredients, mix the wet ones, and combine them gently. A cream cheese filling goes in the middle for a creamy surprise. You will look for a deep red color in the batter and a tender crumb when the cake comes out. When a toothpick comes out clean and the top springs back a little, you are on the right track.
The texture should be soft and velvety with a gentle crumb. The frosting adds tang and sweetness that balances the cake. If your grandmother taught you to trust your senses, listen: smell for cocoa and butter, look for even rise, and press lightly to check that springy feel. Meanwhile, give it a try—you might surprise yourself.
Ingredients You’ll Need
What goes into this recipe is simple and familiar. Gather these ingredients before you begin so the process flows.
2 1/2 cups all-purpose flour
1 1/2 cups sugar
1 cup vegetable oil
1 cup buttermilk
2 large eggs
2 tablespoons cocoa powder
1 tablespoon red food coloring
1 teaspoon vanilla extract
1 teaspoon baking soda
1 teaspoon salt
1 cup cream cheese
1/2 cup powdered sugar
1 teaspoon vanilla extract (for filling)
Cream cheese frosting (for topping)
Friendly note: Use what you have and don’t stress the small things. If your food coloring is a different brand, the shade may vary, but the flavor will still be there. If you want to try a different pairing, I sometimes serve this with caramel cheesecake cookies for an extra sweet touch.
Step-by-Step Directions
-
Preheat the oven to 350°F (175°C). Grease and flour a bundt pan.
This helps the cake release cleanly. I run a knife around the edges before turning it out. -
In a large bowl, whisk together the flour, sugar, cocoa powder, baking soda, and salt.
Take a moment here to sift or whisk thoroughly so the cocoa blends evenly. -
In a separate bowl, mix the vegetable oil, buttermilk, eggs, food coloring, and vanilla.
Whisk until smooth. The batter will take on that lovely red color as you stir. -
Combine the wet ingredients with the dry ingredients until well mixed.
Fold with a spatula until just smooth—overmixing can make the cake dense. -
Prepare the cream cheese filling by mixing the cream cheese, powdered sugar, and vanilla until smooth.
Taste a tiny bit if you like; it should be tangy and sweet, not overly sugary. -
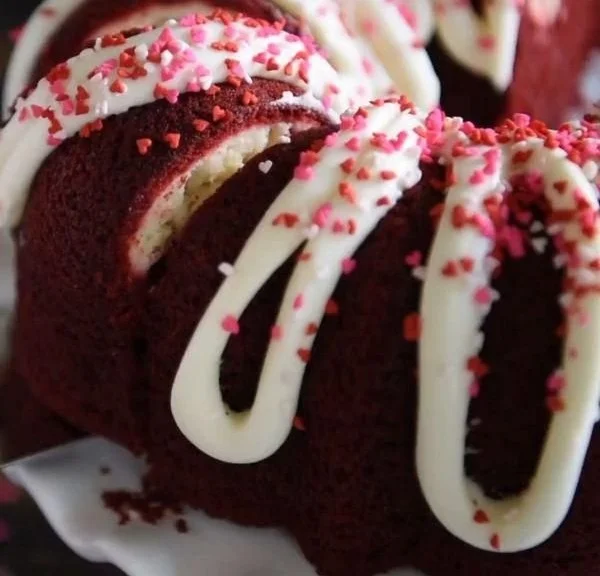
Pour half of the cake batter into the bundt pan, then add the cream cheese filling, and finish with the remaining batter.
Smooth the top gently. The filling should sit in the center and stay mostly intact. -
Bake for 45-50 minutes or until a toothpick comes out clean.
If the top browns a little, that is fine. A little color builds flavor. -
Let the cake cool before topping with cream cheese frosting.
Cooling is important so the filling and frosting do not run.
Quick tip: Let the kids stir the batter for step 3 if you can. It’s a small participation that creates a big memory.
Serving Red Velvet Cake with Love
I serve this cake family-style in the middle of the table. We pass plates around, spoon coffee for anyone who wants it, and slice the cake so everyone can get a bit of the cream cheese center. Sometimes we set choices out: extra frosting, a dusting of cocoa, or a handful of fresh berries.

For a gathering, I place the cake on a simple pedestal and let people help themselves. My husband likes a larger slice with extra frosting, and my son prefers a narrower piece with a dollop of whipped cream. There is no wrong way to enjoy this cake.
For a full meal, I sometimes pair the cake with light, savory starters. If you want something to serve before dessert, try a simple salad, or make a small batch of cupcakes that echo the flavor, like these Boston cream pie cupcakes for a playful dessert spread. The contrast of warm dinner and cool frosting always feels like a little celebration.
Storage & Reheat Tips (Keeping the Goodness)
Store the cake covered in the refrigerator if you have frosting and a cream cheese filling. This keeps the frosting stable and the filling fresh.
If you plan to save slices for the next day, put them in an airtight container. The cake softens overnight and often tastes even better after the flavors meld.
Reheat tips: The microwave is fine for a quick warm slice—wrap a piece in a paper towel and heat in short bursts. For a fresher texture, warm a slice in a 325°F oven for 5 to 8 minutes. I prefer the oven when I have the time because it revives the cake’s crumb.
If you need to freeze, wrap slices tightly in plastic and place them in a freezer bag. Thaw in the refrigerator overnight and let come to room temperature before serving.
My Kitchen Notes & Shortcuts
- Swap the oil for melted butter for a slightly richer flavor if you prefer. It changes the texture a bit but tastes wonderful.
- Make the cream cheese filling ahead and refrigerate it; it saves time when you assemble the cake.
- To speed up cleanup, line your bundt pan with a baking spray that has flour in it, or grease and flour ahead of time.
- If you do not have buttermilk, mix 1 tablespoon white vinegar with enough milk to make 1 cup and let it sit for 5 minutes. It works in a pinch.
- Let the batter rest for a few minutes before baking; it helps settle any dry pockets and gives a more even crumb.
Also, if you like to keep dinner simple before a special dessert, this easy 4-ingredient chicken salad is a favorite of ours and pairs nicely with an uncomplicated evening.
Family-Friendly Variations
Make it your own. Here are a few ways our family tweaks the cake:
- Lighter version: Reduce the oil to 3/4 cup and replace 1/4 cup with unsweetened applesauce for fewer calories and a moist crumb.
- Kid-friendly: Omit the food coloring and make a cocoa-flavored cake with the cream cheese swirl. The texture is still soft and familiar.
- Extra chocolate: Add 1/2 cup mini chocolate chips to the batter for pockets of melted chocolate.
- Festive twist: Top with toasted nuts or a scattering of red sprinkles for parties.
If you want a savory contrast for a full meal, we sometimes start with seafood like these Cheddar Bay crab cakes which my family adores. It makes the dessert taste even more special.
FAQs About Red Velvet Cake
Can I make this ahead for a busy week?
Yes. You can bake it a day ahead, keep it covered in the fridge, and frost it the next day. It often tastes even better after a rest.
Why does the cake sometimes crumble?
Crumbling can happen if you overmix or if the cake cools too quickly. Use gentle folding and allow the cake to cool in the pan for 15 minutes before turning out.
Do I need to use red food coloring?
No, but it gives the classic look. If you prefer not to use artificial dyes, try natural beet powder for a gentle red hue, remembering the color may be milder.
Can I make this as cupcakes instead?
Absolutely. Bake in a 350°F oven for 18-22 minutes depending on your oven. Cupcakes are a great way to share at school or potlucks.
How do I keep the frosting from sliding?
Make sure the cake is cool and the cream cheese frosting is chilled slightly before spreading. A cool cake and firm frosting stick together better.
One Final Thought from My Kitchen
I hope this Red Velvet Cake finds its way into your home on a night when someone needs a little cheering up, or when you want to mark a small victory. Cooking is less about perfection and more about who you share the food with.
If you make this cake, give yourself permission to enjoy the process. Let a child help sprinkle sugar on top, or savor a quiet slice with a cup of tea while the house is still. These are the small moments that turn a recipe into a family memory.
Conclusion
If you want another carefully tested cream cheese frosting version, check out Red Velvet Cake with Cream Cheese Frosting – Sally’s Baking for a trusted take. For a different technique and a beloved classic, this Red Velvet Cake – Preppy Kitchen is an excellent resource with clear photos and tips.
Until next time, happy baking and warm kitchens full of conversation.
Red Velvet Cake
Ingredients
Dry Ingredients
- 2.5 cups all-purpose flour
- 1.5 cups sugar
- 2 tablespoons cocoa powder
- 1 teaspoon baking soda
- 1 teaspoon salt
Wet Ingredients
- 1 cup vegetable oil
- 1 cup buttermilk
- 2 large eggs
- 1 tablespoon red food coloring
- 1 teaspoon vanilla extract
Cream Cheese Filling
- 1 cup cream cheese
- 0.5 cups powdered sugar
- 1 teaspoon vanilla extract (for filling)
Topping
- to taste cream cheese frosting
Instructions
Preparation
- Preheat the oven to 350°F (175°C). Grease and flour a bundt pan.
- In a large bowl, whisk together the flour, sugar, cocoa powder, baking soda, and salt.
- In a separate bowl, mix the vegetable oil, buttermilk, eggs, food coloring, and vanilla. Whisk until smooth.
- Combine the wet ingredients with the dry ingredients until well mixed, folding gently with a spatula.
- Prepare the cream cheese filling by mixing the cream cheese, powdered sugar, and vanilla until smooth.
Baking
- Pour half of the cake batter into the bundt pan, then add the cream cheese filling, and finish with the remaining batter.
- Bake for 45-50 minutes or until a toothpick comes out clean.
- Let the cake cool before topping with cream cheese frosting.
Serving Suggestions
- Serve the cake family-style in the middle of the table, allowing everyone to enjoy the cream cheese center.